Recently, I got it in my head that I needed to conquer croissants. I mean, puff pastry is Baking 101, right? In the Great British Baking Show, the ability to turn out a quick puff pastry is a basic requirement. All the bakers can make it, no problem. So why not me?
Turns out, the number of variations on the theme were rather overwhelming. Which kind of butter: Salted or unsalted? Plain butter, or butter fortified with wheat germ and flour? All butter, or a mixture of butter and (blech) margarine?
About the method: quick puff or a slow, three-day process? No leavening or yeasted? And should the dough rise before baking, or was it better to freeze it first and then pop it directly into the oven? Or should I do both?
It was enough to make my head spin.
Hoping to find someone who knew a thing or two, I emailed a friend. Have you ever made puff pastry? I asked.
Nope, she wrote back. But I know I’d rather shove bamboo under my fingernails.
You know, being a self-taught baker (or a self-taught anything, for that matter) can be exhausting. Sometimes, especially when I’m trying to master a new recipe that I know nothing about, I just want someone to hold my hand and show me. I want a Gold Standard, something against which I can compare myself. But short of becoming best buds with a French pastry chef, or actually traveling to France (ha, dream on), I’m on my own, sigh.
I’ve now made puff pastry a number of times over the last few weeks and, while the idea of folding and rolling a entire slab of butter directly into dough does seems like a disaster waiting to happen, it turns out it’s actually a clean-cut, simple process with very little mess. A couple batches in and the method began to feel almost intuitive.
frozen raw (and twice glazed) and then glazed for a third time and popped into the oven, still frozen
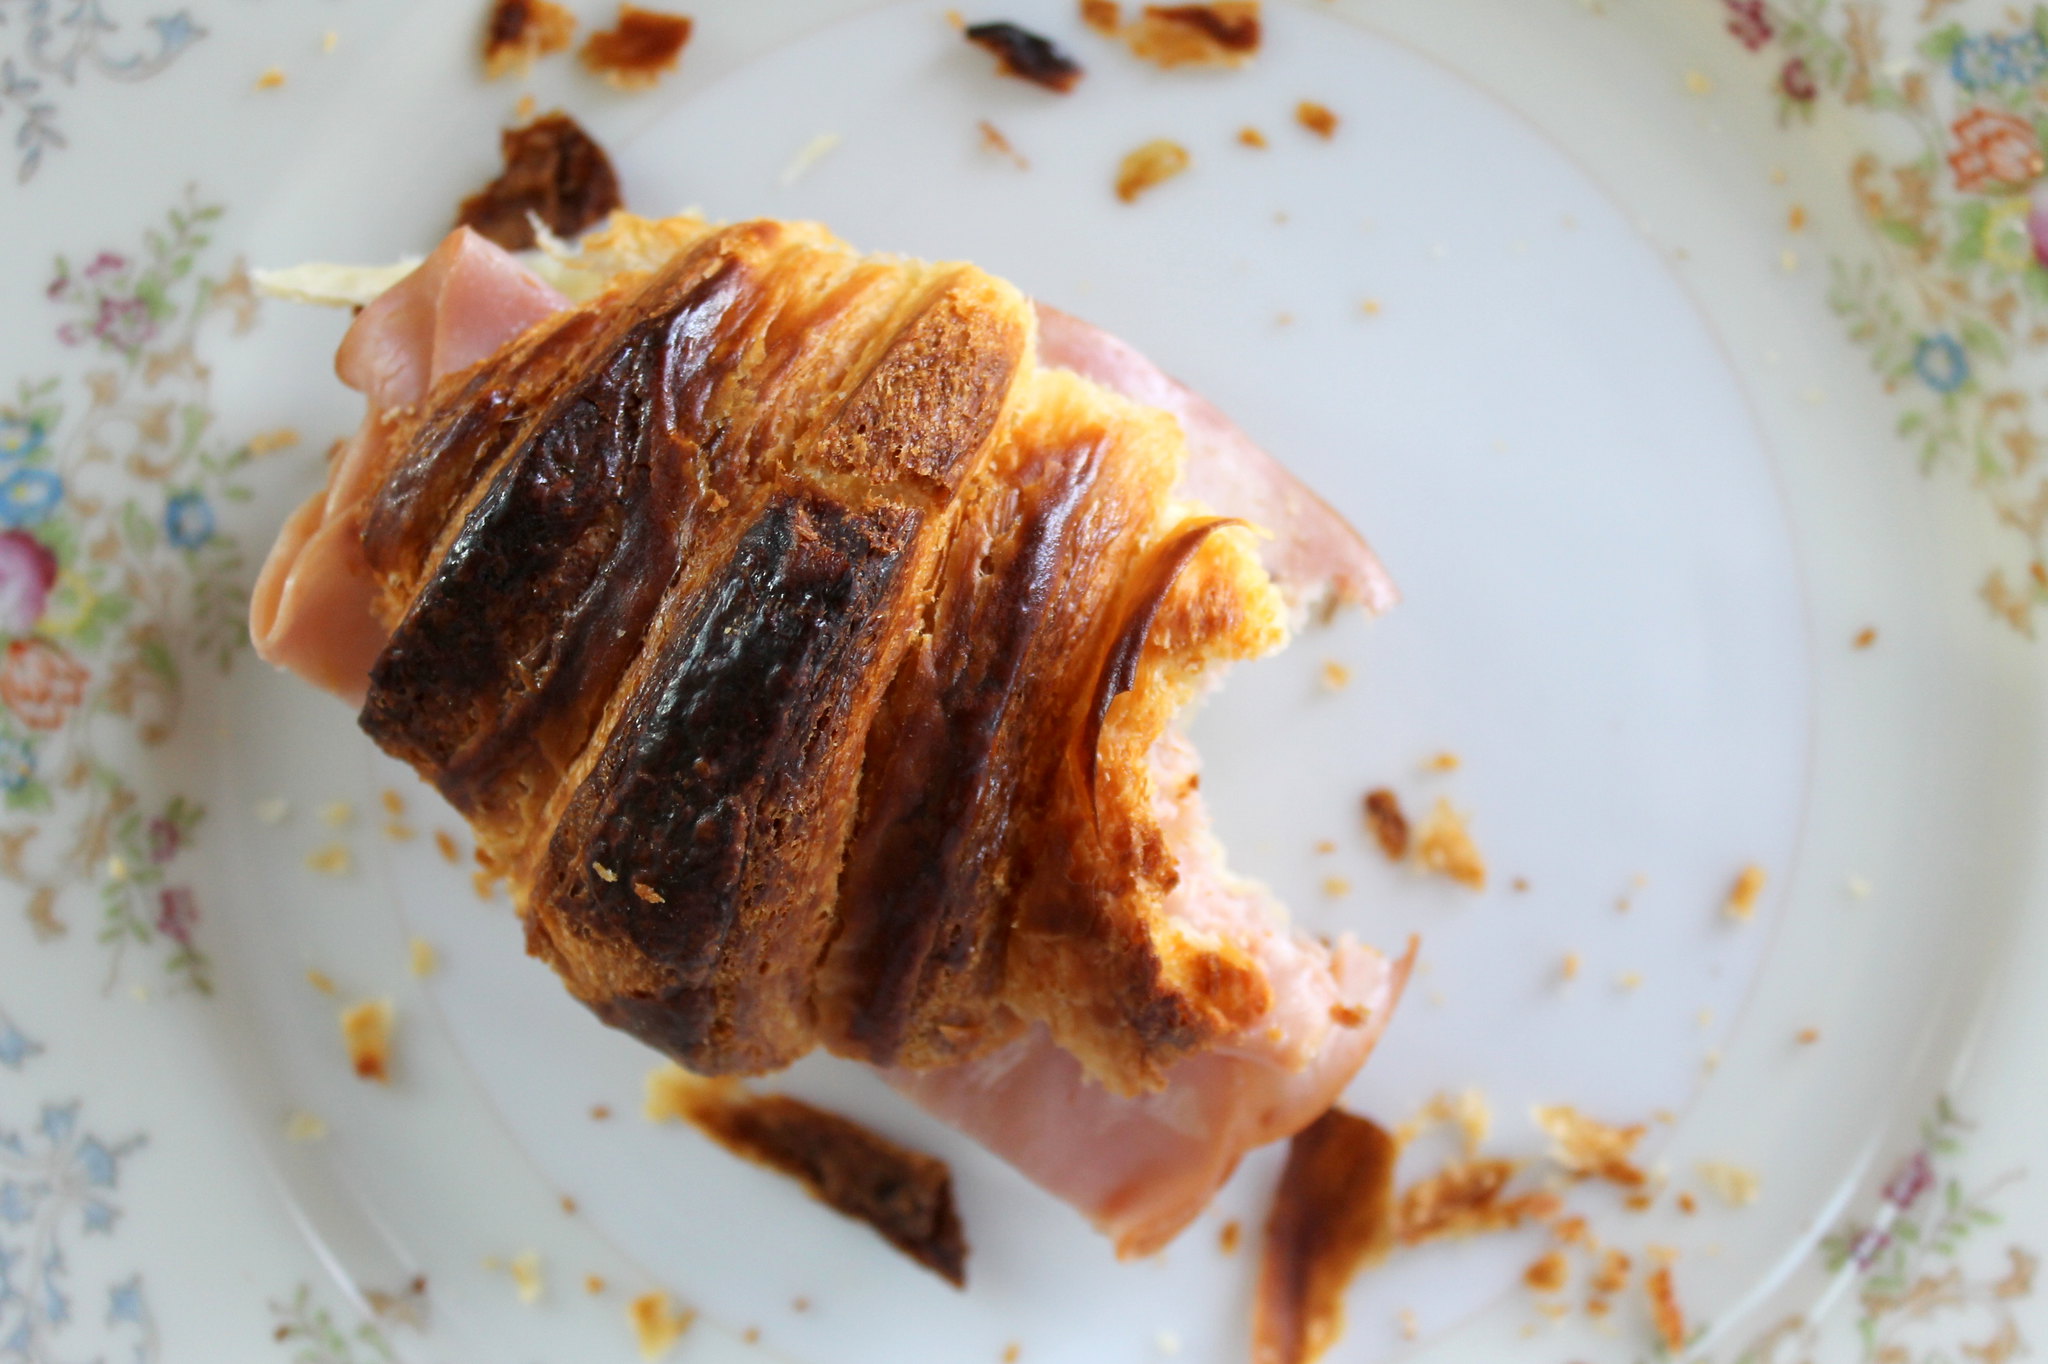
There were problems, though. Most notably, no matter how long I baked the croissants, they felt a little gummy inside, like they were either underbaked (they weren’t) or they had too much butter (impossible). Weirdly enough, they tasted better the second day, especially when split lengthwise and stuffed with ham.
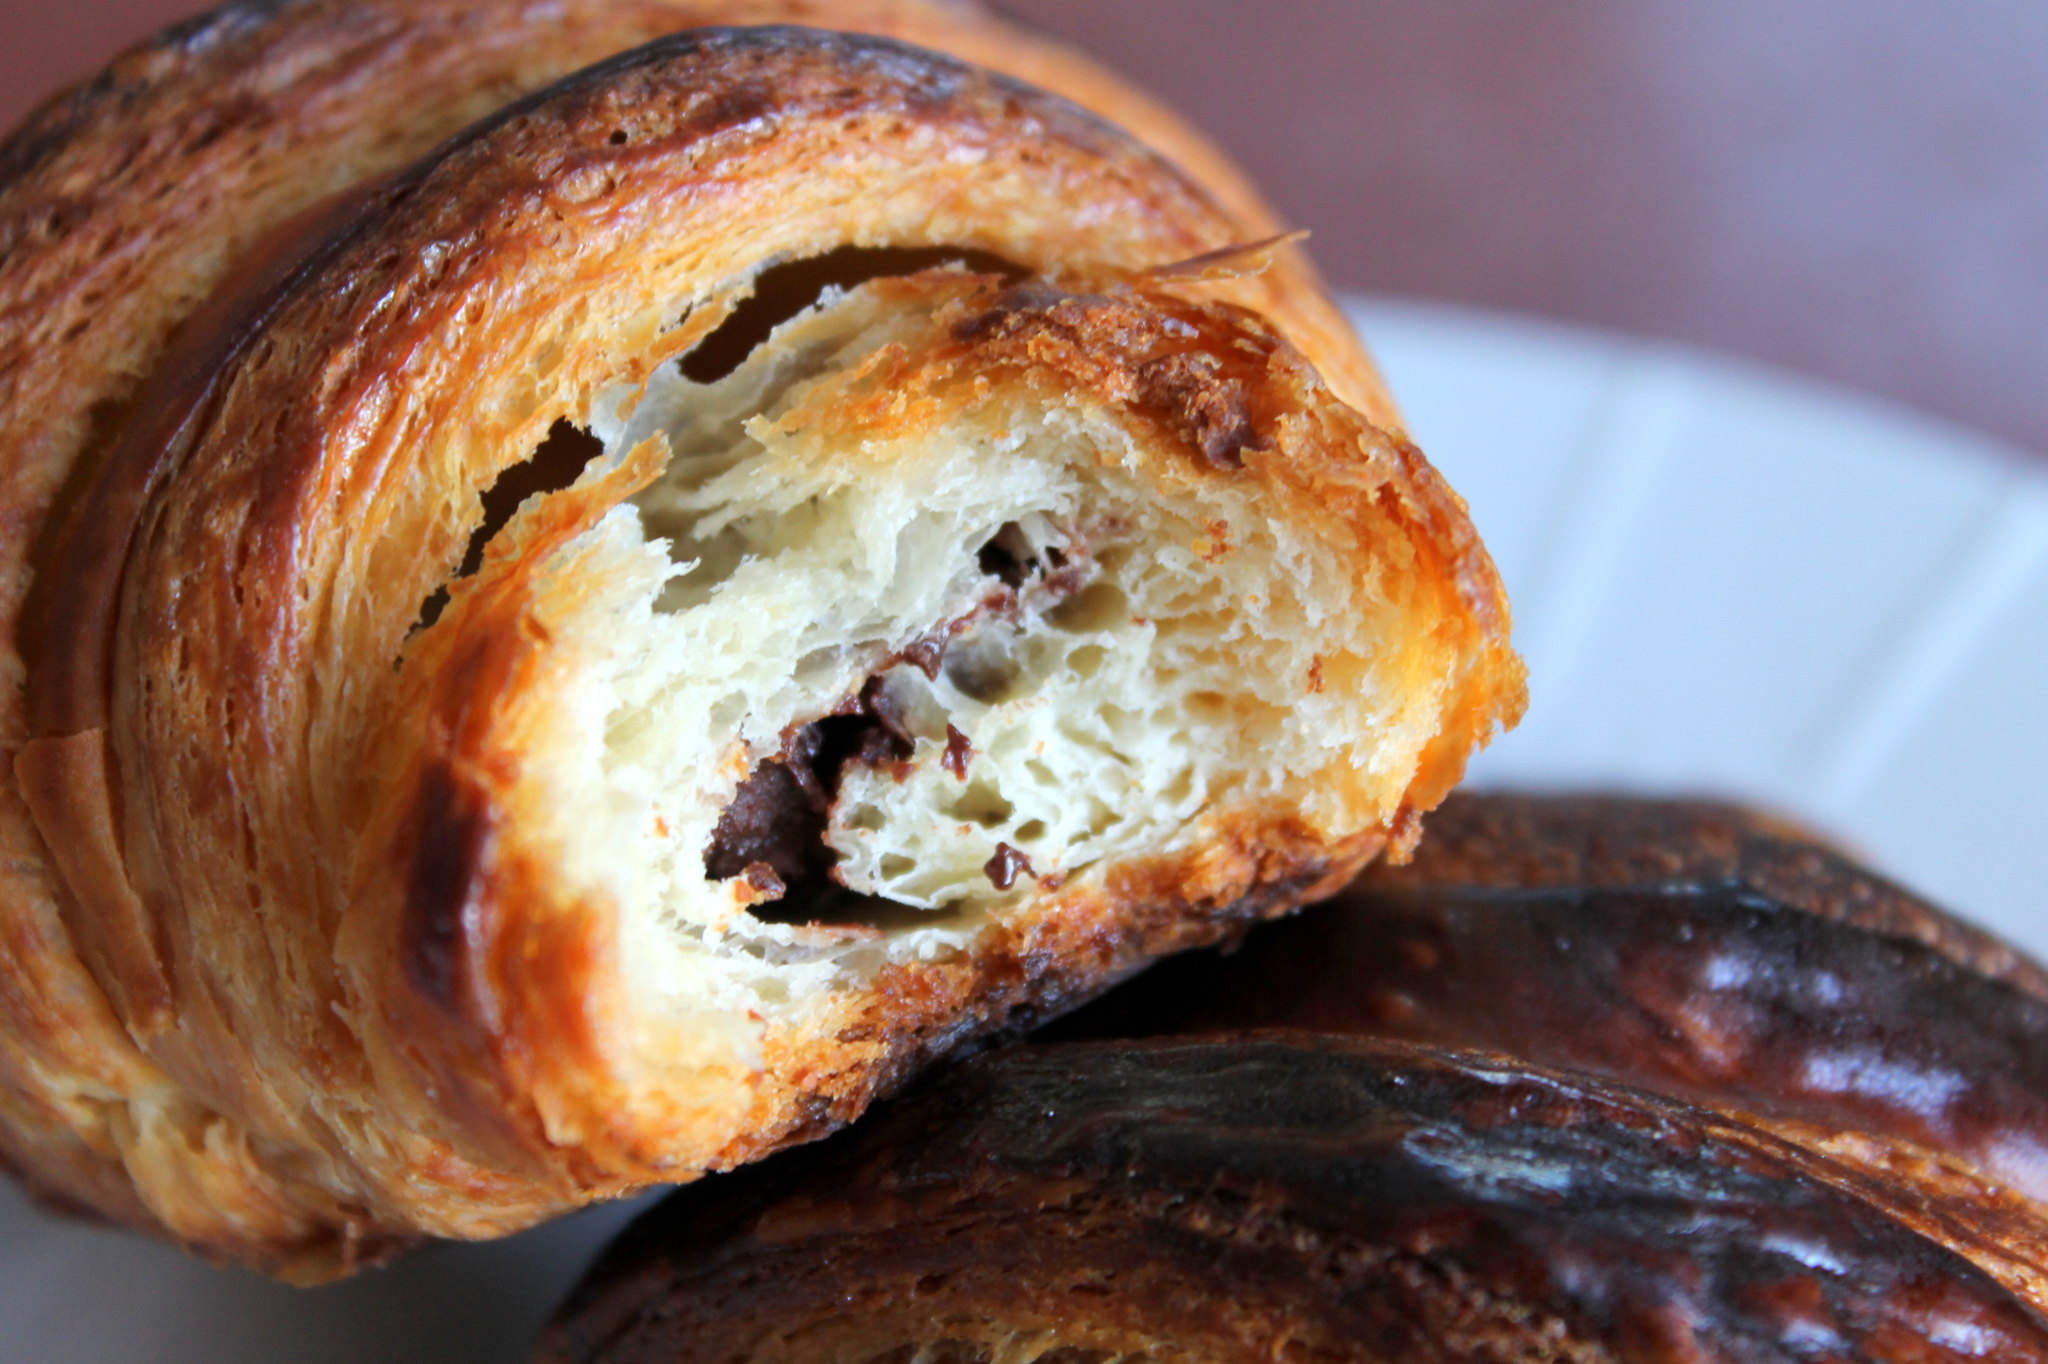
Desperate for insights, I shelled out the several dollars for a Panera croissant. Biting into the pastry, I was horrified to discover that here, instead of baking bits of dark chocolate into the actual pastry, they’d just sliced a regular croissant in half and stuffed it with chocolate icing! Furthermore, the actual croissant was practically tasteless. Hmm, I thought as I gagged it down, I guess the competition isn’t as stiff as I thought?
what an actual chocolate croissant should look like, according to Miss Know Nothing Moi
I continued to plug away, and finally, a couple nights ago, I actually turned out a steller, honest-to-goodness croissant. How did I know? I’m not sure! Just, one bite and all the pieces — the researching, the tasting, the redoing — slid into focus and I knew this was it: I’d made a croissant.
Much, I imagine, as Wonder Bread tastes nothing like a crusty artisan loaf of sourdough, these croissants don’t taste anything like commercial ones. Even though they’re airy-light, with hundreds of spectacular layers, there’s a heft to them, a rich flavorfulness that feels more substantial.
That night, I couldn’t stop cutting the croissants: vertically! horizontally! With each cut, I’d scrutinize the internal structure and then, squealing triumphantly, hold the pieces out for everyone to admire. The kids watched me like baby hawks, smiling and nodding, waiting for me to quit gloating and feed them already.
My success, however, was short-lived. A couple days ago I baked up a few croissants, exactly as I did the other night (and from the same batch and with the same process, straight from the freezer into the oven), so I could take photos. After letting them cool for 15 minutes or so, I cut into one and — what in the world? — they had that undone look again! I’d baked them at 400 degrees for exactly 30 minutes, too, so I know they’re done. I can not, for the life of me, figure out what’s going on. Anyone? ANYONE?
Croissants
Adapted from Issue 97 of Fine Cooking.
Make sure to use instant yeast, not rapid rise. (Rapid rise yeast needs to be activated with warm liquid, while instant yeast goes straight into the dough.) I buy little individual packs of instant yeast special for this recipe (and for making ciabatta), and then store them in the freezer. (Update: it might not matter! I’ve used both rapid rise and instant, with no ill effects. I simply use hot tap water to activate the yeast.)
For the butter layer, I use Kerrygold. The flavor shines through, so it’s absolutely worth the extra cost.
Updated March 2019: For lots more tips and information, see this post. The most important information is tucked in the directions below.
1 pound 2 ounces all-purpose flour
5 ounces each hot tap water and cold milk
2 ounces sugar
1½ ounces butter, softened
1 tablespoon, plus scant ½ teaspoon, instant yeast
2¼ teaspoons salt
10 ounces good quality, cold butter, for the butter layer
1 egg, for the egg wash
Day One
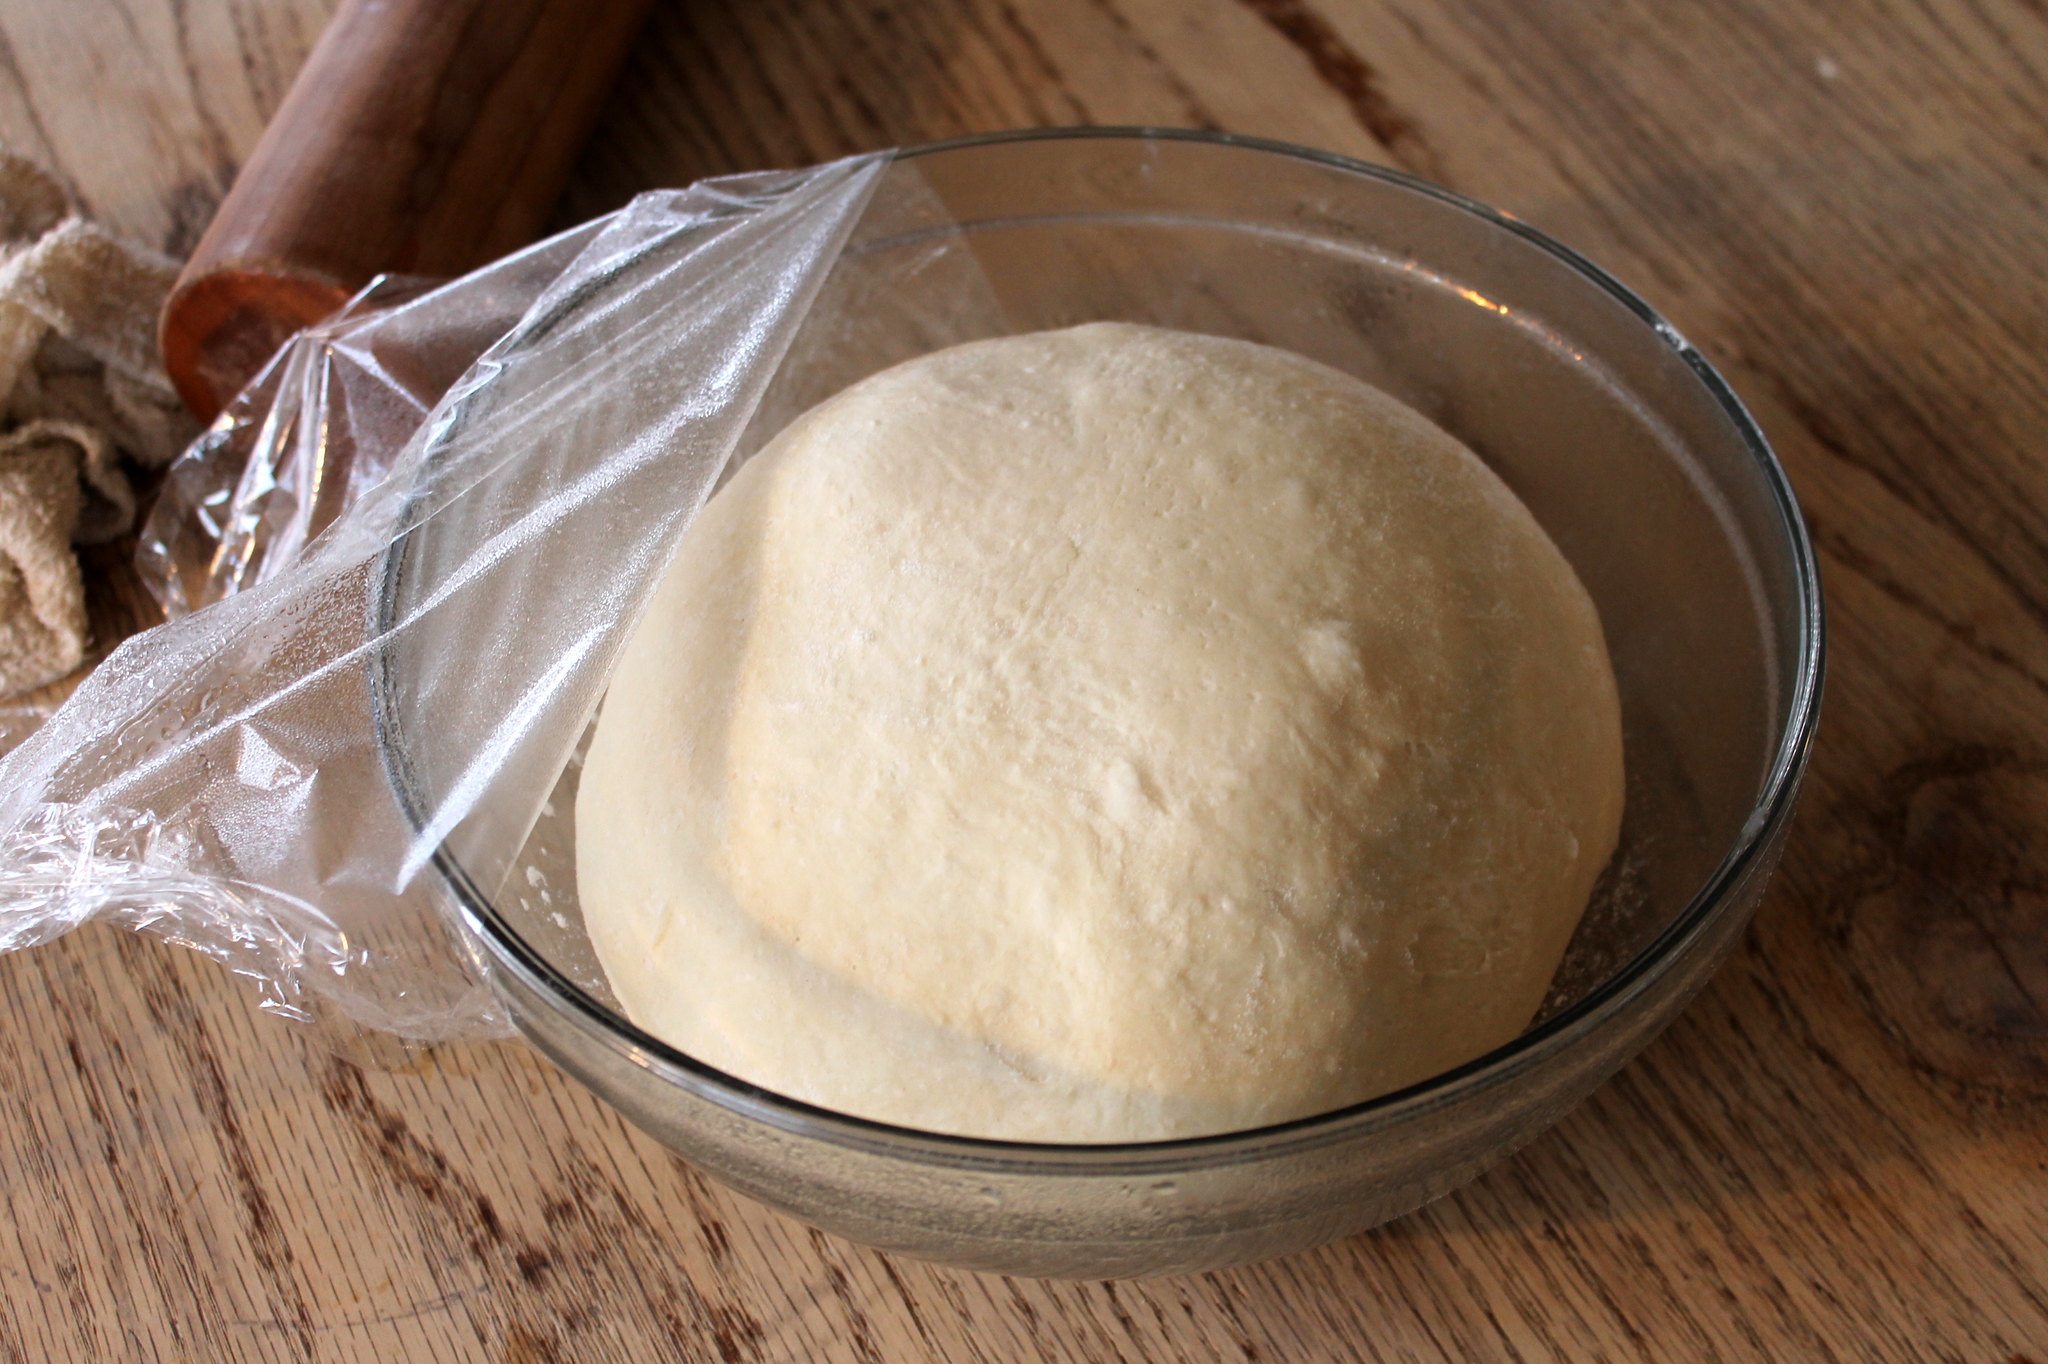
In the bowl of a stand mixer (or, if making by hand, in a regular mixing bowl), combine the flour, water, milk, sugar, the 1½ ounces butter, yeast, and salt. Using a dough hook, mix for 4-6 minutes. Transfer the dough to a lightly floured bowl, cover with plastic, and refrigerate overnight
Day Two
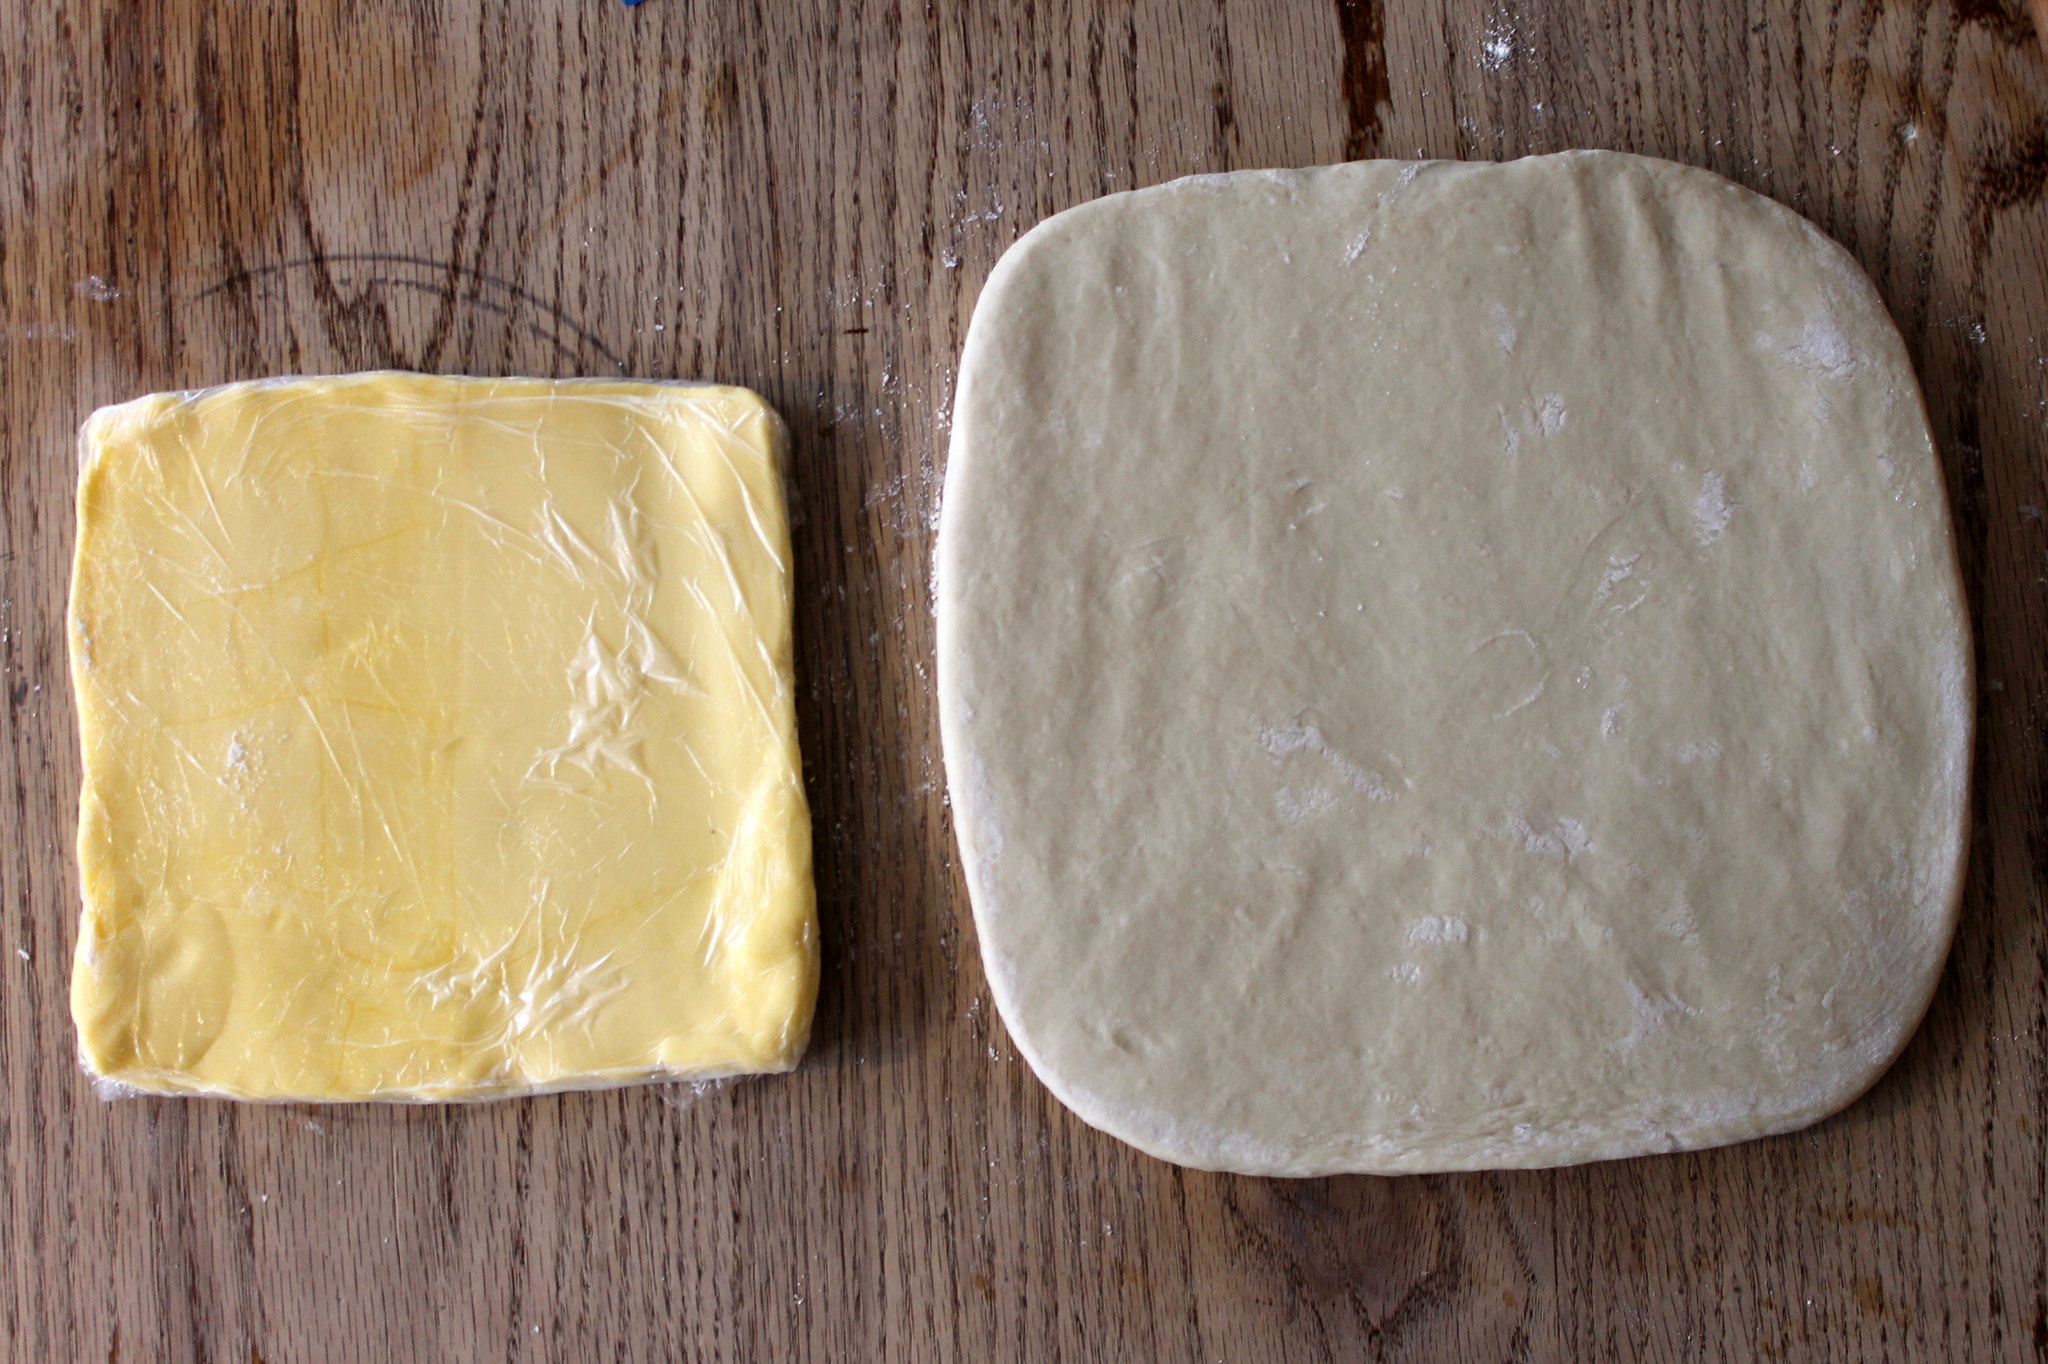
Arrange the butter in a rectangle and sandwich between two sheets of plastic wrap. (Important: Sprinkle the plastic with a couple teaspoons of flour, and then sprinkle the top of the butter with a couple more teaspoons. The flour will be incorporated into the butter as you roll it, thus eliminating any extra moisture.) Using a rolling pin, pound and roll the butter until it’s roughly a 7-inch square. Wrap tightly in plastic and refrigerate.
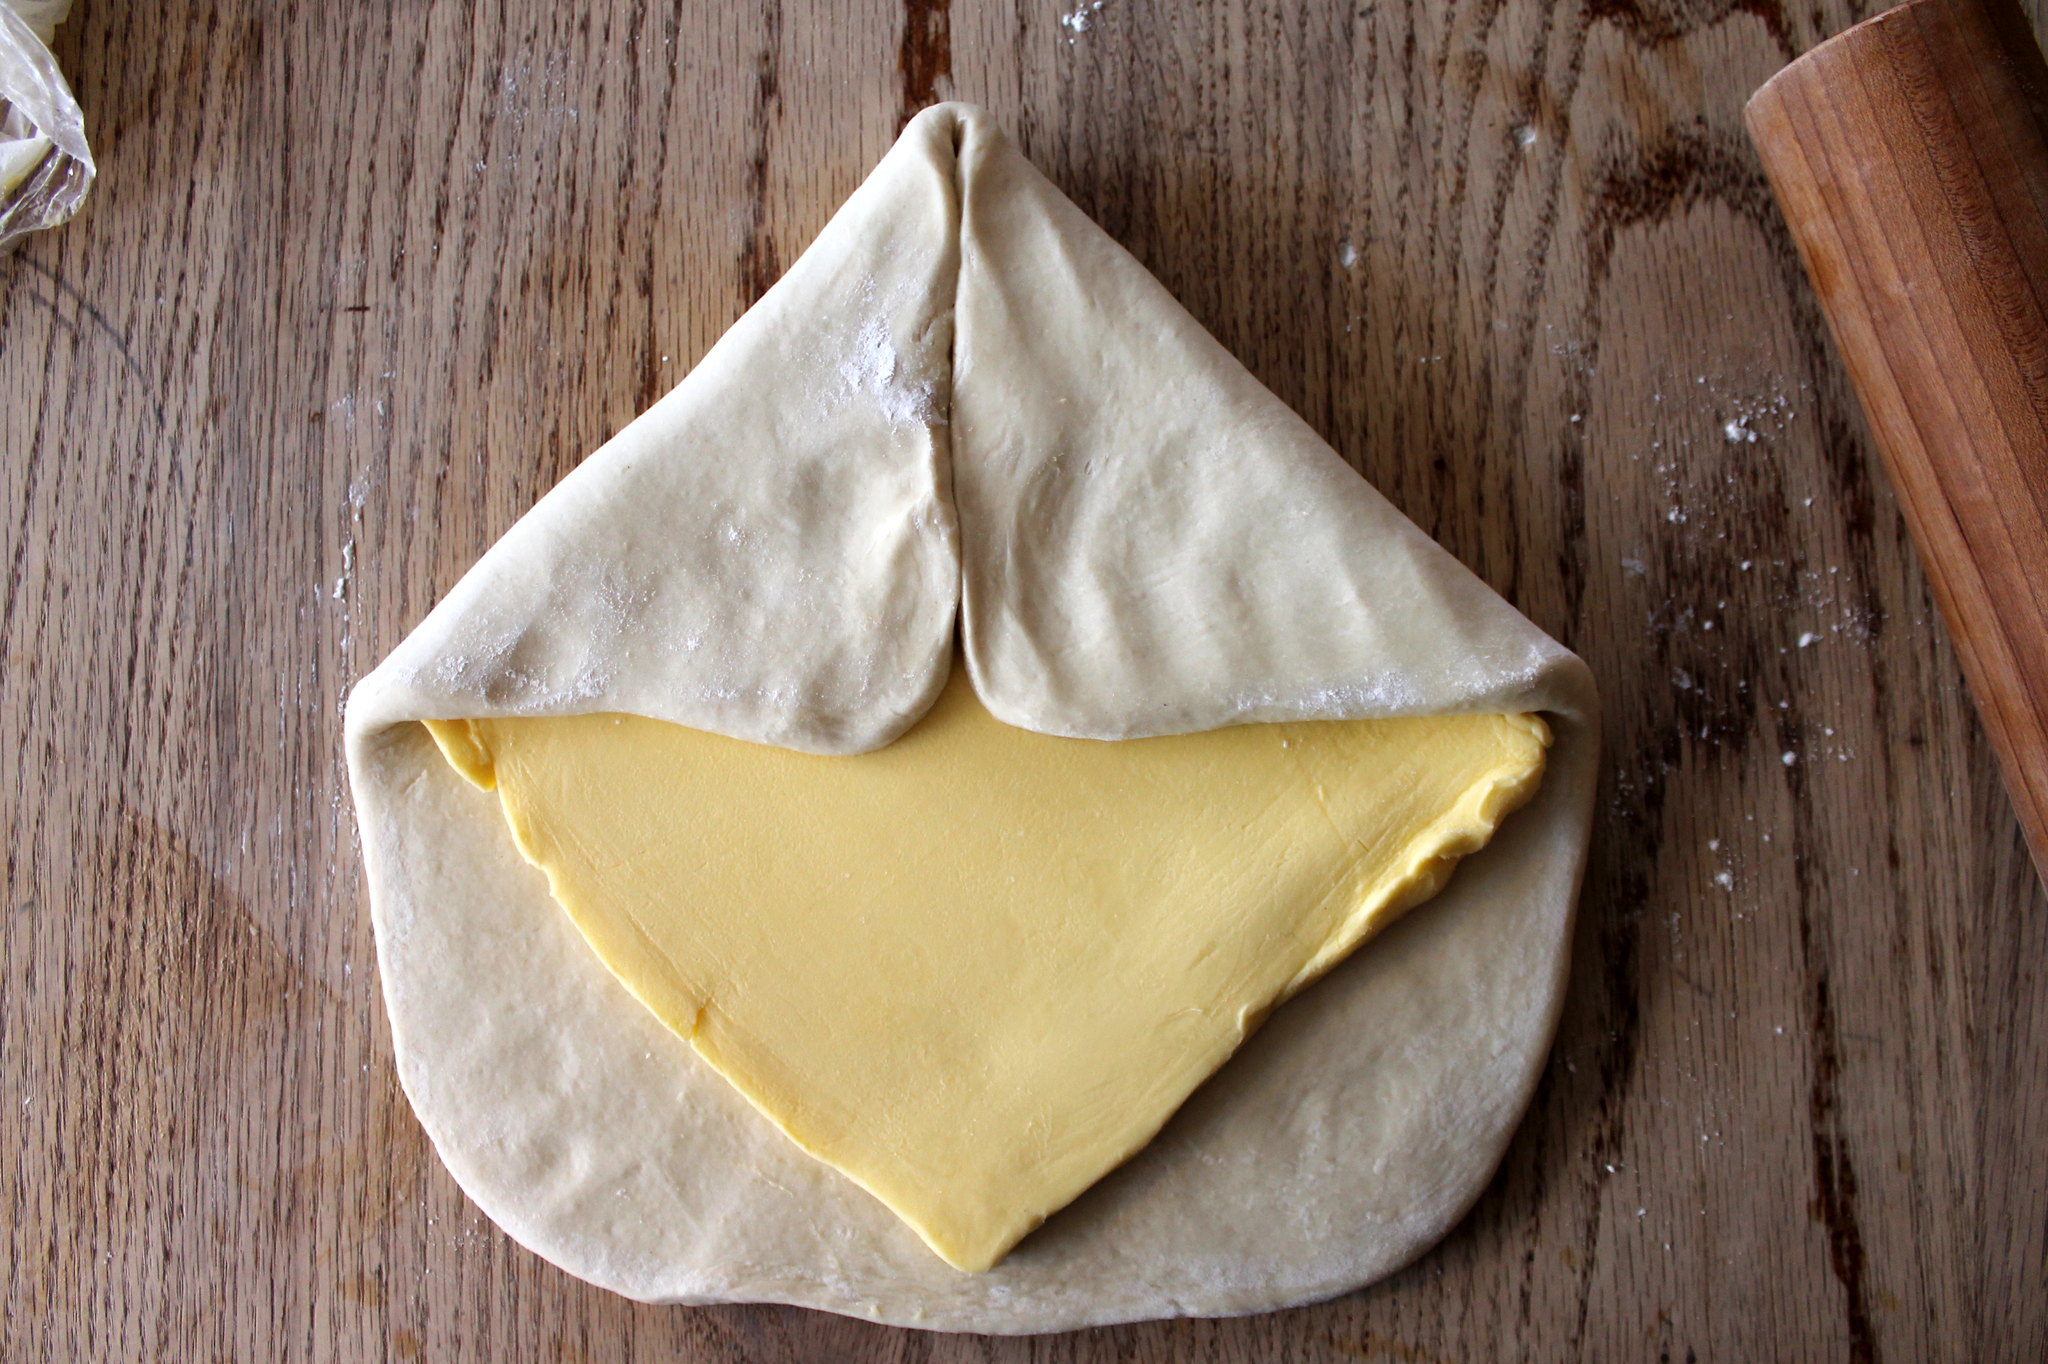
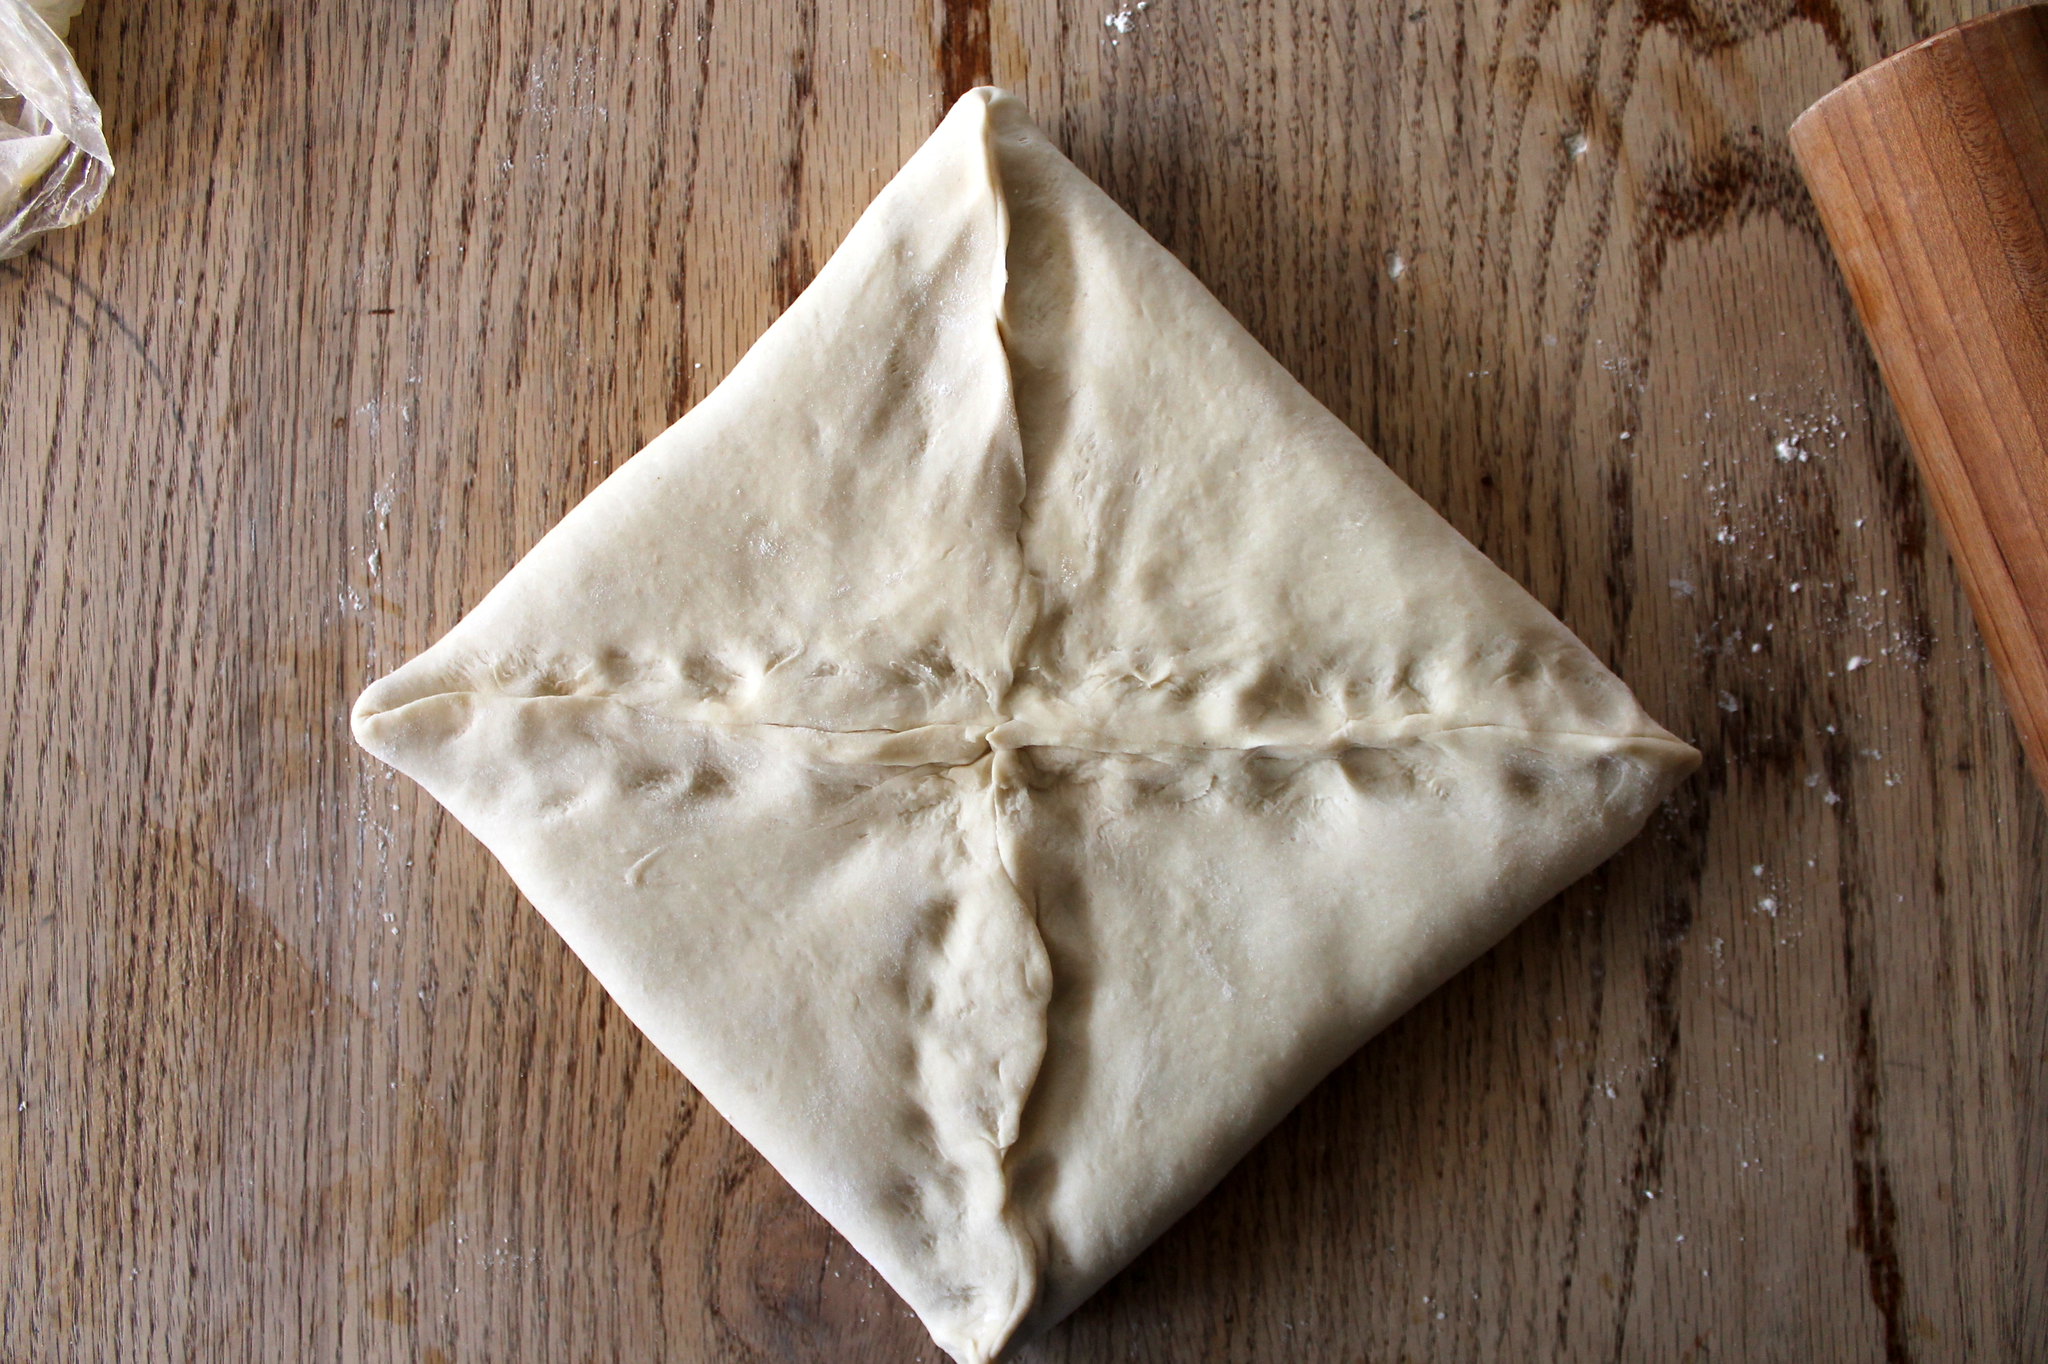
While the butter is firming up, turn the dough out onto a floured table and roll into an 11-inch square. Unwrap the butter and place in the center of the dough arranged so it looks like a diamond atop a larger square. Pull the edges of the dough around the butter and pinch to seal shut.
Flip the dough, seam-side down, on a lightly floured surface and roll into a long rectangle, about 8 by 24 inches. Fold the dough into thirds, as you would a letter, brushing off any excess flour. Wrap in plastic and refrigerate for about 45 minutes.
Place the rectangle of dough seam-side down on the floured table and repeat the rolling and folding process. Refrigerate for another 45 minutes.
For the third time, roll and fold. Wrap well (it will rise a little, so make sure it has some wiggle room) and refrigerate overnight.
Day Three (or four or five)
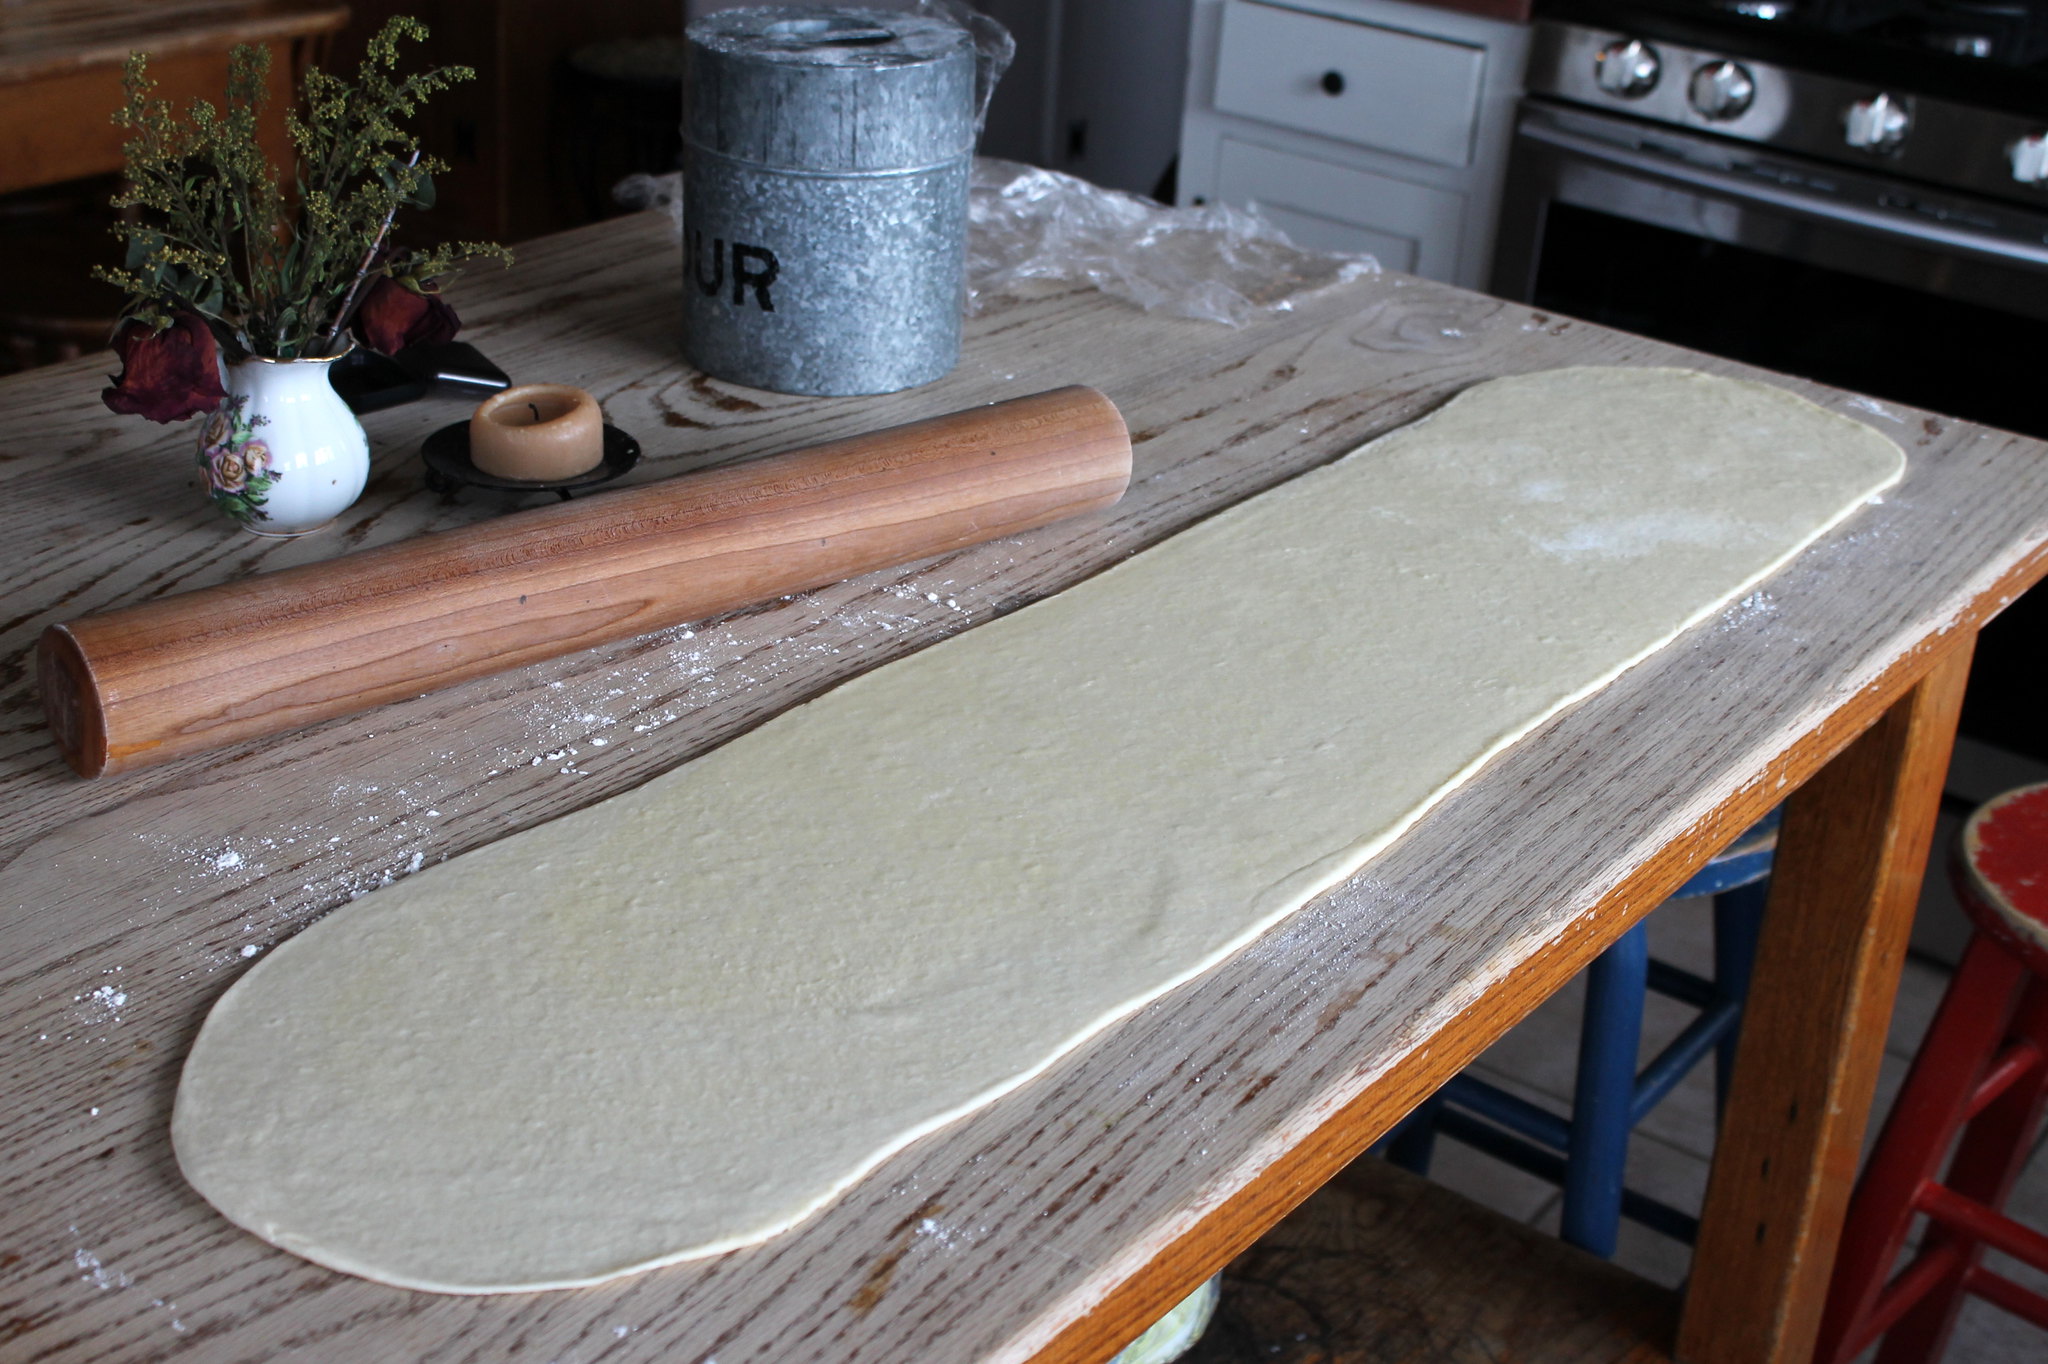
On a lightly floured table, roll the dough into a very long rectangle, this time 8 by 44 inches. (Partway through, if the rolling gets too difficult, lightly fold the dough, wrap in plastic, and return to the refrigerator to relax a bit.)
Note: If you don’t want to bake all the dough at once, lightly roll it into a small rectangle (8 by 12 inches, maybe) and cut in half. Roll one half into a longer rectangle and then fold in thirds, wrap in plastic, and return to the refrigerator. With the other half, make whatever you want.
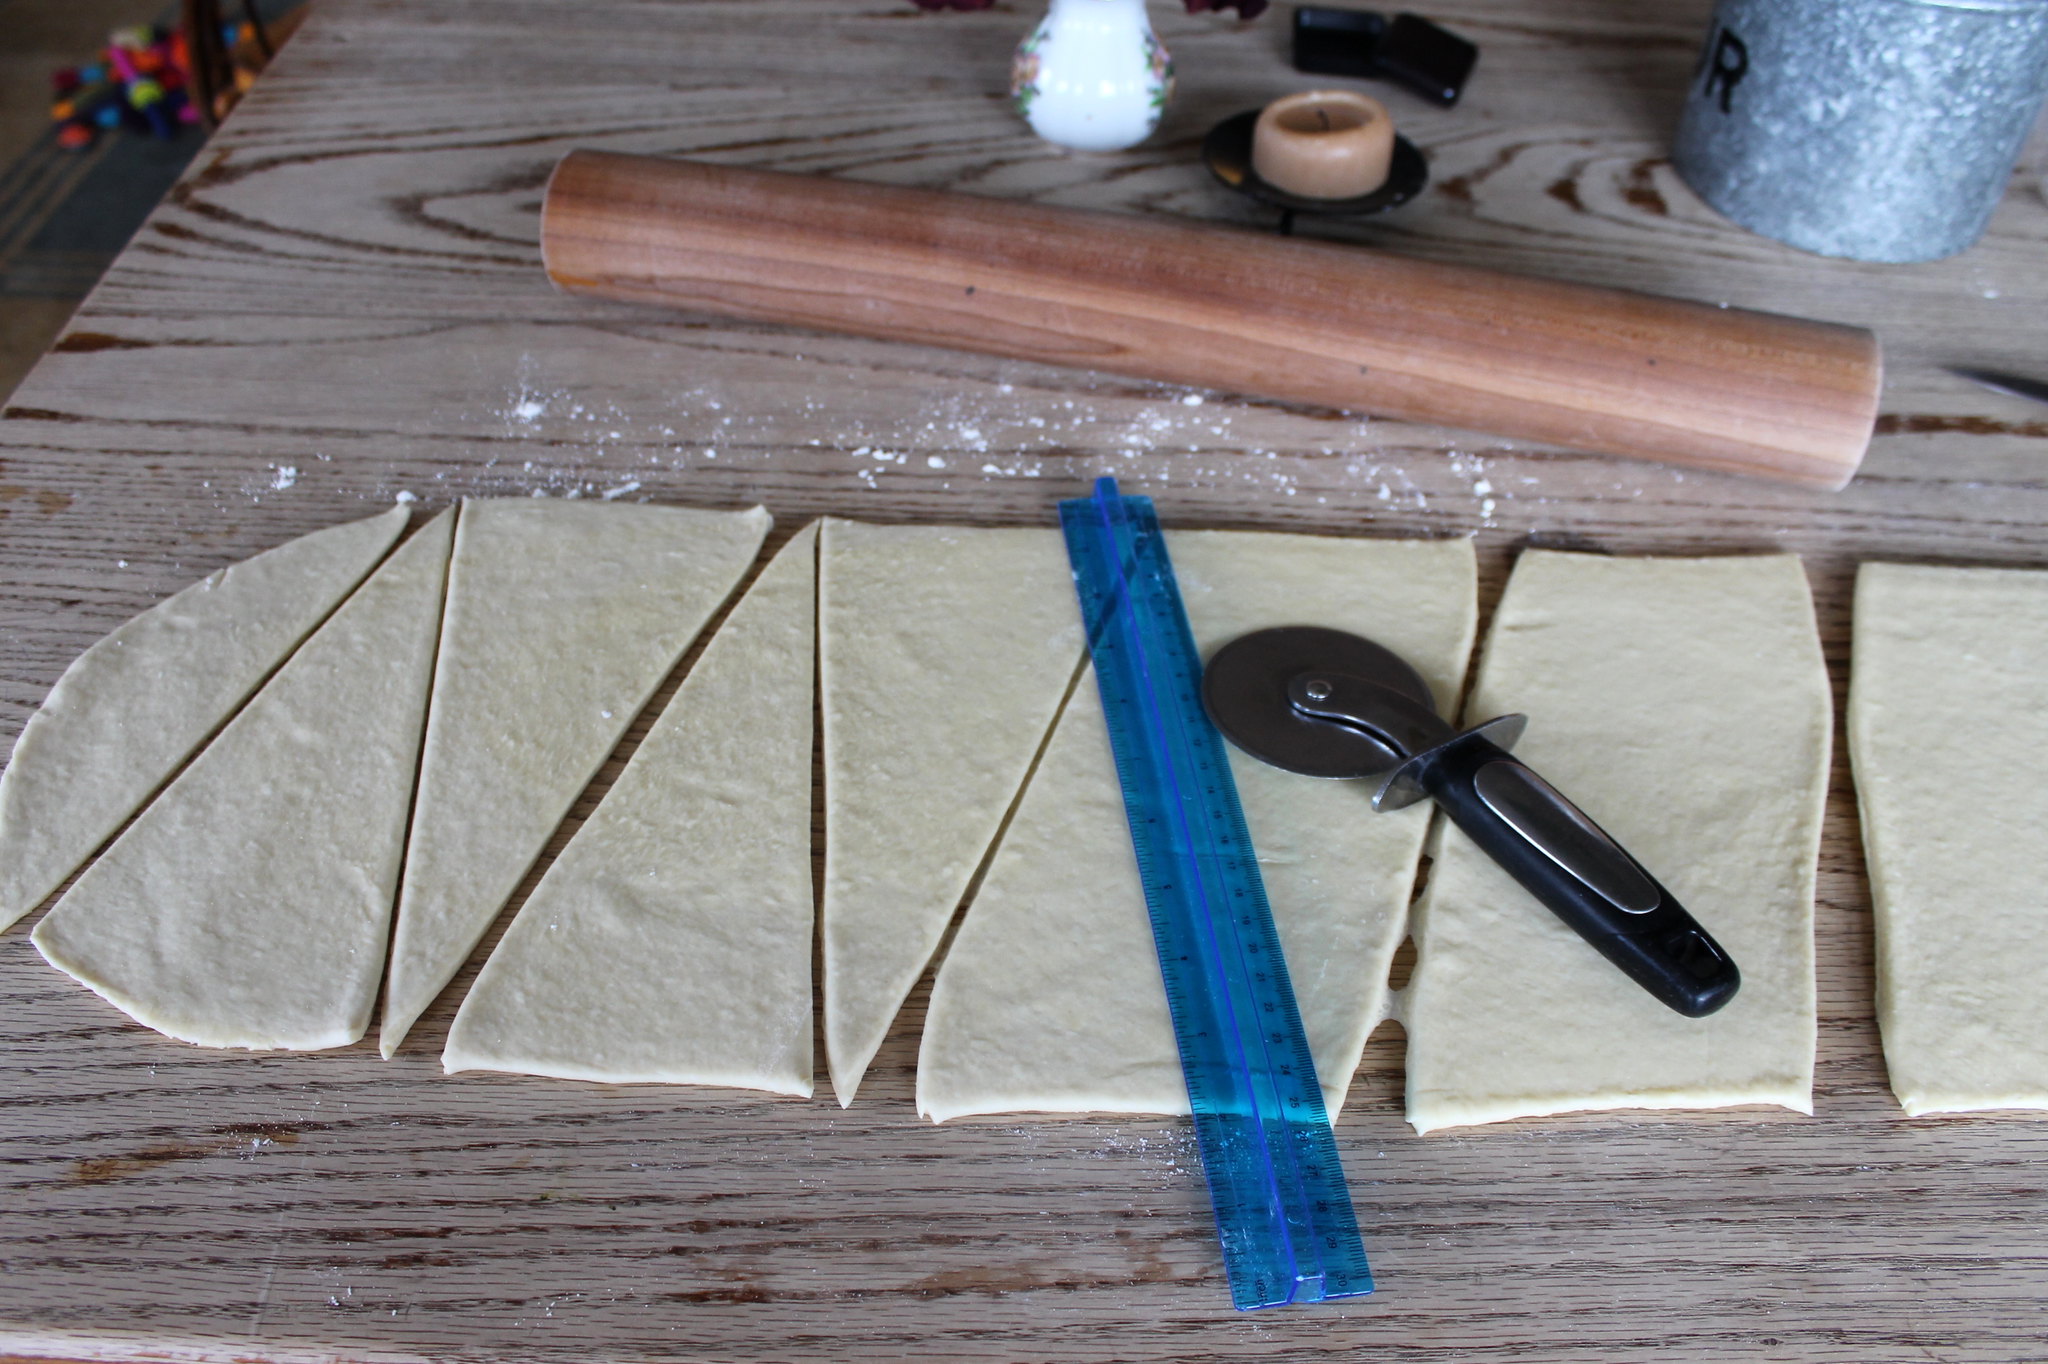
Using a ruler, snip the dough every five inches along the top side. For the bottom side, measure in 2½ inches, snip, and then snip every five inches until you get to the end. Using the ruler to keep your line steady, and a pizza cutter or knife for cutting, cut the dough on the diagonal, snip to snip, into sideways rectangles (or whatever they’re called). Go back through, cutting each rectangle in half to make long, skinny triangles.
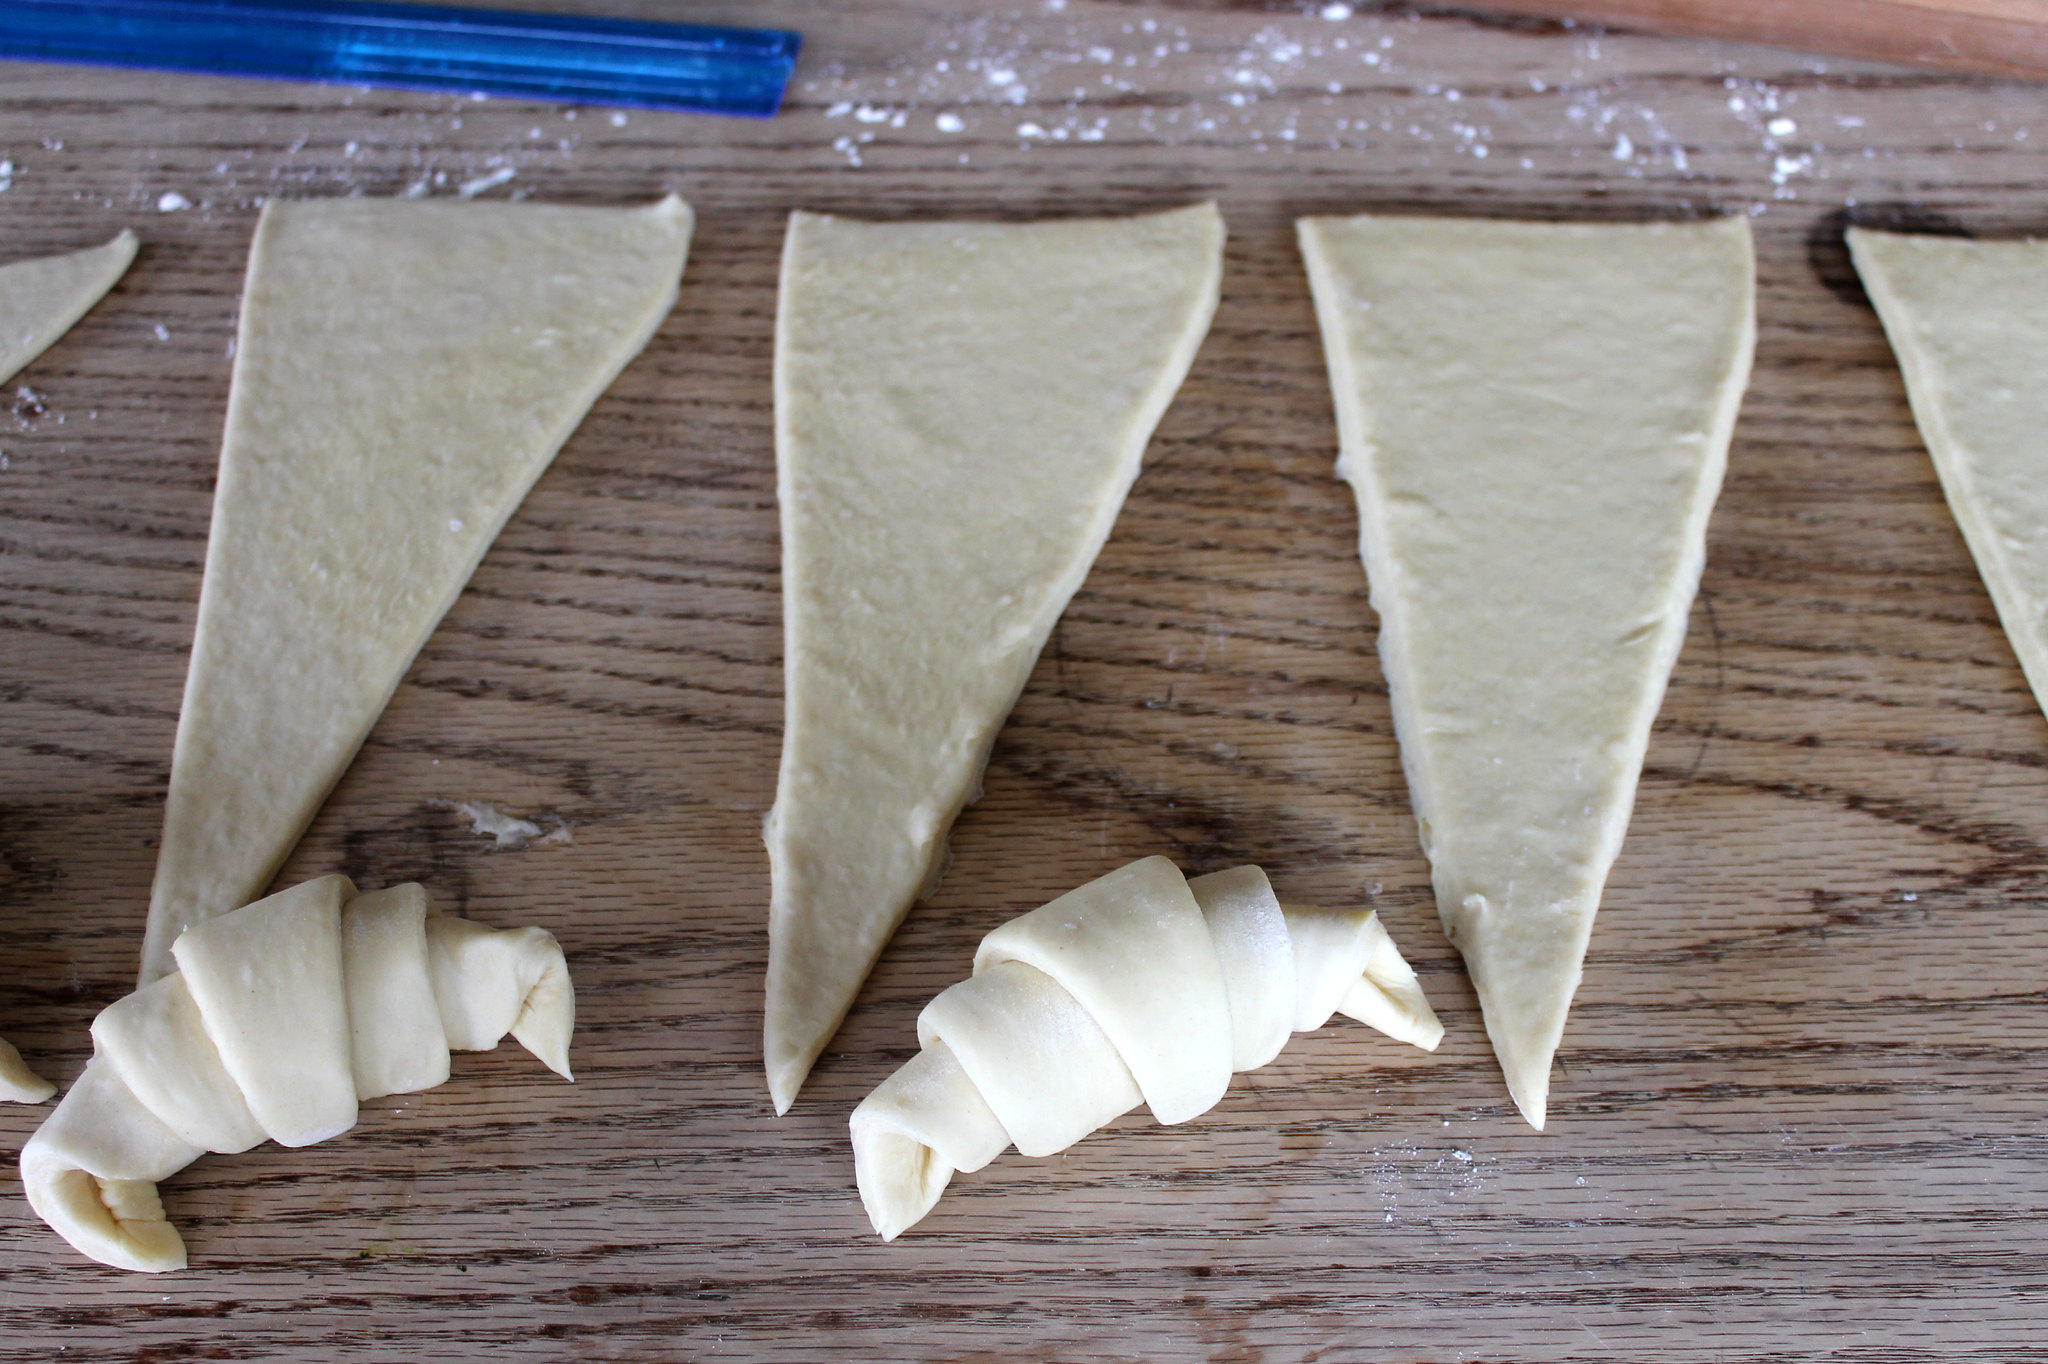
Before rolling the croissant, make a ½ – inch slash in the wide end of the dough, in order to help the dough curve around in the appropriate semi-circle. Roll the dough, from the snipped, wide end to the point. Place the croissants on a parchment-lined baking sheet, the narrow tip on the underside. Pull the two ends together, gently pinching them together in the front of the croissant — or not. It doesn’t really matter.
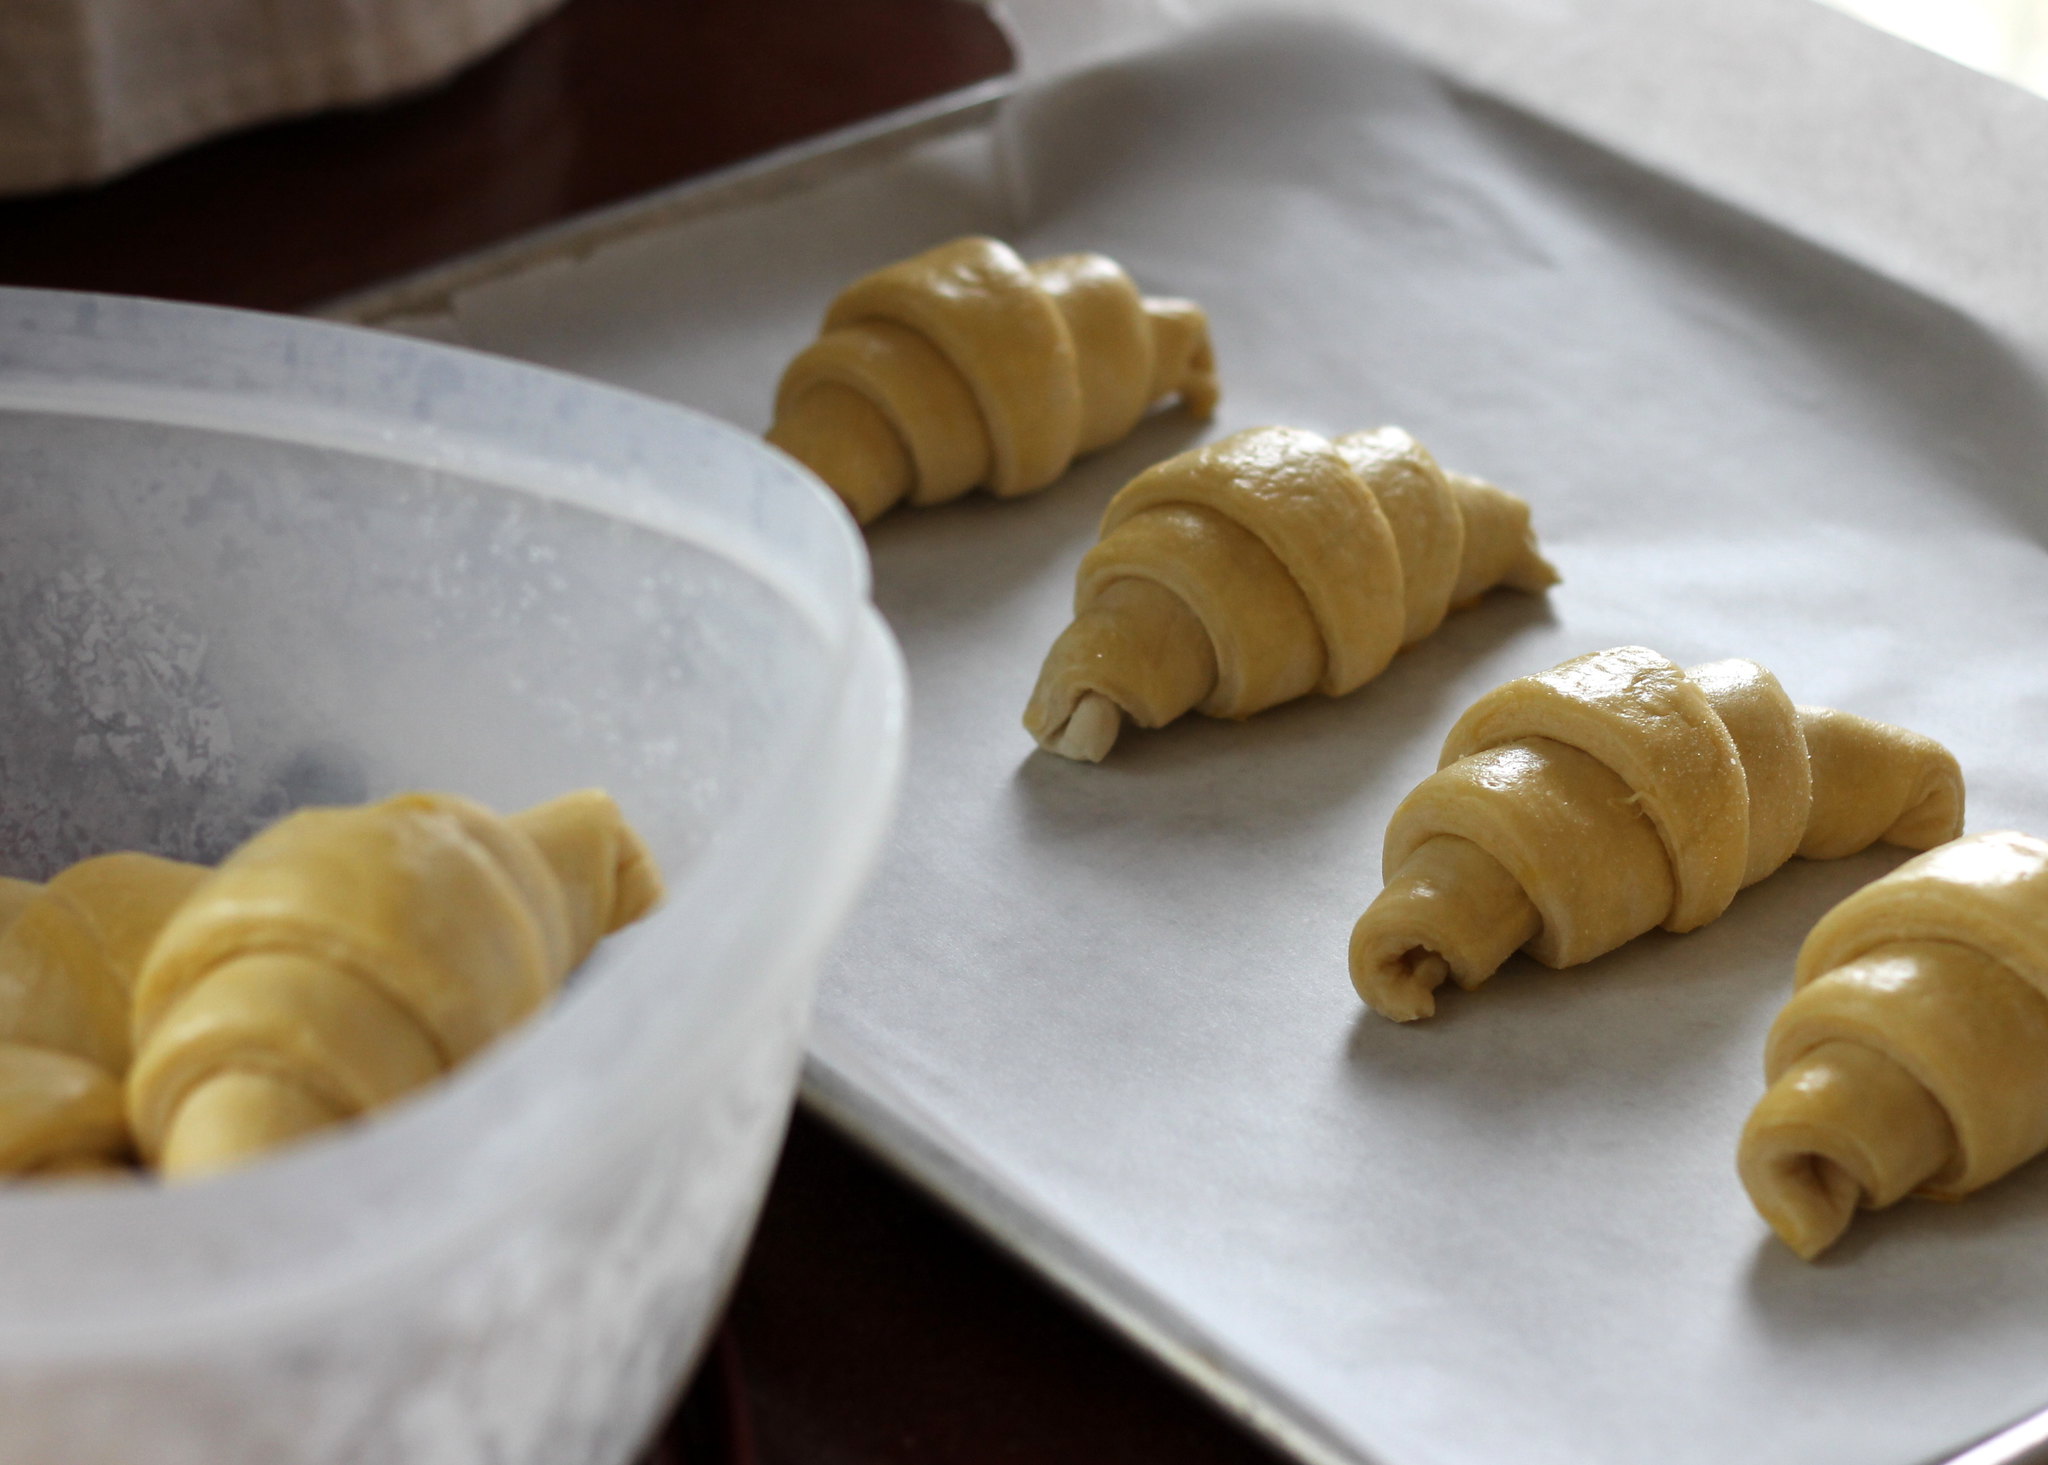
Beat the egg with a teaspoon of water and brush over the tops of the croissants. Allow them to rise for an hour and a half, uncovered. They don’t puff up that much, but if you jostle the pan, the tops will jiggle. Brush them again with the egg and water mixture.
Now you have two options: bake them straight away, or pop them in the freezer to bake later. They say both methods are fine, but since my best croissants were frozen first and then popped directly into the oven still frozen, I strongly advise you to freeze them. (Update: I now think they are better if they go directly from rising into a hot oven!) So! Gently slide the tray of twice-brushed and risen croissants into the freezer. After one hour, transfer them to an airtight container and return to the freezer.
To bake, place however many croissants you want on a parchment-lined baking sheet. Let them rest at room temperature for about five to ten minutes. Brush them with a third coat of egg mixture. Bake at 400 degrees (convection bake, baby!) until dark golden brown all over, about 25-30 minutes. If they are getting too brown on the bottom, slip a second baking sheet directly under the first at about the 18-minute mark.
Cool to room temperature before devouring.
For a killer breakfast, cut in half lengthwise and stuff with salty ham.
For chocolate croissants: place some chopped chocolate (chips, or whatever you have) on the wide end of the triangle before rolling.
This same time, years previous: in praise of the local arts, science lessons, the quotidian (12.14.15), hot chocolate mix, soft cinnamon sugar butter bars. cracked wheat pancakes, cranberry white chocolate cookies.