• Peanut Butter Cream Pie

    This past weekend, as part of my malaise treatment plan, Mr. Handsome and I watched The Waitress. It was an okay movie, humorous and quirky with a small dash of reality, and it served it’s purpose well by helping me escape from my humdrum existence for an hour and a half.


    Mom had warned me about the pies in the movie: “They’re gross,” she said, and she was right. Lots of unnaturally-colored (lime green, brilliant purple) pudding pies with chunks of chocolate and smashed bananas. Not the kind of pie I’m fond of (though a smidge here and there can be mighty pleasing, I’ll admit). I normally prefer fruit pies, or old-fashioned molasses pies (better known as shoo-fly), or pecan pies, with a dollop of whipped cream or a couple scoops of ice cream served up alongside. But that movie did a number on my brain and got me to hankering after a custard pie. To be more exact, a peanut butter cream pie.


    I stalled, instead making that potato-sausage quiche (in a pie pan, yes), but the hankering did not go away, so yesterday I submitted to my carnal desires and made myself a pie, Waitress-style. And I’m calling it: Got Me A Hankering Peanut Butter Cream Pie. Or wait, how about Persistent Peanut Butter Pie? Or, No Humdrum Existence For Me Peanut Butter Pie? Or Quirky Malaise Treatment Plan Peanut Butter Cream Pie? Or Smithereen Smashing Peanut Butter Pie? 

    This is kind of fun. I might have to do like The Waitress and start naming all my pies. 
    Several years ago I went on a peanut butter pie rampage, trying to find myself The Best recipe. I obsessively experimented, trying out pies with chocolate cookie crusts, pies loaded with cream cheese and whipped cream, pies garnished with chocolate shavings and chopped peanuts. And then, from a compilation of several different recipes, I finally discovered/created what I was longing for. 
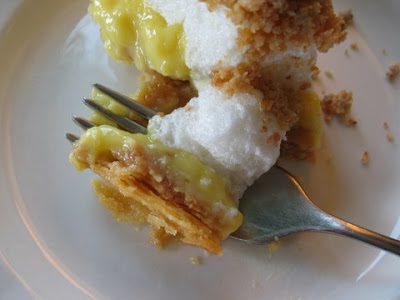
    It goes like this: In a pre-baked pie pastry you spread a layer of peanut butter crumbs, pour in the hot egg custard filling, seal the top with a meringue, and then sprinkle the rest of the peanut butter crumbs on top. Bake the pie for 15 minutes, chill it well, and there you have it, the classic peanut butter pie.


    Got-Me-A-Persistent-Hankering-For-A-Quirky-Malaise-Treatment-Plan-That-Will-Kick-My-Humdrum-Existence-To-Smithereens Peanut Butter Cream Pie 
    Adapted from my recipe card notes and the Better Homes and Gardens New Cookbook 
    3/4 cup confectioner’s sugar 
    1/4 cup flour 
    ½ cup creamy peanut butter 
    3/4 cup sugar 
    1/4 cup cornstarch 
    1/4 teaspoon salt 
    3 cups milk 
    4 eggs, separated 
    2 tablespoons butter 
    1 ½ teaspoons vanilla 
    For the crumbs: 
    In a smallish bowl, mix together the confectioner’s sugar, flour, and peanut butter. Set aside. 
    For the custard: 
    In a small bowl, mix together the sugar, cornstarch, and salt. Pour the milk into a heavy-bottomed kettle and whisk in the sugar-cornstarch mixture. Heat the milk over medium-high heat, stirring frequently at first and then constantly as it starts to get hot, until thick and bubbly. Cook it for two minutes more, stirring constantly. 
    In another bowl, lightly beat the four egg yolks. Add one cup of the hot milk to the egg yolks, whisking constantly. Pour the tempered egg yolks into the milk mixture and heat, stirring steadily, till bubbling. Cook for another two minutes. 
    Remove the kettle from the heat, add the butter and vanilla, and set aside. 
    For the meringue: 
    Beat together the four egg whites, 1/4 teaspoon of cream of tartar, 2 tablespoons sugar, and ½ teaspoon vanilla until stiff peaks form. 
    To assemble: 
    In the baked pie shell, sprinkle two-thirds of the peanut butter crumbs. Pour the hot custard over the crumbs. (You may have some extra custard—I’m sure you’ll figure out what to do with it.) Spread the meringue over the custard, and sprinkle the remaining crumbs over the meringue. 
    Bake the pie at 350 degrees for about 15 minutes until the meringue is golden brown.

    Cool the pie at room temperature for a couple hours before cooling in the refrigerator for another four hours. The pie needs to be completely chilled before you cut it, or else the custard will be runny, which may or may not be a problem—that’s up for you to decide.


  • Evolution

    As this blog has evolved, different themes have emerged. There are the recipes, of course, and then the sourdough bread. There is the list of all the books that I’ve read to my children, put out there for you to use as a reference. And lately I’ve begun to notice yet another theme: the excerpts from the book that my mother and I had been working on.

    So now, in an effort to be as clear and precise and obsessive as possible, I have created yet another index for this blog that I have titled Book Bits. At this point it’s still a small list, but I suspect that over time it will evolve and expand. (This blog seems to have a habit of doing that.)

    Take a minute to go check it out (see the link on the side bar). Like I said, it’s not much, but I did post some (slightly embarrassing) pictures of my mother and I, for your entertainment edification.

  • Don’t Cheat When Proofing

    Here is the pumpkin bread that I told you would be coming.


    It’s not made with pumpkin, but with sweet potato, and enlivened with cumin and toasted pumpkin seeds. The last time I made this recipe it got rave reviews and everyone scarfed it down, but this time it is languishing, half-eaten, on the kitchen counter.

    It is all my fault. I decided that the bread didn’t really need to take two days to make—I could just rush it through if I cut back on the proofing times just a little. So I did, and while the final product has good flavor, the texture is too dense and heavy. So please learn from my mistake: do not skimp on the proofing times, and you shall be richly rewarded (with scarf-able bread) for your honesty and integrity.

    Pumpkin Bread
    Adapted from The Breads from the La Brea Bakery


    Start the bread in the late afternoon or early evening so that it can ferment in the fridge overnight.

    Two medium-sized sweet potatoes, or one big clunker
    1 1/3 cups (7 ounces) shelled raw pumpkin seeds
    1 ½ cups (12 ounces) cold water
    1 cup (8 ounces) white starter
    5 tablespoons raw wheat germ
    1 teaspoon ground cumin
    3 1/4 cups (1 pound and 2 ounces) white bread flour
    1 1/4 cups (7 ounces) whole wheat flour
    1 tablespoon sea salt

    Bake the potatoes in the oven,


    and then peel them and scoop out 1 1/4 cups (10 ounces) of the pulp and set it aside.


    Put the pumpkin seeds on a cookie sheet and toast them in a 350 degree oven for 10-15 minutes until they are golden brown. It’s important to get them all nice and toasty-brown because then they will taste lighter and crunchier once they are baked into the bread. Set them aside.


    Mix together the water, starter, wheat germ, cumin, and flours, and knead well. Let the dough rest for twenty minutes, add the salt, and knead for another 5 minutes. Add the pumpkin seeds and knead for another two minutes, or until the seeds are well-incorporated. Place the dough in a greased bowl, cover with a shower cap and let it ferment in the fridge for about 10 hours.

    In the morning, cut the dough into two equal pieces and shape into loaves. You can make the bread into standard loaves, or boules, depending on your preference. I think they would also make fine dinner rolls.


    If you make elongated boules, lay them smooth-side down on a flour-dusted cloth that has been placed on a cookie sheet. Pull the cloth up around the edges of the loaves to provide a separation between them and to help them keep their shape.


    Once your bread loaves/boules/rolls are shaped, cover the loaves with shower caps (or if you’re using cookie sheets, slip the pan into a garbage, or big zip-lock, bag) and put them in the fridge to proof for another 6-10 hours.


    Take the bread out of the fridge (now you are on late afternoon/evening of day two) and remove the plastic and cover the loaves with a cloth. Allow the dough to proof on the counter for one to two hours (till the dough reaches about 60 degrees). Dock the bread and bake in a hot oven, about 400 or 450 degrees, for about 30-40 minutes (less if you made rolls).