The other day—
(You do realize that’s a euphemistic phrase, don’t you? It means that whatever I’m about to tell you happened a while back, perhaps a good deal of a while back, perhaps as long as a couple months back, but since I never got around to writing about it until now, and since I want my words to seem fresh, I say “the other day” because it sounds more recent (and more relevant) than “a couple ages and eons ago.”)
Where was I going with this? Oh yes, red beets.

The other day (maybe a week and a half ago, if you’re wanting the hard, irrelevant truth) I thinned out my beets. I don’t have a very big row of beets since no one else in my immediate family enjoys them, but I do plant a handful of seeds so that I have enough to eat some fresh, make a salad (or two or three), and possibly whip up a chocolate beet cake for a church potluck. Right about then, after feasting my heart out, I start to get sick of beets and begin to feel rather glad that there is no point in canning them since no one else likes them anyway. So I cheerfully, and without guilt, toss the large, woody beets that are still hanging out in the garden onto the compost pile, and move on to preparing and eating other foods, relieved to lay off the beets for another ten months until the next beet season swings around and provides me with the opportunity to glut myself once again.
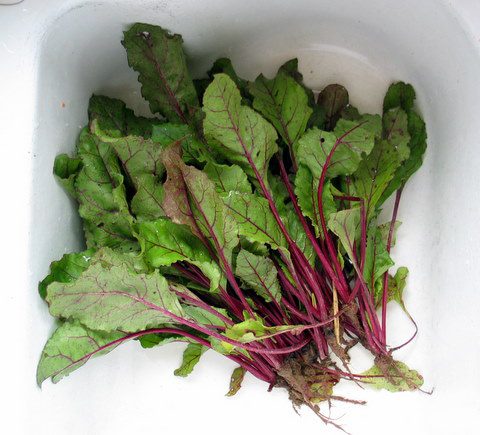
So anyway, as I was saying, I thinned my beets. For the Amelia Bedelias among you, that does not mean that I slipped girdles on my beets to restrain their slowly swelling bellies, nor does it mean I took a knife to them, trimming their round frames into hourglass figures. It means that I went down the row pulling up the beets that were crowding too close together, making the row thinner, not the beets.
I’m guessing you probably already knew that.

Of course I couldn’t throw away the pulled plants, so I gathered them into a bowl and took them inside, intending to cook them up for my lunch.
I had planned to eat only the greens, but the little beets, some skinnier than a pencil, looked so yummy that I decided I would eat them, too. I cut them off and set them aside in a little bowl—I would boil them first and then serve them along with the greens.

It appeared that the only beet part I was going to toss out would be the red stems, but then I got to wondering if they would be good to eat as well. So I called my mom and she said, Sure, go ahead and eat them if you want; it certainly won’t hurt you.
I boiled the little beets in a pan of salted water till they were almost, but not quite, done, and then I added the stems. When both the beets and stems were fork-tender, I poured them into a colander to drain while I wilted my greens in a pan of hot butter. Once the greens were sufficiently cooked, I scooped them onto my plate, piled on the stems and little beets, and dug in.

It was a huge pile of roughage; I made it three-quarters of the way through before I called it quits. I had eaten salad for breakfast that morning, so I was feeling a little nervous about all that fiber flooding my system. Maybe there was a limit to the amount of salvaged compost that a human body could digest. Maybe I had overdone it. Nothing happened to me though, except that my cheeks turned rosy red, my fingernails lost their white spots, and my split-ends mended themselves. (My ears also grew a couple inches and my nose started twitching, but by the next morning those symptoms had vanished, so I think they were a fluke.)
Red Beet Greens
The greens from baby beets, about one large bowlful, or about 8-12 cups
2 tablespoons butter
salt and pepper, to taste
Melt the butter in a large soup pot. Add the greens, salt liberally, and toss gently till they have wilted. Allow them to cook, uncovered, for three to six more minutes (the shorter amount of time for newer greens and a longer amount of time for the not-so-new greens).
Yield: Will feed one to two adults when served straight-up as the main meal (the gray fuzz that sprouts on the back of your hands will disappear within twenty-four hours), or it will feed four to six adults when served as a side dish, or, when tossed with a pound of cooked spaghetti and freshly grated Parmesan and served as a main course, it will be make a hefty main meal for four to six adults.
About one year ago: One freaky kid

