That fateful night, a week ago, when Mr. Handsome decided to indulge in a strawberry smoothie and declare himself the loser to our spending freeze, I was busy doing industrious things, such as paging through a Food and Wine magazine while listening to my brother and his wife and my other brother perform their groovy songs. At the back of the magazine I spied a recipe for coconut brownies. The title did not catch my eye, but the photo did (I am like everyone else, it appears, drawn like a magnet to pictures of artfully displayed consumables): a little chocolate-covered square on a plate, the outline of an almond just visible through the dark sheen of chocolate.

It was that almond bump that snagged me.

The recipe filled an entire page but didn’t seem too complicated, so on a small piece of card stock, the reverse side of which was a form that customers could fill out to inform the café of how they were doing and enter in a drawing for a free meal, I jotted down the recipe in my tiniest handwriting, employing all sorts of abbreviations and short-cut instructions while doing my best to remain clear. I knew I wouldn’t be seeing the magazine again any time soon.
There were only two ingredients I didn’t have on hand, the sour cream and the orange rind (optional), but when Mr. Handsome sheepishly headed over to the counter to place his unnecessary order, I did three things: first, my jaw dropped in mock horror, second, I laughed, and third, after taking a couple minutes to absorb the full meaning of my newfound freedom—I could buy new jeans! go out for coffee with a friend! order some books on Amazon! serve my family boxed cereal!—only then did it occur to me how his purchase related to the recipe I was so diligently copying down: “Hey! I can buy the sour cream for these brownies now!”
Which I did, right off, like any deserving little winner. (I skipped the orange zest, though I do believe it would be a nice addition … maybe next time.)
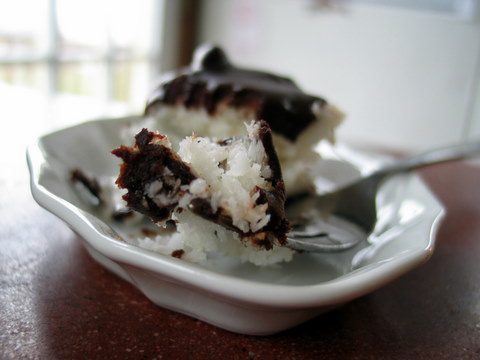
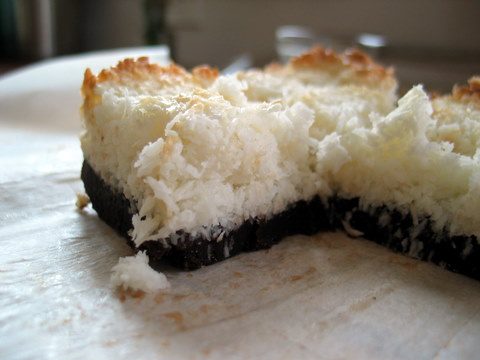
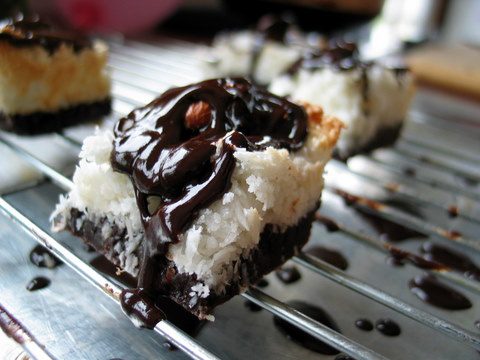
There are three parts to these brownies: the brownie base, the coconut filling, and the chocolate glaze. The brownie base is fantastically thin and rich, almost like a fudge, but with a bit of a chew to it. The coconut filling is perfect—intensely coconut-y with just enough egg whites and sour cream to tie it together, but just barely.
But the chocolate glaze, while not a complete disaster, was lacking. I followed the recipe to the letter but somehow ended up with a runny glaze that barely glossed the coconut layer—all the coconut pieces were visible, poking through the chocolate. (It was probably because I had used raw cream which feels thinner to me, so when I make this recipe again, I will add only half of the cream, increasing it as needed.) I remedied the runny problem by melting more chocolate and thinning it with the already-made glaze.
In the magazine picture, the brownies appeared to be chocolate-coated on all sides, like individual chocolates. I tried to make mine like so, but found it to be too labor intensive (the chocolate dribbled unevenly down the sides and clumps of coconut kept tumbling into the bowl of glaze), so after a bit of playing around I finally settled on adding the chocolate as a third layer.
And one other thing: the magazine declares that this recipe makes forty brownies, which it does if you chose to so cut them, but I found them to be on the big side. I recommend cutting them smaller (and using more almonds accordingly). I shared plates and tins of these brownies with four other families and we still have about a dozen more in the refrigerator, so if you make these be prepared to make some deliveries.
Coconut Brownies
Adapted from Food and Wine Magazine, October 2008
For the brownie base:
1 cup sugar
1 stick, plus 1 tablespoon, butter
1/4 cup light corn syrup
1/4 cup water
14 ounces bittersweet chocolate, broken into pieces
3/4 cup flour
1/4 teaspoon salt
2 eggs, beaten
1 tablespoon vanilla
Place the first four ingredients in a saucepan and bring them to a boil. Put the chocolate pieces in a glass bowl.
Pour the boiling sweet liquid over the chocolate, let it sit for one minute, and whisk the mixture until the chocolate has completely melted.
Add the flour, salt, eggs, and vanilla, stirring briefly to combine.
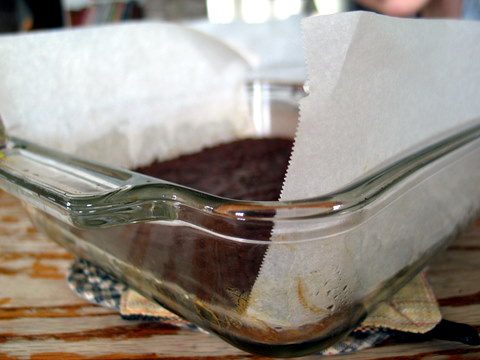
Pour the batter into an 11 x 17 pan (or use an 8 x 8 pan and a 9 x 12 pan) that has been greased and lined with parchment paper (letting the paper extend beyond the edges of the pan just a little, and greasing the parchment paper, too). Bake the brownies at 350 degrees for 15 minutes.
Cool the brownies and then slip the pans into the freezer to chill for thirty minutes, or until firm. While the brownies are cooling and chilling, work on the coconut layer.
For the coconut layer:
7 egg whites
1 1/3 cups white sugar
6 ½ cups (one pound) shredded coconut, unsweetened
1/4 cup sour cream
1 teaspoon vanilla (or one vanilla bean, just the seeds)
1 teaspoon orange zest, optional
Put a mixing bowl over/in a kettle of boiling water. Put the egg whites and the white sugar in the mixing bowl and beat with a hand-held mixer for about two minutes, until the sugar is dissolved and the egg whites are warm. Remove the mixing bowl from over the boiling water and continue to beat till stiff peaks are formed, about another eight minutes. Fold in the coconut, sour cream, vanilla, and optional zest. Spread the coconut mixture over the cooled brownies and bake at 350 degrees for 20-30 minutes until golden brown and set. Once the brownies are cool, cover and refrigerate. When they have chilled through, glaze with the chocolate.
For the chocolate glaze:
1 pound and 2 ounces bittersweet chocolate, chopped
4 ½ tablespoons butter, cut into pieces
4 ½ tablespoons light corn syrup
2 1/4 cups heavy cream
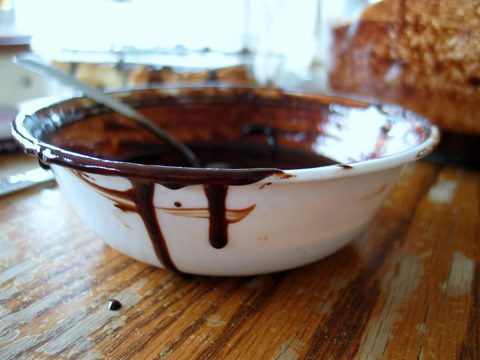
Place the first three ingredients together in a bowl. Boil the cream and pour it over the chocolate. (Note: Start with one cup of cream and then add more as needed. The goal is to have the glaze be thickly drizzle-able.) Let the ingredients stand for one minute and then whisk till the chocolate has completely melted. Let the glaze rest for ten minutes before glazing the brownies.
To assemble:
40-50 whole almonds, roasted (preferably unsalted, though salted also works)
If you would like to completely glaze each brownie, covering both the sides as well as the top, lift the brownies out of the pan, using the parchment paper as handles. Set the brownies on a cutting board, slice into pieces, top each brownie with an almond, place the brownie on a fork and holding it over the bowl of melted chocolate with one hand while using your other hand to spoon the chocolate over the brownie. Set the brownies on a rack to dry. Once the chocolate has set (it will still be soft), place the brownies in an airtight container and store in the refrigerator.
Alternately, if you simply want the chocolate glaze to be a third layer, stud the top of the brownies with the almonds and pour the chocolate over all. Refrigerate the brownies till the chocolate has set, cut the brownies into serving pieces, and return the brownies to the refrigerator.
The brownies will stay fresh in the refrigerator for at least a week, maybe two. (I see no reason why they couldn’t be frozen, though I did not do so. If you try to freeze them, please report back on the results.)


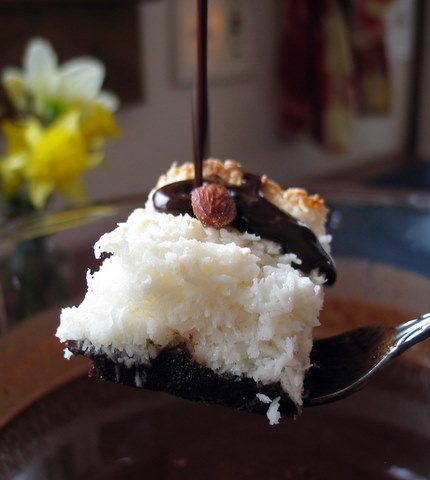

 In the magazine picture, the brownies appeared to be chocolate-coated on all sides, like individual chocolates. I tried to make mine like so, but found it to be too labor intensive (the chocolate dribbled unevenly down the sides and clumps of coconut kept tumbling into the bowl of glaze), so after a bit of playing around I finally settled on adding the chocolate as a third layer.