• Burnished


    Burnished. This was the word that popped into my mind when I made these bagels. If someone could’ve seen inside my head, they would’ve thought me certifiably psycho: They are soooo burnished! Shiny and burnished…glossily burnished. Sleekly and sexily burnished. Buuurnished.
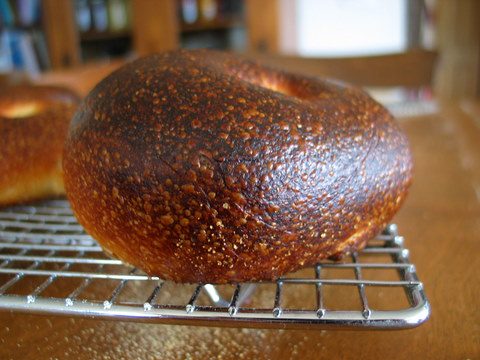

    These, hands down, are the best bagels I have ever made.


    I have another recipe for bagels of the commercial yeast variety, and even though I like them a lot, invariably some of the bagel bottoms end up dense and gummy, like noodles. But these, well. I had not a single—not a single!—flop.


    We tore into them while they were still warm. At first I was disappointed because the texture was more bread-like then chewy bagel-like. But after the bagels cooled to room temperature and sat for several hours, they transformed into delicious burnished chewy-nesses. And by day two they were even chewier.


    This is one of the faster sourdough recipes. Just throw all the ingredients in the mixer (the recipe calls for a lot of starter, which is always a plus in my book because then I can get away with making just one recipe for the day and don’t have to feel like I need to make a variety of different breads just so I can use up all the starter), knead it for eight minutes, shape the bagels (it’s actually a fun activity and not a chore at all), put them on two trays, cover them well, and transfer them in the refrigerator to proof till the next day when it’s time to boil and bake them. After a brief dip in a pot of boiling water and fifteen minutes in a hot oven, they are done.


    I will be making these beauts every time I do a round of sourdough baking. They are an essential bread, one I’ve resolved to have on hand at all times.

    Bagels
    Adapted from Nancy Silverton’s Breads from the La Brea Bakery

    Update September 10, 2022: I think the bagels need more salt. Might want to consider increasing to 4 teaspoons.

    Update October 13, 2022: this recipe is easier, faster, better!

    12 ounces (1 ½ cups) cool water
    2 teaspoons yeast
    13 ½ ounces (1 ½ cups) white starter
    2 pounds (6 ½ cups) high-gluten flour or white bread flour
    6 tablespoons wheat gluten (if not using high-gluten flour)
    1/4 cup sugar
    4 teaspoons salt
    2 tablespoons barley malt syrup
    6 tablespoons milk powder

    Day One:
    Put all the ingredients in your standing mixer and mix on low speed for one to two minutes. Turn the mixer up to medium speed and mix for another 8 minutes, or until a thermometer reads 75 degrees when plunged into the dough. Let the dough rest for ten minutes.

    Line two baking sheets with parchment paper and sprinkle them with cornmeal or semolina flour.

    Divide the dough into 18 four-ounce pieces. Roll each lump of dough into a 6-8 inch rope, then loop it around so that the ends overlap by about 1-2 inches. With the fat overlapping part of the bagel in the palm of your hand and the skinny part of the bagel over the back of your hand, press your hand down on the counter and roll back and forth, pressing the bagel ends together. (It’s much easier than it sounds.) Repeat with all the lumps of dough.


    Place the shaped bagels on the prepared baking sheets, leaving an inch or two between each bagel.


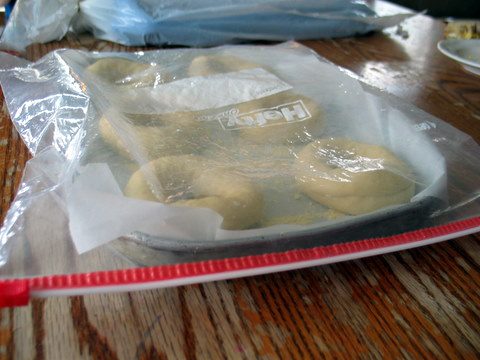
    Slip the sheets of bagels into a large bag, tie it shut, and put them in the refrigerator to proof for 12-24 hours.

    Day Two:
    Remove the bagels from the refrigerator, uncover them, and let them proof at room temperature for about 20 minutes.


    Put about four inches of water in your widest (not deepest) kettle and bring it to a boil. (You may want to add something to the water to enhance the bagels, but it isn’t necessary. Brown sugar, baking soda, or salt are the most common additions, I think.) At the same time, preheat your oven (and baking stone, if using) to 450 degrees.

    When the water is rapidly boiling, gently drop in three or four bagels. Boil for 20 seconds on each side, flipping them over with a slotted spoon.


    Carefully remove the bagels, one at a time, from the water and place them, smooth side up, on the preheated baking stone (that you generously dusted with cornmeal after heating). Once your baking stone is filled, bake the bagels for 15-20 minutes.


    Wait to boil the remaining bagels until the first batch is out of the oven since it is important to get the bagels out of the boiling water and into the oven as quickly as possible—you don’t want the boiled bagels to sit around at room temperature for too long.

    They keep well at room temperature for two or three days. If freezing, cool completely before bagging.

    Note: I’m submitting this post to Yeast Spottings.

  • Not all that difficult

    A couple months ago my friend Tina asked me if I’d be willing to contribute some food for an international fundraiser dinner. “I would be cooking for how many people?” I asked, hesitating. Visions of slaving over a hot stove for two long days churning out food for the masses kept me from shouting YES! and jumping up and down for joy.

    “Oh, don’t worry about that,” she quickly assured me. “Just make however much you want to. It’s a smorgasbord. I’ll even pay for your ingredients if you want me to. Think on it, okay?”

    To be honest, that’s a very loose rendering of our exchange, most of which occurred via email, but then I did actually call her up to tell her I had decided that I would do it. “I’ll make spinach-cheese crepes,” I said.


    “Ooo, that sounds lovely,” she said. “Where are they from?”

    “Oh, uh….” Silly me had forgotten that this was an international dinner. Tina had probably tapped me because of my three years spent living in Nicaraguan banana patch. I thought fast. “I kind of invented them myself, so I guess they’re from my kitchen, but they’re crepes so we could say they’re French. They also have Parmesan cheese in them, so we could say they’re Italian.”

    “Whatever,” she laughed. “They’ll be fine.”


    Last week when it came time for me to start cracking eggs and flipping crepes, I realized that I never wrote down the recipe several years ago when I first invented the dish. I was pretty certain I could remember how to make them, but I was a little rusty on a couple points. I knew I sauteed spinach with garlic and olive oil, but should there be some onion, too? There were three cheese: Parmesan, mozzarella, and something else…maybe a sharp cheddar?


    Back when I had first made my invention, I had taken the crepes to a church potluck several years ago and received a recipe request (oh, joy!), so I dutifully wrote out the recipe and dropped it in the person’s mailbox. Maybe she still had it? I called her up and left a confusing message on her answering machine, the gist of which was: Hi Julie! Several years ago I made spinach-cheese crepes for a potluck and you requested the recipe and I wrote it out and gave it to you and now I need to make them for a dinner and I don’t have the recipe and was wondering if you still had it and if so, could you please share the recipe with me? Thanks!”

    I never heard back from her, which wasn’t too surprising considering the oddness of my message.


    On a whim I called up my girlfriend Kris, who knows all things food and is quite accustomed to my odd food questions (What is brandy made from? Where do you buy smoked salt? How do you store garlic? What is tamari sauce?), and said, “Hey, remember those crepes I brought to your house for that dinner we had a long time ago? What cheeses did I have in them besides Parmesan and mozzarella?”

    She barely even hesitated, “Feta?”

    Bingo!


    “And besides the garlic and spinach… anything else?”

    “Hm, maybe some green onion? If it’s just regular onion it will need to be sauteed.”

    Double bingo!

    Who needs a recipe when you have a culinary genius as a friend?


    I was all set. I made the crepes, topped them with sauteed spinach, garlic, and onion, sprinkled over the three cheeses, rolled them up, laid them side-by-side in greased pans, brushed their tops with olive oil and sprinkled over a little more grated Parmesan. I passed several pans off to Tina and kept some back for us.


    And then, because they are really not all that difficult to make and because I loved them so much, I made some more this week. One pan I gave away, another pan I froze (as an experiment because I’d like to know if they hold up to fluctuations in extreme temperature), and another pan I stuck in the fridge for whenever I’m in need of a quick meal.


    That’s the great thing about these crepes—you can make them in advance, cover them with plastic, and then store them in the fridge for several days before baking them, and once baked, they are delicious cold, at room temperature, or reheated. You really can’t go wrong with them.

    Spinach-Cheese Crepes

    These can be a time-consuming affair since you have to make the crepes, which are actually not crepes at all, but Russian pancakes (real crepes call for butter and sugar, fewer eggs, and sometimes some water), saute the veggies, and grate the cheese, but if you make the crepes at a time when you can be in the kitchen doing other oddball tasks (or, as in my case this week, while visiting a friend), then it’s not so bad. Once the crepes are made, the rest goes quickly.

    The quantities in this recipe are guesstimates, as is my habit when donning the hat of a savory cook. The important thing to remember is: You must refrain from stuffing the crepes. The goal is to lightly flavor them, so only put about two to three teaspoons of the spinach mixture on each crepe and just a bit of the cheese.

    2 recipes of Russian pancakes, pre-made
    1 box of frozen spinach, thawed and drained
    3 cloves garlic, minced
    ½ cup onion, minced
    salt and black pepper
    olive oil
    3 cups Parmesan cheese, freshly grated
    1 cup feta cheese, finely crumbled
    2-3 cups mozzarella cheese, grated

    Saute the garlic and onion in some olive oil. When the onion is lightly browned, add the spinach and saute for another 3-5 minutes. Season with salt and pepper. Set aside, or refrigerate if you’re preparing it ahead of time.

    Grate the cheeses.

    To assemble:
    Lay out all the crepes on a large flat surface. Distribute the spinach mixture over the crepes, taking care to dot them evenly with small bits—no large spinach-clumpage allowed. Sprinkle each crepe with a bit of feta, just a bit, and then a sprinkling of Parmesan and then the mozzarella. Roll up each crepe and place it, seam-side down, in a greased baking dish. Brush the tops of the crepes with olive oil and shake a few grinds of Parmesan over top. Bake at 350 degrees for 20-30 minutes, till sizzling and slightly browned.

    Serve either warm or at room temperature. (If serving them as appetizers, cut them into thirds or fourths and arrange on a plate. If they are the main course, serve them whole, like a burrito.)

  • My excuse

    I occasionally (grrr, as usual I had to backspace and correct the spelling for occasionally since I added two s-es—I am such a consistently—oops, it’s -ent, not -ant—bad speller) scroll down through the recipe indexes of other food bloggers and am amazed at their huge selection of vegetable recipes. They post about salads and braised leafy green things and artichoke hearts (I don’t think I’ve ever even had an artichoke heart, unless you’re counting the mush that you can buy in a can) and it all looks really, really good. And then I develop a mild case of I’m A Bad Cook-itis because I only have six or seven recipes (I think that’s an accurate number; I’m not online so I can’t go check right now) under the vegetable section and most of them are potato-based.

    On the other hand, my dessert section is really long, making me feel lopsided and one-dimensional. Today I attempted to redistribute the wealth, adding some new categories to thin out the well-endowed sections and I think it worked. I now appear to be a more well-balanced person—that is, as long as you don’t pay too much attention to the new titles: Cakes, Cookies, Pies and Tarts, and Soups.

    But seriously, seeing those long lists of vegetable dishes (here’s one example and here’s another) makes me stop and wonder. We eat an above-average amount of fruits and veggies, but it’s plain, down-home cooking, not even worthy of a recipe. I spend the summer packing quart-sized bags full of green beans, corn, broccoli, chard, and peas. We can tomatoes out the whazoo. Cherries, applesauce, peaches, pickles, jams, jellies, juices—the list goes on. And on and on and on (and now I’m getting tired, just thinking about all the work that will need to be done in the next six months).

    When it comes to cooking the food that we preserve, say green beans, it couldn’t be more simple. I dump a bag of green beans in a kettle, sprinkle them generously with salt, put about an inch of water in the bottom of the pan, bring them to a boil and then turn it back to a simmer for another twenty minutes or so, until they’re tender. Before serving, I drain off the water and sprinkle them with more salt, and if I’m feeling fancy I’ll brown some butter and drizzle that over them, too. But that’s it, really. Peas and broccoli are cooked likewise, boiled and salted—corn sometimes gets a little sprinkling of sugar and a dab of butter along with the salt.

    Like I said, my methods aren’t very note-worthy. But when you’re working to get a decent quantity of vitamins and minerals down the throats of four children and the food has been grown on your own land, you don’t need or want a bunch of fancy recipes. At least that’s my excuse.

    In conclusion, do not be deceived by my recipe index. We do eat our vegetables, and lots of them. I just wanted to be clear about that.

    Truth-telling addendum: The homegrown veggies in the above post are mostly hypothetical. Because we didn’t do a full-scale garden last year, we have been eating lots of boiled, store-bought peas. The store-bought broccoli is anemic, so that’s been disguised in soups, and the frozen corn has the texture of field corn, so that has also been disguised in soups. Basically, what I’m trying to say is that we’ve mostly been eating either boiled peas or boiled green beans (and half of the green beans came from my parents’ garden), and while we eat a lot of them and we eat them consistently, it’s not very exciting.