• A more peachy peach

    Peach season is over for me, but I feel obligated to tell you about the peach tarts that I’ve been making because while you may not get to make it this year, you’ll at least be able to have the recipe ready, butter crusts crimped and in the freezer (if you have room), right at the very start of next year’s peach season. You can thank me later, too.


    I always thought that peaches were best eaten fresh and that baking them was rather futile and practically downright sinful, seeing as there was no way the lush fruits could be improved upon. But I was wrong. Baked peaches are incredible. They shrink a little, the cut edges firming up just enough to seal in the juices. If anything, the flavors are intensified, and when paired with a rich, crisp butter crust and topped with whipped cream, well, it really can’t get much better.


    (Ooo, you wanna know something? Nectarines are almost just like peaches and they are in season right this very minute, so I guess it’s not too late to make this pie after all, lucky you.)


    Peach Tart
    Adapted from Julia Child’s Mastering the Art of French Cooking.

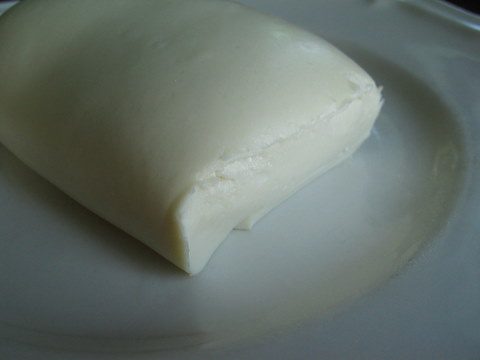
    This tart is basically just peaches and crust, so it’s important to use a really rich, delicious crust, one that calls for people to lick clean their plates. Make your favorite, richest pie crust, or do what I’ve been doing and make Deb’s butter crust (recipe follows).

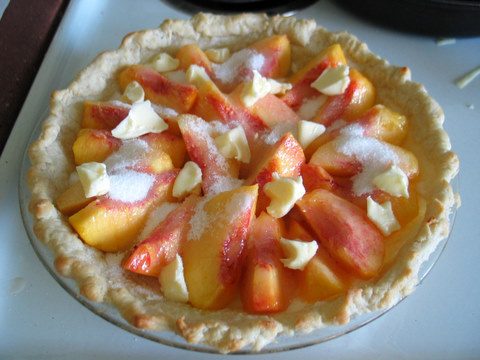
    Because I don’t have a tart pan (I keep my eyes peeled when I go thrift shopping), I use a regular pie pan. Just go about half-way up the sides with the crust (you’ll have a little leftover pie dough), because the resulting ratio of crust to peaches will be too high if you make a full-blown pie crust (as you can see from the pictures, that’s what I did, and while it wasn’t any hardship eating all that crust, I think it would be best with a little less).

    One of the “problems” I’ve had with this pie is that the peach juice doesn’t thicken and once you cut into the pie, the liquid runs off, and what doesn’t run off soaks into the bottom crust. I suppose I could toss the sugar with a tablespoon of flour or cornstarch, but I haven’t tried it yet because I like how absolutely simple and basic this tart is and I don’t want to go messing with that. As it is, the top part of the bottom crust gets soft and gooey, kind of how the dough gets on an apple dumpling, and the bottom part of the bottom crust stays crisp and buttery, so it’s not really a problem, if you ask me—I’m just telling you how it is so you know what to expect. However, the pie is best eaten as soon as it has cooled to room temperature, though I have eaten leftovers several days out and the pie still possessed the swoon factor.

    Important: make sure the crust is darkly golden brown on the bottom and the sides. I bake my pie on a preheated baking stone, first for the fifteen minutes of pre-baking and then for the full fifty minutes that it takes to bake this pie. If you have trouble with the edges getting too dark, put a piece of foil with a hole cut out of the middle (so the center part of the pie will continue to darken) atop the pie.

    Sometimes I turn the broiler on at the end of the baking time, just long enough to caramelize the tops of the peaches.

    I’ve peeled my peaches, but I really don’t think you need to. I made another pie that called for un-peeled peaches and I hardly even noticed they were there, and when I did notice, I really liked it. If you use nectarines, definitely do not peel them.

    One-half recipe butter crust (see recipe below), partially baked
    About 3-5 peaches, pitted, peeled (optional) and cut into thick wedges (four to six slices per peach)
    2/3 cup sugar
    2 tablespoons butter, cut in small chunks
    lightly sweetened whipped cream for garnish (optional)

    Sprinkle three tablespoons sugar over the bottom of the partially baked crust. Arrange the peach wedges in the crust, peel sides down. Pack them in tightly, but don’t overlap them too much. Sprinkle the remaining sugar over the peaches. Dot with butter. Bake the pie at 375 degrees for 40-50 minutes, till the crust is golden brown (if the edges darken too quickly, cover them with foil) and the juices are bubbling. If you want the peaches to be caramelized and slightly blackened, briefly broil the pie at the end of the baking time, watching very, very closely.

    Cool to room temperature before cutting and serve with the optional whipped cream.

    Rich Butter Pastry
    From Smitten Kitchen (to see Deb’s instructions, click here)

    I’ve started to make Deb’s crusts about two weeks ago, and since then, I’ve made the recipe three different times (that would be six pies). I like this recipe for three reasons: first, it’s delicious, second, the recipe is simple to make and can be made ahead of time and stored in the refrigerator and/or freezer at different points in the process, and third, the proportions are a cinch to memorize so now I always have a pastry recipe that I can make without even thinking twice. Go ahead and try it. I think you’ll like it.

    2 ½ cups flour
    1 tablespoon sugar
    1 teaspoon salt
    1 cup (two sticks) butter
    ice water, starting with 6 tablespoons

    Stir together the flour, salt, and sugar. Using your fingers, crumble in the butter. Do not mix it in all the way—you should still have pea-sized chunks of un-mixed butter when you are finished. Stir in one-half cup of ice water. At this point my dough comes together just fine, but if you need a little more water, go ahead and add it, a teaspoon at a time. Do not over mix.

    Divide the dough in two parts, form each part into a disk, and wrap each disk in plastic wrap. Chill the disks in the refrigerator (or bag them up tightly and freeze them).

    When you are ready to shape your pie crust, allow the disk to sit at room temperature for about five minutes to soften just a little. Unwrap the dough, place another piece of plastic wrap on top, and roll out the dough. Put the rolled dough in the pie plate, fold over the edges and crimp. (If the dough gets too soft to crimp—mine always does—allow it to stiffen up in the freezer for five minutes before continuing.) Pierce the bottom and sides of the pastry with a fork, about thirty jabs.

    Place the crimped crust in the freezer till it is rock solid—about thirty minutes—before baking. When you are ready to bake it, press a piece of tin foil down into the pie plate, pressing down hard all over the pie and all the way up the edges. (You may put some dried beans or pie weights in the pie, but I have neither right now, so I skip that part.)

    Bake the pie at 400 degrees for ten minutes. Remove the pie from the oven. Carefully peel off the foil. Using the back of a spoon, press down any bubbles in the crust. Return the pie to the oven (reserve the foil for the next time you bake a pie pastry) and bake for another five minutes for a partially baked crust. If you want a fully baked crust, bake it longer, probably another 15 minutes or so (I haven’t done this, so I don’t know how long it would take).

    One Year Ago: Thoughts on breastfeeding a large toddler/little boy. He’s weaned now, in case you wondered, not that I have anything against nursing three (or four, or five?) year-old kiddies.

  • Sunday sauce

    I don’t know what we’re going to do. Both our freezers—the upright and the chest—are packed to the gills. It is pure chaos in there, too, a veritable arctic jungle of different colored frozen blocks of vegetables and fruit. I cleaned the freezers out a couple months ago but since then we’ve added chickens, green beans, broccoli, corn, zucchini, chard, spinach, pesto, and pesto torte, and not in any particular order either. By the time I’m done putting up food, I usually can’t stand to be around it for one second longer so I just toss it into the freezer and slam the door. As a result, everything is tossed together and I have no idea what is underneath the top layer.

    I’m not sure why the freezers are so full this year because we didn’t even freeze any applesauce or peaches, and at present there is no bread in the freezer (not counting one pack of hotdog buns and a couple mini loaves of zucchini bread). In fact, we’ve been flat out of bread and have been buying the chemical-laced-bags-of-puffed-air version (that Miss Becca Boo refuses to eat—I love that girl!), so I’ve started baking again, but then I ran into the freezer problem (I knew this would happen, but I proceeded as though I had all the freezer space in the world) so now the bread is sitting on the kitchen counter, all tidily bagged up, waiting for the other frozen foods to get either pulled and eaten, or else to magically disintegrate.

    My refrigerator isn’t much better off. I have big tubs of tomatoes in there, zucchinis (still!), cucumbers (still!), and jars of refrigerator pickles. I wasn’t going to do any canning today, but then Mr. Handsome bought a gallon of milk on his way back from town (we all skipped church but he drove into town to go hang out at Dunkin’ Donuts where other guys from our church gather for a “Sunday school class” for men who don’t do Sunday school—the class was started by our previous pastor’s husband) and we had to make room for that, so I sighed deeply, marshaled my forces, and started in on a batch of Tomato and Red Wine Sauce.


    I still feel like I’m having a day of rest, though. (When I think back to last Sunday when we skipped church—two times in a row now, heaven help us!—and did twenty-something dozen ears of corn, and that after doing corn on Thursday, peaches on Friday, applesauce on Saturday, and then finishing off the pickled beets on Sunday morning before dealing with the corn—when I think of all that then I feel almost lazy…almost, but not quite.) While Mr. Handsome ran off to town, I lounged on the sofa and read library books to the kids. Then we watched an hour-long video about Nepal (they showed one of those monks lifting weights with his obviously-otherwise-useless male member, and my kids were so impressed that I felt obligated to give my boys a little never-ever-ever-try-that-yourself speech), and then I read some of our chapter book to the older kids. When Mr. Handsome showed up at eleven with a box of donuts, we indulged in a donut sampling party, and then didn’t eat lunch till after one o’clock. Naps came next, and then Mr. Handsome joined me in the kitchen to help with the garlic and onion chopping. Now it’s almost seven and time for our family night movie—tonight, Heidi—during which I’ll have to get up numerous times to stir the sauce and then to finally can it. I hope to get everything done by nine o’clock so that I can go to bed early and wake up refreshed, ready to go pick more tomatoes.


    Tomato and Red Wine Sauce

    For a canned tomato sauce, this chunky sauce tastes amazingly fresh and light. I have made numerous different tomato sauces, but this is my favorite.

    I use Roma tomatoes but any paste tomato will do.

    If you don’t have fresh herbs, substitute dry (about a half cup, maybe), though without the flecks of green, the finished product won’t be quite as pretty.

    Oil isn’t typically used in water-bath canning because it neutralizes the acids, thus the reason for the extra lemon juice. However, if you prefer, you can use citric acid in place of the lemon juice (that’s what I did this time), one-half teaspoon citric acid per quart of sauce.

    8 quarts peeled and chopped Roma tomatoes
    10 cups chopped onions
    2 heads of garlic, cloves peeled and minced
    1 cup olive oil
    1 bottle red wine
    3 cups of chopped, fresh herbs such as basil, oregano, thyme, and rosemary
    2-3 tablespoons salt
    1 tablespoon black pepper
    3/4 cup lemon juice

    In your largest soup pot, saute the onions and garlic in the olive oil. When the onions are translucent but not browned (about 15-20 minutes), add the chopped tomatoes and the bottle of wine. Simmer the sauce on medium-low heat, stirring every ten minutes, for about four hours, or until the sauce reaches the desired consistency. Add the fresh (or dried) herbs, the salt and pepper, and the lemon juice and cook for another ten minutes. Ladle the sauce into jars. Obsessively wipe the rim of the jars to remove all traces of oil. Process the jars in a hot water bath—fifteen minutes at a gentle boil.

    Yield: About six to eight quarts of sauce, depending on how long you cooked it down.


    About One Year Ago: Vegetable Beef Soup, Mustard Eggs, and Russian Pancakes.

  • It’s time

    Tomatoes are in season, and so is basil. You know what that means, don’t you? That means it’s time to make cheese. What? Not what you were thinking? Well, shoot. You better think again.


    I realize that also in season are corn and beets and green beans and peaches and nectarines and apples and chard and raspberries, but let’s forget about those for the time being, okay? When tomatoes and basil are flourishing, no matter what else is flooding your kitchen and no matter how many hours you’ve been standing over a hot stove, the steam making your hair poof out to China and your feet so sore that you feel like your heels have become imbedded in your knee caps, you simply have to make cheese. It’s one of those laws, just like “an object in motion tends to stay in motion,” “for every action there’s an equal and opposite reaction,” “company and fish are alike—after three days they start to stink,” and “when it rains it pours.” When you have tomatoes and basil you must make cheese. It’s a law. Do I make myself clear?


    It’s really no big deal. I say that—“It’s really no big deal”—all the time and it makes Mr. Handsome cringe. For example, take this real-life incident: we’re supposed to be getting ready to turn four bushels of apples into applesauce and he comes out to the kitchen and finds me washing a pile of beets and he says, “Wha—?” and I say, “The beets needed to be done, so I thought now would be a fine time—it’s really not a big deal.” And then he hits the roof and jumps about and rants and raves while I go about finishing what I started and then we get on with the sauce, my “no big deal” project only setting us back about thirty minutes.

    And that’s all that you’ll get set back when you make this cheese—a half an hour to make the cheese and about five more minutes to wash up all the kettles.

    What are you waiting for? (If you don’t look out the window at your garden, it’s not there. That’s another one of those laws, you know.)


    (Back to that true-life example, I cooked the beets, but didn’t get around to pickling and canning them till the next day because if I had done that and 102 quarts of applesauce in one day, it might have become a big deal, and I certainly didn’t want to run the risk of not staying true to my word.)

    Fresh Mozzarella
    I first learned to make this cheese from Barbara Kingsolver’s must-read Animal, Vegetable, Miracle, but another good cheese making book that I have referred to with much frequency is Home Cheese Making by Ricki Carroll.

    You can make this cheese from any kind of milk—skim, 2%, or whole (do not use ultra-pasteurized)—but I recommend starting out with whole milk as it makes a creamier, tastier cheese.

    Also, you need a thermometer for this recipe, but once you make it several times you can abandon all scientific paraphernalia and go by feel.

    Note: If you live in the area, I would be glad to sell you some of my rennet. Last spring when I was on a big cheesemaking kick I ordered an entire pint of the stuff from The New England Cheesemaking Supply Company. I don’t know what I was thinking.


    1 gallon milk, preferably whole
    1/4 teaspoon liquid rennet
    1 ½ teaspoons citric acid
    1 ½ teaspoons cheese salt, or another non-iodine flaky salt

    Pour the gallon of milk in a large, thick-bottomed kettle, attach the thermometer to the side of the kettle, and heat the milk on medium-high heat.


    While the milk is heating, dissolve the citric acid in 1/4 cup cool water. In another small bowl, dilute the rennet in another 1/4 cup of cool water. Set both bowls aside, taking care to remember which is which.

    When the milk reaches 55 degrees, slowly stir in the dissolved citric acid, then leave the milk alone till it reaches 88 degrees (the milk should be curdling) at which point you can slowly stir in the diluted rennet. Put the stirring spoon down and watch the kettle closely. Within a couple minutes you will see the milk solidify—the curd pull away from the edges of the pot and a yellowish whey will form, surrounding the curd. It is like magic; gently touch the top of the silky smooth curd and give a little whoop of joy.

    See the curd ringed by the whey?

    When the temperature reaches 100 degrees (I move the thermometer around, alternating between inserting it in the center of the curd and then in the surrounding whey, since the kettle’s contents don’t all heat up at the same rate), take the kettle off the heat. Allow the curds and whey to sit undisturbed for another ten minutes.

    Now comes the fun (and messy) part: getting all the whey out of the curd. Ladle the soft, jiggly curd into a large glass (microwave-safe) bowl.


    Once you have all the curd in the bowl,

    The bowl of wet curds and the kettle of whey

    carefully tilt the bowl, using one hand to gently press on the curd while the whey trickles away (hey-hey).


    Put the bowl of curd in the microwave and heat it on high for one minute. Using your hands (or a spoon, if your hands are sensitive to heat), press on the curd to release more whey. Repeat the heating, pressing, pouring-off process one more time.

    Note my red hand, and yes, I scald it every time I make cheese. It makes the cheese taste better.
    Just kidding (about the tasting-better part—the scalding part is absolute fact).

    Is there still more whey? Then heat up the curd again, this time for only 30 seconds.


    Once all the whey has been extracted, add the salt and begin to knead the cheese until it is smooth and shiny and elastic.


    If it gets too hard, reheat it for 20 seconds at a time. Stretch the cheese into a rope to see if it has reached the proper stretch-ability-factor—once it can form a rope (one to two feet long) without breaking, the cheese is done.


    Form the cheese into a ball and set it on a plate. Now you can slice it and eat it, cook with it, or wrap it in plastic wrap and store it in the refrigerator.

    Yield: A ball of gorgeous mozzarella, weighing in at a little less than one pound.


    About One Year Ago: Dehydrating Food.