• cuajada

    Whenever I’ve gone through a cheesemaking phase, I always think longingly of cuajada, the salty, fresh cheese made from raw, unheated milk that we learned to love when we lived in Nicaragua (back at the end of the last century).

    Don Kilo andDoña Paula, circa 2013 when we visited.

    Doña Paula, our neighbor, had a cow and made the best cuajada. The process was equal parts fascinating and horrifying. The container of rennet hung from a hook on the adobe wall — a piece of calf stomach soaking in some whey (or milk or whatever) — or sometimes she used a cuajo pill from the little venta down the road. (Cuajar means “to set” or “to coagulate;” cuajada means “curd.”) Expats often called the cheese “amoeba cheese” because, well … let’s just say that our internal workings sometimes struggled a bit.

    Elias and my older daughter.

    Many times, I sat on a wooden stool in her kitchen watching asDoña Paula scooped out some rennet and stirred it into a big bowl of milk. Then she’d let it rest on the counter while she lumbered about, patting out tortillas or prepping a twiggy bouquet of chicken feet for a stew. 

    When the milk had sufficiently solidified, she’d shoo away the flies that had gathered about the bowl and, gently and slowly, oh so slowly, press the curds with her hands, coaxing out the whey. The solids she’d place on the molino — a stone, similar to this one (though I know for sure it didn’t cost 189 dollars!), for grinding corn into masa — and begin mashing and pressing on the curds until all the whey had been pushed out: a bit of the whey went back into the container on the wall to replenish the rennet, if I remember correctly, and the rest she’d divide between the chickens and dogs. Once she’d kneaded the cheese into a smooth mass, she mixed in an ungodly amount of salt, form the cheese into large, palm-sized ovals, and press her thumb into the very top to leave her mark. 

    In our community, the cuajada was stored at room temperature in a plastic container and mostly served alongside a plate of boiled red beans. Simple food, yes, but there’s nothing quite like a freshly toasted corn tortilla, smokey from the cooking fire, with a thick slice of cuajada on top. I’d palm the plate-sized tortilla in my left hand and, with my right, tear off bits of warm tortilla to scoop up bits of the creamy, almost unbearably salty, cheese. Add a sugary cup of black coffee and that, my friends, is what Nicaragua tastes like. 

    So anyway. Back to my kitchen.

    My double-boiler method for heating milk, though I often just heat it directly over the flame, too.

    I’ve always wanted to learn to make cuajada but I couldn’t, for the life of me, find a recipe. Considering the lack of refrigeration, running water, sanitation, money, and materialDoña Paula was working with (or not), I figured it shouldn’t be that complicated, so I started messing around: Rennet. Room temp milk. Mashed curd. Salt. 

    Checking for a clean break, which shows that the milk has set.

    It kinda worked, but not really. The cheese didn’t have the right texture, the same depth of flavor. And then I found the blog of a woman living in Nicaragua and she, bless her heart, did a post about learning to make cuajada. Her instructions said to break up the curd with my fingers (did Doña Paula do that? I don’t remember) and then add water and let it sit.

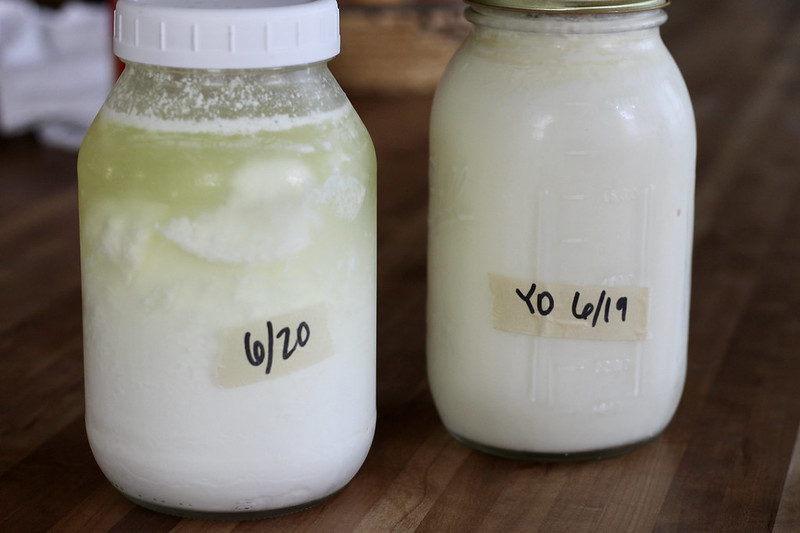
    l-r: yogurt cheese, cuajada, gloves from making mozzarella

    I’m still not a hundred percent solid on my methods — I know they didn’t hang the curd, and maybe I really shouldn’t heat the milk? and Wah! I missDoña Paula! — but it’s getting close. Each time, I improve a little. I’ve changed things, like slightly heating the milk to get it to set, and, in lieu of a molino, I use a food processor to mash the curd.

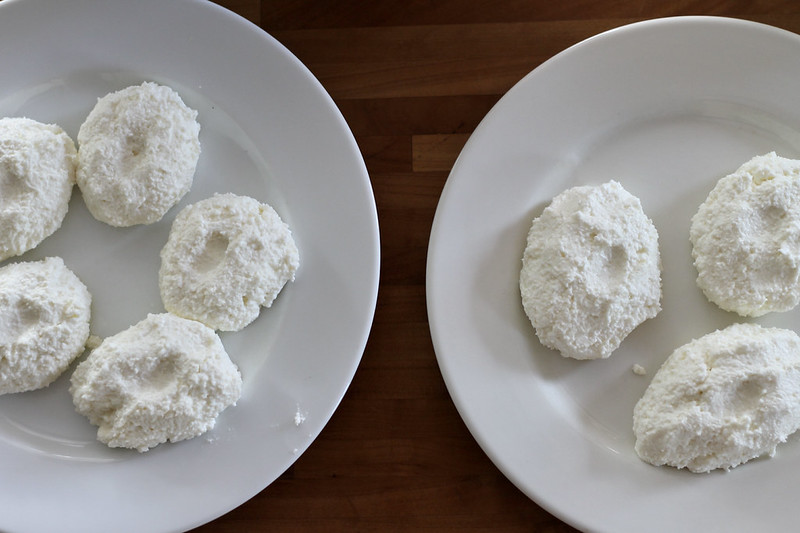
    Baby cuajadas: normally I shape them bigger, about the size of oval softballs.

    For now I’m confident enough in the recipe to share it here, though I’ll probably pop back in to to tweak and adjust, so stay tuned!

    Cuajada
    Adapted from the method that Emily shared on her blog Camoapa Oneota, and for more cuajada-making inspiration, see also this post by Suze Cohan.

    When I leave the milk at room temperature, as per the traditional method, it doesn’t set. Heating it just a little seems to give it the necessary kick in the pants. Also, my use of the food processor is not authentic (obviously), but it’s what gets the most authentic final product.  

    UPDATED: the recipe on my YouTube channel is much improved over this one…

    1 gallon milk
    ¼ teaspoon rennet in ¼ cup cool water
    3 cups cool water
    salt, non-iodized

    Heat the milk to about 90 degrees. Remove from heat and gently stir in the rennet. Let sit, undisturbed for 45 minutes, at which point the milk should be set. To test, stick your finger or a knife into the curd at an angle and lift up; the curd above your finger should split cleanly apart. If it’s still mushy soft, let it sit another 15 minutes or so. 

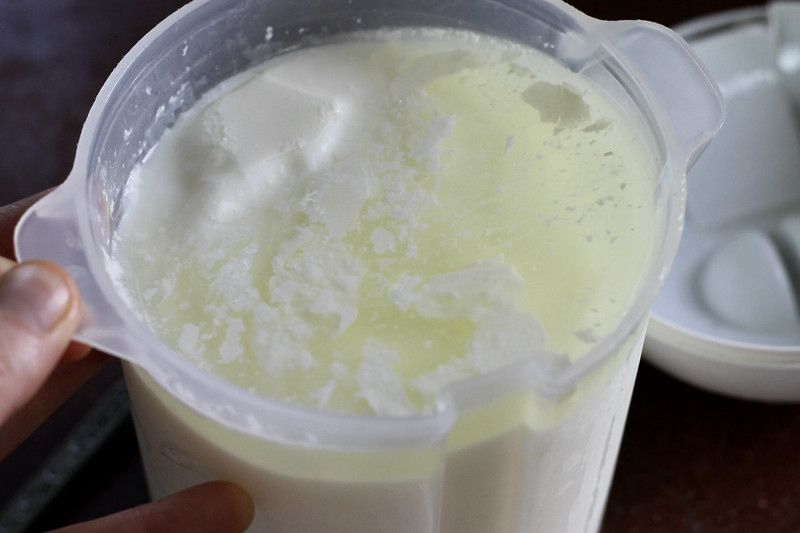
    Using your hands, gently stir the curd to break it into pieces. Add three cups of cool water, stir, and then let the curds sit, undisturbed, for 10 minutes, during which time the curds will sink below the surface of the whey.

    Pour the curds and whey into a cheesecloth lined colander. Discard the whey. Hang the cheese cloth for 30 minutes or so, or if you’re impatient, you can twist and squeeze the bag to remove the whey. Or squeeze the curds gently with your hands. Whatever! Just get the whey out.

    Dump the curds into a food processor and pulse until creamy. Or, if you have a molino, knead and mash them by hand. Add salt to taste, making it saltier than you think it should be. The salt will dissipate a bit, but remember: this cheese is meant to go with bland food so it’s supposed to pack a punch.

    Form the cheese into plump ovals, pressing your thumb into the top to leave your mark. Place the cheese, uncovered, on a plate in the fridge. More whey may come out, or not… After a few hours, wrap the cheese in plastic and store in a plastic container in the fridge where it should last for about two weeks. 

    To serve: place thick slices of cheese atop boiled red beans, bowls of chili, steaming corn tortillas, scrambled eggs, etc. 

    This same time, years previous: the quotidian (8.3.20), in the kitchen, the quotidian (8.6.18), glazed lemon zucchini cake, cheesy herb pizza, horses, hair, and everything else under the sun, the quotidian (8.6.12), why I am recuperating, dishes at midnight.

  • fun times

    I’m finding it hard to focus these days.

    The cold weather — such a glorious reprieve — makes me itchy in my skin. I want to do EVERYTHING. At the SAME TIME. Right NOW.

    But then I end up doing just one small thing, like watering the plants or hosting a writing group, and then I collapse on the couch, tired and out-of-sorts because I can’t decide whether or not to make the peach pie filling for the bakery pies or make another batch of cottage cheese or bake a cake. So I do none of that and instead scroll facebook and check Instagram (on my computer only) and then get pissy at myself for being so undisciplined and pathetic. 

    Pull yourself together, I say to myself, though not in those words, exactly. My get-with-it pep talk is more like a long, drawn-out internal moan: angsty and self-pitying and supremely uninspired.

    Sorry. This is boring.

    About Instagram: I hate it. I’ve recently been introduced to some fabulous cheesemaking instagrammers but I keep getting mad because the platform is so dang impossible to navigate. There’s no way to quick find the recipe/information I want, and then, once I do, there’s no time to dwell on it because the damn slides zip by faster than I can read them and I have to keep pausing and unpausing. And if there’s sound to contend with? Oh good lord!

    To make things worse, IF YOU CAN IMAGINE, everything is video which takes a crazy amount of time to work through, and don’t even get me started on the disappearing stories which only heightens the gotta-click-on-this-before-it’s-gone addiction factor. (Unless the person saves them but I can’t know that at the time if they’ll be saved, gr.) And then there’s the whole “subscribe to be an insider” thing, and I know people gotta make a living but I HATE specials and deals and sign-up-here-now-or-else stuff. Just give me the information or stop talking, please.

    At first I thought me struggling with the Insta was just a result of me being too inflexible and uncool to catch on to the media platform’s wiley ways but then I asked my older son to please enlighten me and he was like, “You’re not doing anything wrong. Instagram sucks.” HA.

    So why do I persist if I hate it so much? Because, in spite of myself, it’s kinda fun (wiley social media sorcerers, indeed!), but mostly because there’s some good stuff out there that’s helping me up my cheesemaking game AND because it’s how certain people/businesses I know and care about communicate and, well, here I am.

    On the couch.

    Fussing.

    But hey! I bought a new cheesemaking book the other day. It holds really still and doesn’t make noise and the pages only turn when I make them.

    I like it.

    P.S. My older son and his friend went to a medieval-themed party. They asked me to take photos. We had fun.

    This same time, years previous: a fantastic week, fried, knife in the eye, the end, gingerbread, damn good blackberry pie, dimply plum cake.

  • yogurt: the water bath method

    Let’s talk yogurt!

    berry preserves, leftover from the diner

    I have been testing, and retesting, my methods, trying and trying and trying to nail down a yogurt making process that a) sets up decently firm even though my milk doesn’t have much cream, b) does not taste too sour, and c) doesn’t leach out whey. 

    This last one was surprisingly tricky. I’d been making my yogurt in the dehydrator, using an ambient thermometer to keep tabs on the temp, and after just 3-4 hours at 110 degrees, as per the instructions (though they said it should take 6-8 hours), my yogurt had set up firm, but with several inches of whey on top. I’d pour off the whey and, while the yogurt tasted fine, having only a partial jar just didn’t seem right. Plus, it looked gross.

    I had the same problem with the yogurt maker.

    So I tried things, like incubating at slightly lower temps, or experimenting with boiling my milk to evaporate off some of the water — maybe less water would equal less whey? — but nope. I still got the same separation. 

    And then sometimes I wouldn’t.

    I never knew how it would turn out, and the inconsistency was making me mad. 

    Oh, also: a friend recommended not stirring the yogurt culture into the milk — just put the starter in the bottom of the jar and then pour in the milk — so I tried that. But my yogurt didn’t set up as well that way: the yogurt in the bottom of the jar was always substantially thicker than the yogurt at the top. (I think this no-whisk method was supposed to eliminate the stringiness that supposedly comes with whisking in the starter, but I’m not sure. So far, I think I’ve been spared the stringy problem, but maybe that’ll come later?)

    So then I started to wonder if the incubation temp was simply too high and too fast. Maybe a lower temp and more relaxed incubation time would yield a more consistent product? Many of my friends make their yogurt by wrapping it in an insulated sleeping bag, or sticking it in the oven with the pilot light on, or putting it in a crockpot or cooler filled with warm water. And lots of them let their yogurt incubate over night. The way I was doing my yogurt, if I let it go overnight, the final product would’ve been pucker-tart.

    Having heard about my quandary, one of my friends sent me a photo of her yogurt. Set solid — in the photo she was holding the jar upside down (just to taunt me, I’m sure) — and with an enviably gorgeous cap of cream, it was just the type of yogurt I was lusting after. She told me her methods — heat to 160-180 degrees, cool to 115, stir in some culture, pour into jars, and then incubate in a cooler with 95 degree water. 

    95 degree water? Hmm…

    So I tried it. I followed her method to a T, thermometers and all.

    After about 7 hours: yogurt without whey!

    Granted, my yogurt didn’t have a cap of cream, and if I’d held it upside down, the yogurt wouldn’ve glugged right out (dang Holstein) (sorry, Daisy — we love you), but it was definitely set all the way through and it tasted deliciously sweet to boot. Woot!

    And THEN, I started experimenting. One of my friends had told me that when her kids were little they weren’t crazy about yogurt so she added a tablespoon of sugar and some vanilla to each quart and they gobbled it right up. And then I wondered about using honey instead of sugar….

    Now, after lots of tests and quite of few gallons of yogurt, I’m consistently making (sometimes, upon request, for local friends) three different kinds of yogurt: plain, honey, and vanilla. The plain is, well, plain. The honey has about a tablespoon of honey per quart — the honey’s floral notes shine through, making me think yogurt might be an excellent way to showcase different varieties of honey — and the vanilla has a little sugar and a bunch of vanilla.

    Last time my writing group met at my house, I served them honey and/or plain yogurt and granola. One of the guys who claims he doesn’t like yogurt — not store-bought, not flavored, not homemade, not in a box, not with a fox — had three (four?) servings of the honey yogurt and then put in an order for a quart next time we meet.

    I understand his enthusiasm. I am not a big yogurt (pudding, jello, custard) person either, but I can not — I repeat, can NOT — get enough of this yogurt. I eat it for breakfast, snacks, dessert, and before bed. The other day when I went writing, I packed some for a late breakfast and, partway through the morning, I slipped out to the car to get my yogurt fix. 

    I love looking in my fridge and seeing all the cute little jars filled with yogurt. But they kind of bug me, too, because I want to eat them all, right now, but I can’t. Or shouldn’t, at least. 

    If we don’t eat through the yogurt fast enough to suit me, I make smoothies for dessert/snack/breakfast: a pint or two of yogurt, fruit, preserves, frozen bananas, coconut cream for sweet, if we need it. Like so, we can eat through boatloads of yogurt and fast

    Still, my favorite way to eat it is with granola.

    This granola, to be exact, and the vanilla yogurt. Berries, too, if I have them. 

    PS. Last night, I was telling our dinner guests about my yogurt making ventures and, lo and behold, one of them, turns out, despises yogurt of any sort. It makes her gag, she says. Something about the acid taste. The thickness, too, maybe. She has to spit it out. So I asked her if she’d like to try mine? Why, yes, she said bravely, she would. And she liked it! It’s not acidic at all, she said, and it’s so gentle and light, almost like cream. Which is funny because there is almost no cream in our milk.

    Yogurt: The Water Bath Method
    Adapted from my friend Kris’s instructions.

    Milk
    Roughly 1-2 tablespoons of plain yogurt per quart of milk

    Heat milk to 180 degrees, stirring occasionally. Remove from heat and cool to 115 degrees: to make this go faster, I pour the milk into a bowl and then set the bowl in a tray that I’ve filled with ice and water, changing out and refreshing the water as needed, and giving the milk a stir every 5 minutes or so.

    While the milk is cooling, fill a cooler half full of 95 degree water. The water should come at least three-fourths of the way up the jars and/or, making sure the lids are screwed on tightly, cover them completely. 

    Place the starter culture — the plain yogurt — in a small bowl. If scaling up the quantities, slightly reduce the amount of starter. Label the jars with tape on which you’ve scrawled the date and/or type of yogurt. (Why, yes, I do work in a restaurant!)

    Once the milk has cooled to 115 degrees, whisk about a cup of milk into the starter to thin it and then add it back into the big bowl of warm milk. Give it a good whisk. Pour into the jars, cap tightly, and place in the cooler of tepid water, along with the thermometer. Check the temp every 3 hours or so, adding more hot water as needed. The yogurt should be set in 6-9 hours — to check, unscrew one of the jars and dip in a spoon. If it’s firm — scoopable/semi-sliceable — it’s done. 

    Transfer the jars to the fridge and chill thoroughly before serving. Don’t forget to reserve some plain yogurt to start your next batch.

    Variations
    Honey Yogurt: prior to adding the starter, whisk 1 tablespoon of honey (per quart of milk) into the milk.
    Vanilla Yogurt: prior to adding the starter, whisk 1 tablespoon of white sugar and 2 teaspoons of vanilla (per quart of milk) into the milk.  

    This same time, years previous: hill of the martyrs, in the kitchen, injera and beef wat, a trusty skirt, the quotidian (7.28.14), rest and play, the boy and the bike ride, a quick pop-in.