I don’t know if you’ve heard (ha), but I’ve been having quite the little fling with cheesemaking. It’s been about a year now, and Daisy keeps squirting out the milk (a whole extra gallon this morning: the fresh spring grass, maybe?) and the cheeses keep rolling out of the press and my stockpile keeps growing and growing and growing.

The part of cheesemaking that has been the most confounding since the very beginning has been the aging — where to age them, and how. Up until now, I’ve been keeping most of them in the little wine fridge that my daughter-in-law’s father loaned me. We’ve kept the room cold enough all winter that I can store overflow cheeses on top of the wine fridge, or on the folding table that my husband set up for me. (I keep a thermometer in there and “regulate” the temp by opening and closing the door and windows, depending on what it needs.) Cut cheeses that have had sufficient aging, or that I wasn’t thrilled with, got shuttled out to the barn fridge — the regular fridge temps retarded the aging more than I wanted, but oh well.
And still the cheeses kept rolling in and piling up.

All throughout this process, my husband and I discussed options. We tried setting the barn fridge to high temps but it was still too cold. We tested a little college fridge — same problem. Friends offered their (perfect) root cellars/basements, but I’m still too new at cheesemaking to outsource part of the process. We talked about digging a root cellar, but the effort seems excessive (perhaps). I suggested we wall off part of our basement with insulation and a vent, but the basement’s too small. We both checked Craigslist and secondhand sites for wine fridges (expensive, and often far away), and I alerted some friends to keep their eyes open.

And then, when the cheeses had piled so high they threatened to bury us alive and my husband realized that I truly had no intention of stopping, he researched temperature regulator thingies, ordered one (pricey at a hundred dollars, but cheaper than wine fridges), installed it in the empty upright freezer that was hanging out in the basement, and then named it The Cheezer (a freezer for cheese, get it?).
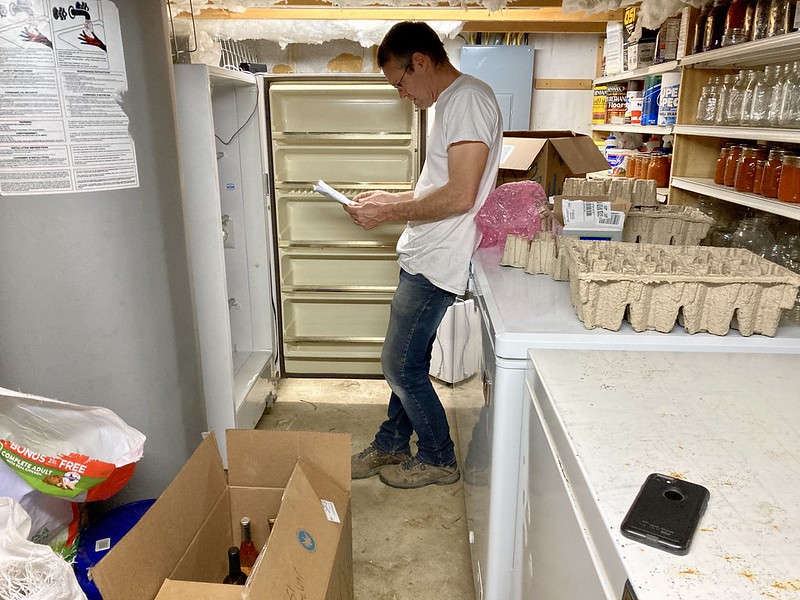
He added more shelves and put in a thermometer that we can check from a monitor upstairs. With another thermometer, I tested the temps at different places inside the freezer.


For a couple days, we watched the thermometer obsessively. Would it regulate properly? It seemed to hold steady right around 53-54 degrees, once in a while plunging to 52 or spiking at 55. Satisfied that it worked, I decided to take the plunge, and yesterday I stocked my new cheezer.
I put the (corked) wines on the top two shelves — the screw-top ones we’re storing upright on the canning shelves.

And then I hauled trays (the first couple photos) and baskets and boxes of cheeses from the barn and the wine fridge and the cool room…


….and stocked the shelves, sorting the cheeses by type.

Top top: Cheddars (including Derbys and Lancashires) and Goudas
Top middle: Colbys, Swisses, Alpines, and Butterkäses
Bottom middle: Havarti, Cotswolds, and longer aging cheeses, like Parmesans, Gruyeres, Asiago, Sao Jorge, and Manchego
Bottom bottom: Caerphilly and Jack
In the door, I put the bum cuts of cheese that are to be used in cooking, and then dedicated the rest to Belper Knolles and ready-to-use wedges.

Now the wine fridge is mostly empty. I’ll fill it with the newer cheeses that need to be flipped every couple days, and maybe, now that I have room, I’ll try to age a cheese without vac-packing it, or play around with white and/or blue mold cheeses.

We’ll see.
And now if you’ll excuse me, I must be off. I have a bunch of milk that’s waiting to be turned into an Asiago…

P.S. I woke up in the middle of the night and thought, What if the thermostat short circuits and the freezer starts freezing??? It’d only take a couple hours for a total loss. I hauled myself out of bed and went downstairs to check the thermostat in the kitchen (it was fine), but then back in bed my mind kept spiraling. This morning the cheezer was absolutely perfect — it’s working magnificently — but I can’t shake the worry. All that cheese…. So, today’s job: researching and ordering an alarm that connects to our phones and that we can program to go off if the temp dips to 45 or so.
This same time, years previous: beef tamales, the quotidian (3.23.20), almond cardamom tea cake, the solo, what did you eat for lunch?, the tables are turning, the quotidian(3.23.15), an accidental expert, the walk home, oatmeal toffee bars.