A couple weeks ago the kids were discussing all the different cakes I’ve made, and my younger daughter said to me, “You’ve never made me a fancy cake.”*
“That’s because you never let her!” everyone shouted. (Which was true. She’s always had restrictions, like no buttercream, not this flavor or that texture, and no fondant, and my rules were that if I was going to do a fancy cake, then I had to have full creative license.)
“Okay,” she said, finally relenting. “This year you can make whatever kind of cake you want. Surprise me.”
Considering her love of chickens, it was pretty simple to figure out what kind of cake I’d make.

September 2022
But finding a cake to model after was a whole other matter. After a bit of digging, I found a five-minute clip of a youtube video — no instructions — that was most similar to what I had in mind, but it wasn’t much to go on. There was so much I didn’t know, like how much cake did I need to make? How much fondant? What kind of cutters? Paint colors? What size dowel rods? What about wire?
Over the course of several days, I made three different batches of cake (four, actually, because the first cake I made was too tender and I realized I needed a firmer, more dense cake that would hold up to carving) and a batch of vanilla fondant.
And then our fridge went out — cue 24 hours of chaos in which I didn’t know if I’d even be able to make the cake since I needed a large chunk of fridge space in which to store it. But then my husband ordered a new circuit board and got the fridge running by Sunday afternoon, whew. That night my husband helped me think through the construction and sketch out the various cuts (because geometry tangles my brain).
And then it was Monday, aka The Day of the Cake. (The birthday dinner would be on Tuesday, and since I’d be working a full shift at the bakery that day, I just had one day in which to build the cake.) To say my stress levels were high would be an understatement. I spent the entire day in a focused, anxious tizz of sugary mayhem.

I thawed the cakes, cut the pieces, and then dry stacked them and did the preliminary carving. I made the vanilla whip and the Italian meringue buttercream. I deconstructed the cakes and reassembled the pieces, this time sandwiching the lemon curd and vanilla whip between the layers.

And then, realizing that the cake layers were pretty thick, I deconstructed the cake again, split the layers in half, spread them with lemon curd, and then rebuilt it.

At this point, my younger son still had no idea what I was building. A race car? he guessed. A squirrel?
Let’s see how long it takes you to figure it out, I said.

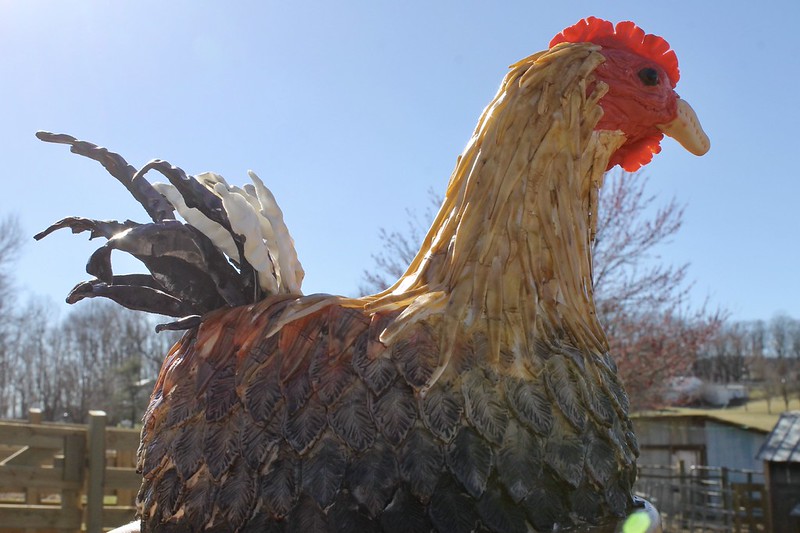
I dirty-iced it with the buttercream — Oh! A chicken! — and then I noticed that the butt and sides were too chunky, so I did some more carving and re-iced it.

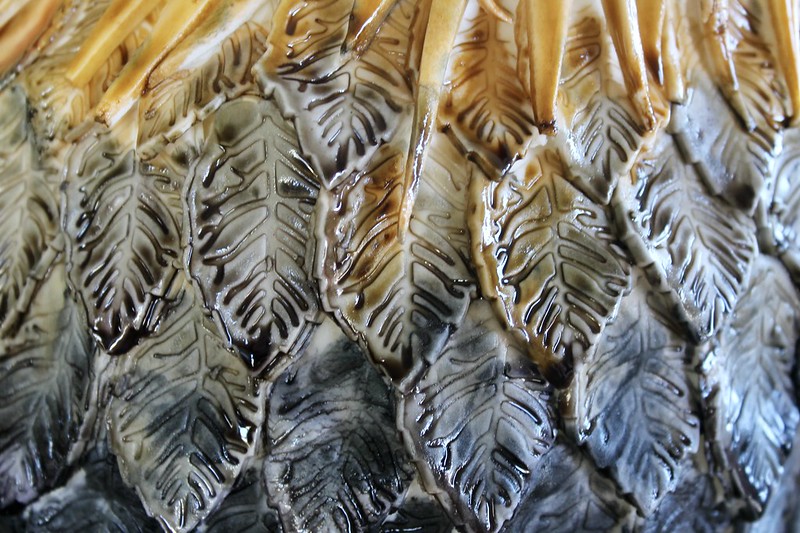
The cake properly iced, I popped it into the fridge and got to work on the fondant. I used leaf cutters for the lower feathers, flower petal molds for the middle feathers, and hand-cut skinny triangles for the neck feathers.

At this point I got so absorbed and overwhelmed and sticky and covered with food coloring that I didn’t take a single photo. There were bits of fondant, cutting tools, and little dishes of gel colors mixed with vodka and paintbrushes scattered everywhere. And then when I got out the piping gel I discovered that — oh crap — it was so ancient it had discolored and I had to make a batch from scratch. (pant, pant)
Once the chicken was feathered, I settled in to paint, mixing colors, darkening, adding textures. It was both forgiving and gratifying. I sipped the latte my younger son fixed for me and dabbed and brushed the afternoon away. It was the best part.

The tail feathers were a pain in the butt (ha). My son figured out how to adhere them to some wire, but we were running low on fondant and they were less than perfect. Plus, I stuck them in the rooster too far up on the back so it was far from anatomically correct, but oh well. This was a cake, not an actual bird.

And what kind of fowl was it, anyway? I’d been aiming for a rooster but the tail feathers were pretty piddly compared to the real thing, and the body and neck looked more like a chicken, so: it’s a “poultry” cake, I decided. Whatever.
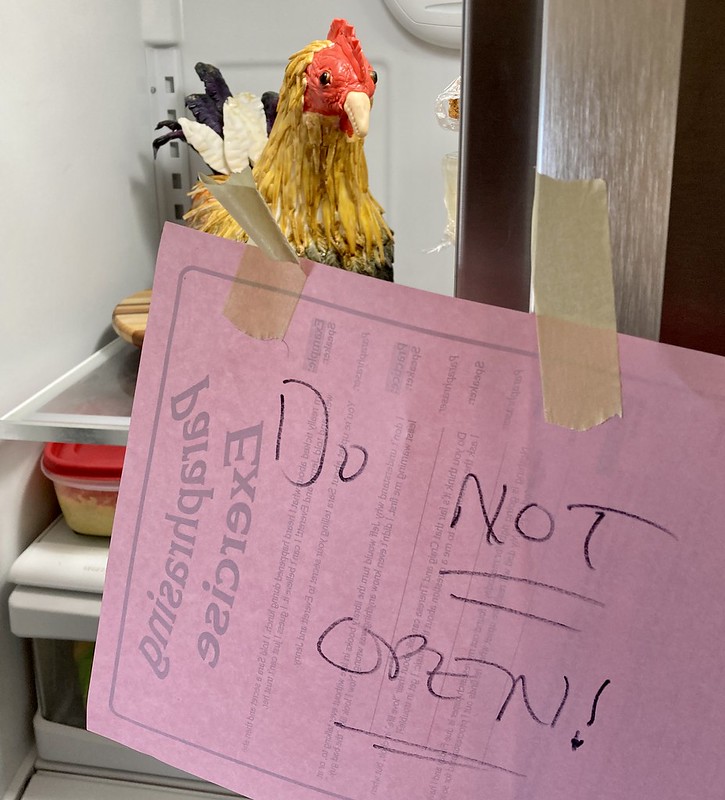
I stuck the cake in the fridge, taped a “do not open” sign to the door handles, scrubbed the kitchen floors, scarfed the pizza my husband picked up on his way home from work, and crawled into bed.
When I got home from work the next afternoon, my younger son and I took the chicken cake out to visit its brethren, and to briefly bask in the sunshine atop the fence post.


Fast forward to the birthday dinner. All the presents were chicken related (a chicken necklace, solar lights for the coop, a chicken book, a chicken hat, a chicken mug) so everyone had a pretty good idea what the cake was gonna be. As per our custom, my brother’s family came over for the big reveal and everyone had to shut their eyes while I got the cake out (and my mother clucked and baw-bawked).
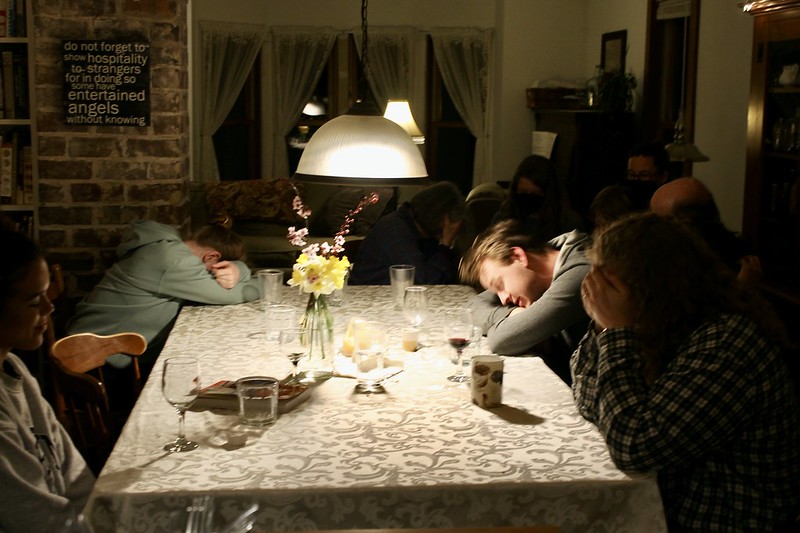
I made them sing Happy Birthday with their eyes closed — they could all open their eyes when we sang her name — and then, ta-da!

All their reactions, and my daughter’s delight, made the work totally worthwhile.
After we admired and discussed it for a bit, my daughter cut the cake. It actually didn’t look too bad inside, and it tasted better than I thought it would; the additional lemon curd had kinda absorbed into the cake making it taste all lemony, and because I was worried the cake would be dry and wanted to punch up the flavor profile, I served the cake with the leftover vanilla whip and a red raspberry sauce so tart it made my daughter-in-law gasp. Also tea and coffee.

And now there’s a remaining feather-spiked hunk of chicken butt (that looks rather like a pineapple) in the fridge, as well as a severed chicken head reclining on a plate, staring at me with its beady little eyes every time I open the door.

The end.
*Other fancy cakes: Game of Thrones Dragon Eggs, Snowboarder Mountain, Snake, The Wood Carver (my niece did much of this one)
This same time, years previous: red velvet cake, currently, Friday mishmash, the Chicoj coffee cooperative, leap year baby, potatoes and onions.