• What Willy Wonka’s chocolate river tastes like

    I can not keep it from you any longer: it is time I tell you what I did with those six egg yolks I had leftover after making the mint wedding cake.

    Really, I had no plan for them … at first. I plopped them in a little plastic container and slipped them onto the top shelf of the fridge. Later, when I opened the fridge later Somethingorother, I spied them, paused in my mad dash, focused my full attention on yolks and applied all my mental energy to the task of coming up with a use for those six golden orbs. I actually felt the heavy clanking wheels in my brain heave forward. ICE CREAM flitted across my mind, the wheels ground to a halt, I grabbed the Somethingorother, and moved on.

    In the intervening hours between when I decided on the ice cream and when I made the ice cream, I pulled my David Lebovitz ice cream book—it bristles with sticky notes—off the shelf and rifled its pages.


    I didn’t have to look for long; the very first sticky-noted page caught my eye.


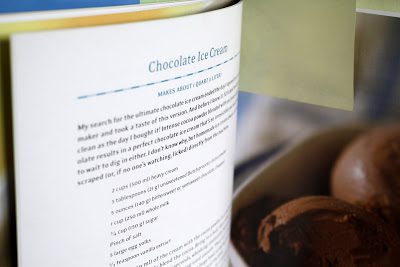
    I like chocolate ice cream well enough, but I’ve never made a chocolate ice cream that I was proud of. David’s chocolate ice cream looked fair enough. Perhaps a little more convoluted than some of the more straightforward recipes I’ve tried, what with both powdered and bar chocolate and a bunch of egg yolks, but a bit o’ convolution is good when you’re searching for a better than average recipe. (Now that I’m looking at the recipe again, I see that it calls for only five yolks. This confuses me. Did I unwittingly add six? Or did I do something with the other yolk that I can not, for the life of me, now remember? Hmmm, it’s a mystery.)

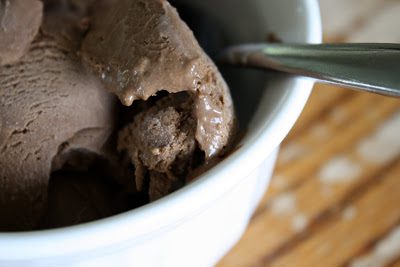
    Making this ice cream made for some crazy-fun times. The textures and tastes thrilled me to the tips of my toes. My heart raced, my adrenaline pumped, and I giggled and laughed, cackled and crowed. I even cornered my children and made them eat samples. (For once, they didn’t argue with me.)

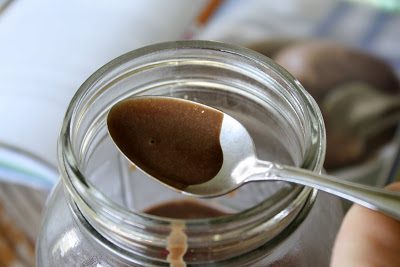
    After boiling the cream with the cocoa powder and pumping it full with chopped chocolate, I peered into the saucepan full of thick chocolate sauce and saw it for what it was: a heck of a lot of ganache. I think it was at this point that I started smiling. Clearly, I was heading down the right track.


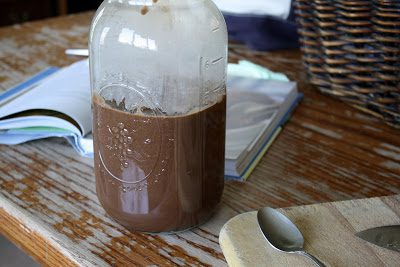
    The warm ice cream base was out-of-this-world good. Creamy and smooth, it slipped down my throat with alarming ease. Or I would’ve been alarmed if I hadn’t been in the midst of one of the most fabulous chocolate-induced stupors of my life. The ice cream base was exactly what I imagine the chocolate river in Willy Wonka’s factory to taste like. I had planned to kick up the chocolate factor with a generous handful of cacao nibs, but it was at this point that I decided that there was no way I was pebbling its sexy sleekness with anything nibbly.


    In fact, while I was standing there, methodically dipping and tasting, it occurred to me that this is what hot chocolate should taste like. Forget that milky, sugary drink that passes for hot chocolate—real hot chocolate should be made of cream, thickened with egg yolks, and served in shot glasses. Can I get an amen?

    Once chilled, the mixture set up into the consistency of a thin pudding. I forced myself to do a bunch of taste testings so I could be sure my “thin pudding” description was accurate. It was.


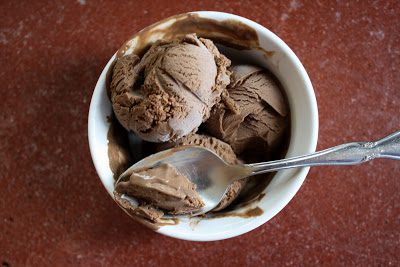
    And then I churned the ice cream. (Or, I should say, my super-duper Mother’s Day gift from last year, this splendiforous ice cream maker, churned my ice cream.) Straight from the machine, the ice cream was Class-A Soft Serve. (No pics, night had fallen thunk.) And after a sleep in the freezer it was Class-A Hand Dipped (set it out for 10 minutes to soften a little prior to scooping).

    Funny story: one night after my stand-at-the-counter-and-eat-straight-from-the-ice cream-container session, I put the ice cream away. Or so I thought. The next morning I found a container of chocolate pudding sitting all pretty-like on the top shelf of the fridge. I shrieked wildly, put it in the freezer, and several hours later it was ice cream again. Moral of the story: this ice cream has endurance.


    Chocolate Ice Cream
    Adapted from The Perfect Scoop by David Lebovitz

    2 cups heavy cream
    3 tablespoons unsweetened cocoa powder
    5 ounces semisweet chocolate, chopped
    1 cup milk
    3/4 cup sugar
    pinch of salt
    5 large egg yolks
    ½ teaspoon vanilla extract

    Put one cup of cream and the cocoa powder in a pan and bring it to a boil, whisking steadily. Remove from the heat and add the semisweet chocolate and stir till smooth. Stir in the remaining cream. Pour the mixture into a large bowl.

    Wash out the pan and measure in the milk, sugar, and salt. Heat it till warm but not boiling. In the meantime, but the egg yolks in another bowl. When the milk is hot, use it to temper the yolks. Pour the tempered yolks back into the pan and heat the mixture, stirring constantly, until it has thickened a little. Pour the custard through a strainer into the bowl of chocolate. Add the vanilla. Thoroughly chill the mixture (it will get quite thick) before churning.

    Yield: a generous quart

    This same time, years previous: baked spaghetti, chocolate mayonnaise cake, a dirt pile (lately, it’s been turned into a cave)

  • It just kind of happened

    I’m not the most gifted crafter of soup. I have a propensity for cooking half of the ingredients to mush, and almost always a bad case of brain fog overtakes whenever I try to imagine what spices might go with what vegetables might go with what meats. For these reasons, I stick to recipes when making soup.

    However, last week I defied all my norms and created a soup to be proud of, a soup to write home about, a soup to blog about—and here it is!


    I was sad when it was all gone. I think of it fondly. I need to make more.

    This soup kind of just happened into being. Earlier in the week when I was scanning my freezers as a first step in my weekly menu planning routine, I discovered a quart of frozen white beans. There were also a few more containers of Swiss chard, and I had a pound of ground pork stashed in the refrigerator freezer. I tapped my lower lip, thought hard, and proclaimed that a dinner of chili was in our near future.

    When I got down to work frying and chopping and stirring, I discovered a few more goodies that needed to be used up: a half quart jar of frozen multicolored sweet pepper strips, a half cup of white wine, and some celery. I debated whether or not the chili should be cream-based or tomato-based, but after a bit more lower lip tapping, I opted for the later and dumped in a pint of roasted tomato sauce and a quart of stewed tomatoes. (I also added the dregs of a jar of pizza sauce—good, but not a recipe requirement). The smells were intoxicating, the flavor was swoony.

    The soup was fortifying, bracing from the chili powder and rich from the roasted tomato sauce. In fact, I’m convinced that it’s the roasted tomato sauce that transformed this soup from good to great. I think this is the first soup I’ve added the sauce to, but it will certainly not be the last. From now on I’ll be dumping pints of the glorious goodness into as many soups and sauces as I can concoct. It’s powerful stuff. Do yourself a favor and can yourself a boatload of it this summer.

    A word about using frozen Swiss chard. When I put it up, I just wash the leaves, chop them up, and pop them in the freezer. The thawed leaves have a musty odor that we all find rather repulsive. However, I’ve found a way to fix the problem: dump the container of frozen leaves into a saucepan, add an inch of water, bring it to a boil and simmer for 5-10 minutes. Drain well, pressing on the leaves to get rid of all the juice, and then proceed with your recipe as normal. The flavor is delicious. (My mother reports that blanching her chard before freezing eliminates that moldy flavor. So with a little extra work, either pre- or post-freezing, you’ll be good to go.)


    Ground Pork and White Bean Chili

    You can substitute the white wine with chicken broth or water. And if you have no roasted tomato sauce, simply add some regular tomato sauce, or an extra pint of canned tomatoes.

    This is a convenience meal all the way, baby: it’s made in a crock pot, and the leftovers freeze well, too. Whee!

    1-2 tablespoons olive oil
    1 pound ground pork
    1 cup diced bell peppers (red, green, orange, yellow)
    2 ribs celery, diced
    1 onion, diced
    2 cloves garlic, minced
    ½ cup white wine
    2 teaspoons chili powder
    1 quart cooked small white beans
    1 quart chopped chard, cooked and drained
    1 quart stewed tomatoes
    1 pint roasted tomato sauce
    salt and black pepper, to taste

    Heat the olive oil in a heavy soup pot. Add the pork and cook till brown and sizzling. Transfer the pork to a crock pot.

    Add the peppers, celery, onion, and garlic to the fat that’s left in the pan and saute for 10 minutes. Add the white wine and simmer for another minute. Dump everything into the crock pot, making sure to scrape out all the flavorful drippings.

    Add the remaining ingredients to the crock pot and cook for 4-6 hours (cook it on high till it bubbles and then turn it down to cook on low for the rest of the time).

    Serve with cornbread or buttered toast.

  • The point is cake

    A few weeks back I got the sweetest email from a friend of yore, a girl that I went to summer camp with and then college. She was writing to tell me that she reads my blog and uses my recipes—two bits of information that always catch me off-guard and give me a little thrill. Aside from a handful of readers who leave lovely comments I have no idea if people actually read my blog. Sure, I occasionally glance at the ticking numbers on my site meter, but they don’t mean much—for all I know, the majority of hits are by people searching for enlightenment and when google lands them on my blog they suffer pangs of bitterest disappointment and disillusionment which leads to a falling out with all search engines. I hope that doesn’t happen, of course, but I have no way of knowing. (Yes, there are high-techy ways of finding out, but I am not inclined towards any techy-ness, and certainly not any HIGH techy-ness.)

    So when Bethany (for that is the name of the aforementioned sweet girl) emailed me and told me that she actually uses some of my recipes in her CSA newsletter, I was first surprised, second tickled, and third addled. Because—hello!—does this means there are people actually reading and cooking from this little blog? I mean, that’s what I want them to do, but whoa, dude! All my shortcomings—the stupid things I’ve said and done, the outrages claims I’ve made—it’s like getting caught with my pants down, and just because I’m used to walking around in public with my pants down doesn’t mean I don’t still blush when someone looks at me, know what I mean?

    You don’t?

    Um, okay. Forget I said anything, okay? (Geesh.)

    I am slip-sliding all over this post, the point of which (yes! there’s a point!) is cake.


    Cake was the point of Bethany’s email, too. See, she was after a recipe. This is what she said, “I still remember a particular mint cake that your mother sent down to school once – a three-layer white cake with flecks of green that was dense and sweet and amazing. I had the recipe and lost it. I’d be grateful for any leads on this – but no hurry.”


    I immediately knew exactly what she was talking about. It’s not every day that you eat a mint cake with real mint in it, and I clearly remember the first time I had this cake. It was at a cousin’s outdoor wedding up in Pennsylvania (my husband and I were a couple months shy of getting married ourselves), and at the reception, we had this cake.


    Come to think of it, I don’t remember much of anything about the wedding or the cake. It’s more of a fact lodged in my brain than an actual visceral memory. I know we had this mint cake, and I know it was delicious, and I know the wedding was lovely. But that’s all I know. The end.


    In order to bake this cake, I had to beg some dried mint from my mom. She brought me the last of her mint which didn’t measure quite up to the full three tablespoons, but it had to do.

    And do it did, just fine.


    I iced the cake with cream fluff frosting, but any butter frosting would be fine. However, I think this elegant cake would be super classy served plain (perhaps baked in a bundt pan), dressed only with sugared strawberries or red raspberries, whipped cream optional.


    Here’s what happens when I serve my husband his first piece of cake. I pull up a stool, sit down, and then stare at him as he eats.


    “What do you think?” I ask.

    Silently, he chews. I tap my foot and wait. He swallows.

    “Well? What do you think?” I ask again.

    He ignores me, shovels another piece into his mouth, and continues chewing.

    “You’ve had plenty of time to taste it,” I snap. “TELL ME WHAT YOU THINK!”

    Then the Baby Nickel sidles up to the table, attempts to sneak a taste with his grubby paw, and gets the boot.


    And I am appeased, for my question has been answered. My husband likes the cake.

    Mint Wedding Cake

    This cake made two full 9-inch layers, but you could get three layers if you used 8-inch pans.

    A note on my recipe card says: put no mint in icing. The cake is perfectly minty as is—any more would be a plunge headlong overboard.

    Oil of peppermint is not to be confused with peppermint extract. Check the baking aisle of your grocery store or a health food store.

    For a standard white cake: omit the oil of peppermint and dried mint leaves, and increase the vanilla extract to 2 teaspoons.

    1 cup butter
    2 cups sugar
    3 cups sifted cake flour (I used Softasilk)
    4 teaspoons baking powder
    ½ teaspoon salt
    3 tablespoons crushed dried mint leaves
    2/3 cup milk
    2/3 cup water
    1 teaspoon vanilla
    4 drops oil of peppermint
    6 (3/4 cup) egg whites

    Beat the egg whites until stiff peaks form. Set aside.

    Using the soiled beaters, cream together the butter and sugar.

    Measure the flour, baking powder, salt, and dried mint into a small bowl. In another small bowl, measure the milk, water, vanilla, and oil of peppermint.

    Add the dry ingredients to the butter mixture alternately with the wet. Fold in the beaten egg whites. Divide the batter between two greased, wax paper-lined (grease the wax paper, too), and floured 9-inch cake pans. Bake the cakes at 350 degrees for 30-35 minutes. Allow them to cool for 10 minutes before running a knife around the edges of the cakes and carefully dumping them out onto a cooling rack.

    If desired, ice the cooled cakes with buttercream (some suggestions: cream fluff frosting, buttercream frosting, and vanilla buttercream frosting).

    I stored this cake, well-covered with plastic wrap, in the refrigerator. The cool temperatures made the cool minty-ness even more refreshing.

    This same time, years previous: banana cake with creamy peanut butter frosting