I am in the thick of pretzels. I talk about pretzels, I read about pretzels, I cook pretzels, I eat pretzels, and I feed people pretzels.

It all started with an overwhelming desire to make authentic hard pretzels (I’m not sure why the sudden infatuation, but hey, it’s a great food to be infatuated with, so I’m not messing with it), but neither my cookbooks nor the web revealed the plethora of information I hoped for. I tried Alton Brown’s pretzels recipe (it’s by far the most common one), but his pretzels, while pretty and perfectly edible, tasted mostly like eggy, dried out lumps of dough.
Then I dug a little deeper and started reading about soft pretzels, and I learned that the key to making them authentic is a little something called NaOH. Otherwise known as sodium hydroxide, and otherwise known as caustic soda, or lye, or highly poisonous chemicals that are used to clean out plugged-up drains. Real soft pretzels get dipped in the stuff.
I was intrigued. Was sodium hydroxide used to make hard pretzels, too? I checked out a popular Mennonite pretzel factory up in Pennsylvania, and sure enough, they also use it on their hard pretzels. Clearly, if I wanted to make real pretzels, hard or soft, I’d need to buy some poison.
After calling a couple hardware stores, I located the right stuff and my husband stopped by after work to pick it up. He said that when he told the guys at the store what he was going to use it for, they looked at him like he was deranged.
They must’ve really given him some serious stink eye because he spent an inordinate amount of time researching different brands of lye when he got home. He wanted to make sure no other toxic chemicals were hiding in our bottle of toxic chemicals besides just the toxic chemicals that we wanted. (There weren’t. If you want to buy some poison, a couple good brands are Rooto—as long as it was manufactured after October 2005—and Red Devil.)
While he researched, I dunked pretzels in lye and screeched at the kids to STAY BACK.
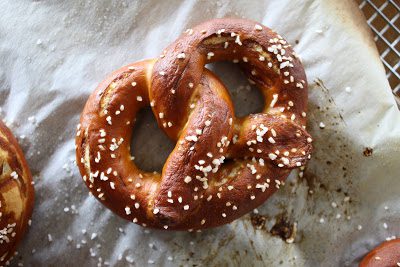
Yesterday was round three and four of my pretzelpaloosa. I still have yet to crack the hard pretzel code (clues, anyone?), but I’m thrilled beyond measure to tell you that I have conquered The Authentic German Soft Pretzel.
Man, are they good.
And fresh from the oven, with slices of sharp cheddar cheese, they become beyond good. They are heaven, doughy, chewy, salty—hallelujah!—heaven. I’ve eaten so many of them that I practically am a soft pretzel.
When I was growing up, I made soft pretzels by dipping them in a baking soda solution, but let me tell you, there is absolutely no comparison between baking soda-dipped pretzels and lye-dipped pretzels. None whatsoever. Do not be fooled into thinking that baking soda-dipped pretzels are anywhere close to the real thing. Because they are not.
Are we clear about this yet? REAL PRETZELS NEED POISON. Period.
And amen. (Auntie Anne’s uses lye, too. Though I’m not supposed to know that.) (Not true! Go here for the facts.)
Now, let’s talk technique.
Real soft pretzels are not for the faint of heart. There’s the poison, the yeast dough, and the boiling water bath. There’s also a bunch of nitpicky little steps, like proofing the dough and refrigerating the shaped pretzels so they’ll form a skin. There’s parchment paper and pretzel salt, tongs, trays, and cooling racks. Plus, you need goggles and plastic gloves.
A person could get bogged down in the details and decide to skip the whole process but DON’T YOU DARE. The end result—both the chewy, salty, malty pretzel and the high you’ll get from making them with your very own hands—is absolutely worth it. Plus, cooking with toxic chemicals takes kitchen wizardry to record heights. There’s something really special about slightly traumatizing your kids with horror stories of flesh-burning chemicals. It gets you some respect.
In all seriousness though, do be very careful with the lye. I’m not normally jumpy about dangerous things, but this lye gave me the jitter-itter-itters. When I’m dipping pretzels, I’m religious about wearing swimming goggles and gloves and keeping the kids on the opposite side of the kitchen. If your children aren’t old enough to be terrorized by pictures of lye burns (don’t click on that link if you have a queasy stomach), then either get a babysitter, or cook when there’s another adult around who can help with the kidlets. Please?

That said, it’s the lye crystals that are extremely dangerous, not the lye solution. Once you’ve mixed up the solution, the scariest part is over and you can relax (more). Even if you get some of the solution on your skin, you’ll have (I think) enough time to wash it off before it burns you. And since vinegar neutralizes the lye, keep a bottle a bottle of vinegar on hand for emergencies.
A few more pointers:
*Lye reacts—as in, sizzle, pop, BOOM!—with aluminum. To test if your utensils and pans are aluminum, stick them to a magnet. If they don’t stick, don’t use them.
testing, testing, one two three
*Lye does not react with glass, plastic, and stainless steel.
*Utensils that have been dipped in the NaOH solution should be placed on a plate, not the table, as the solution will leave burn marks on the table. No joke.
*While mixing the lye solution, do not breathe through your mouth. Do not breathe through your nose, either. In fact, it’s probably best if you forgo breathing all together. Just don’t pass out. (For those of you who are addicted to breathing, a damp hanky covering your nose and mouth works fine.)
A word about the boiling.
There are lots of soft pretzels recipes, lye-dipping ones included, that don’t call for boiling the pretzels. I’ve done some experimenting and the boiled pretzels win every time, hands down. Even my baby can tell the difference.
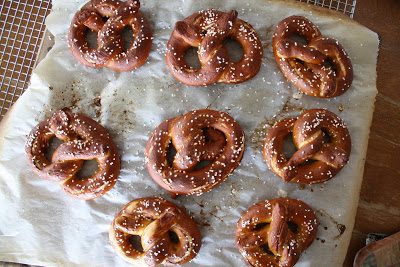
puffy, non-boiled pretzels on the left; wizened, boiled pretzels on the right
Unboiled pretzels are puffier, cakier, drier. The boiled pretzels are marvelously dense and chewy. It’s like the difference between a dinner roll and a bagel.
Authentic German Soft Pretzels
Adapted from this recipe
*It is easier to dip the pretzels if you’re working with a large amount of lye solution. Lye solution will last forever (so I’ve read), so keep the extra in the fridge.
*Do not put pretzels on wax paper to rise. They will stick fast and make you throw a panicked hissy fit.
*Do not mistake your rubber gloves for oven mitts and attempt to pick up the hot baking stone (so says an almost-burned dodo brain).
*This dough is super-stiff. It made my Kitchen Aid do a little dance. Stay close while it’s mixing, and add a little extra water if necessary. (I added a couple tablespoons extra.)
*I have done a little experimenting with freezing boiled, non-dipped pretzels. I think it works, but more experimenting is necessary before I can say for sure.
½ ounce (about 1 tablespoon plus 1 teaspoon) salt
½ ounce (about 1 tablespoon) sugar
½ ounce (about 1 tablespoon) butter
1 ounce (about 2 rounded tablespoons) yeast
2 cups warm milk
2 pounds (about 8 cups) flour
lye solution (see below)
pretzel salt
Other recommended necessities:
goggles
rubber gloves
a baking stone
parchment paper (brushed with a little oil)
Stir the yeast and butter into the warm milk. Once the yeast is dissolved, add the rest of the ingredients. Kneed the dough, either by hand or with a Kitchen Aid mixer. The dough will be very very stiff. Add a little extra water if necessary, but don’t shy away from a workout—the dough needs to be quite tough to withstand all the boiling, dipping, and baking. Cover the dough and let it rest for 20-30 minutes.
Now, ready the production line:
*Put your baking stone in a 450 degree oven.
*Fill a large kettle a third of the way full with water and bring it to a boil.
*Make your lye solution.
*Cut a piece of parchment paper the size of your baking stone and brush it lightly with oil.
Cut the dough into portions and shape as desired. I cut mine into 1 to 2 ounce portions, rolled them into 12-18 inch-long snakes and formed the snakes into the classic pretzel shape, pressing the ends firmly into the pretzels’ bellies. (Even so, the ends sometimes popped free, but it’s no big hardship.)
Set the shaped pretzels on a cloth-covered and lightly-floured tray. Cover with plastic and let rise for about half an hour.
Take the plastic off the pretzels and transfer them to the fridge or some place cool.
After about 10 minutes, the pretzels should feel tough, like they have a skin, which they do. This is good.
Put on your goggles and gloves, and, working with a few pretzels at a time (depending on the size of your kettle), drop the pretzels in the boiling water for 30 seconds, turning once after 15 seconds. Using a slotted spoon, remove the pretzels from the boiling water and drop them carefully into the lye solution. Flip (or dunk) the pretzels to make sure all sides have been completely baptized, and then transfer the pretzels to the hot baking stone (that has been lined with the aforementioned oiled parchment paper).
Sprinkle salt over the pretzels, reduce the oven temperature to 400 degrees, and bake the pretzels for 15-25 minutes, depending on the size of the pretzels. The pretzels will get quite dark, thanks to the lye—this is a good thing and does not mean they are burning. (Unless they are burning, and then it’s a bad thing.)
Transfer the pretzels to a cooling rack and repeat the process till all the pretzels have been baked.
Lye Solution
Note: this is the really tricky step. Be careful! (I used eye protection and gloves, but no hanky over the mouth and I charred my throat just by inhaling the fumes.)
6 ounces lye (re all the concerned commenters: food grade lye is safest)
1 gallon cool water
Put the water in a large kettle and gradually add the lye, stirring after each addition till the lye is dissolved. Transfer the solution to your dipping container—a shallow plastic container that has a secure lid works great.
I’m submitting this recipe to yeastspottings.
This same time, years previous: creamy potato soup with bacon and boiled eggs and meatballs