• Rainy day adventure

    The garden has stressed me out this spring. Actually, it’s not the garden that’s stressing me out, but the fact that I have not been able to get into the garden due to the incontinent skies. It’s been raining almost every day, often in the afternoon. It reminds me of the three years that we lived in Nicaragua, a country (that used to be) filled (until we cut most of them down) with rain forests.

    I have an announcement, people: Virginia weather is not supposed to emulate the weather patterns of a rain forest. It’s kind of freaky.

    Anyway, so it rains and rains and rains and rains. And the weeds in the garden grow and grow and grow and grow. And then it stops raining for a day and the ground starts firming up a bit and I get all excited because I think that the next day I’ll be able to actually get out there and wield a hoe….but then it rains again.

    I think I spied a banana plant shooting up among the asparagus fronds.


    We did have two days without rain this past week (I think it was Sunday and Monday), and so on Monday I worked in the garden till noon and then when Mr. Handsome came home he took his turn, walking behind the bucking tiller, inspecting the plants, weeding. The next day it rained all day, continually. But I felt a little better.

    Well, um, I should say I felt a little better about the garden since we had gotten a chance to rein (ooh, bad word) it in a bit, but the heavy skies and cool temps were a real mood-damper (eek!). I piddled. The kids hovered. I felt itchy-crazy under my skin and my voice acquired a note of panic. But I breathed deep and tried to pretend that we hadn’t all been really piled on top of each other for the past seven hours. And then I made myself walk out through the gentle rain to the garden to pick some chard for supper. That was nice.

    And then I went back outside for an onion. And basil. And parsley. And oregano. It was better than nice; it was kind of fun. I made splashing sounds as I slogged through the grass in Mr. Handsome’s flip-flops, making the little trips out to the garden kind of like an adventure. And goodness knows, I sure needed an adventure.


    I whipped up such a delicious dinner—a culinary adventure of the best sort—that I felt better for a little while. And then we had a family movie night because we had to have some type of reward for making it through a day like that, and because not everyone in my family would call Swiss chard rolls a reward.


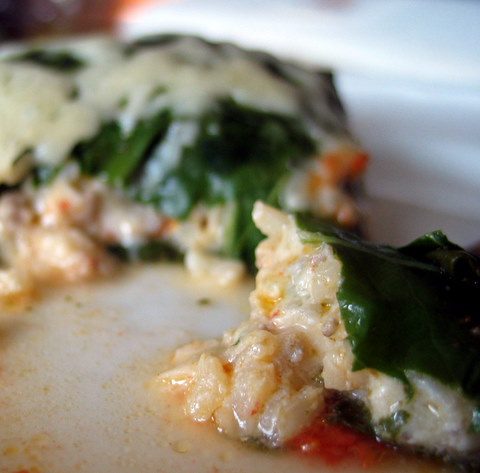
    There were lots of leftovers so I had the privilege of discovering that chard rolls make fantastic leftovers. I ate these rolls for five meals straight, not counting breakfast. I looked forward to each meal, and I was sad when I ate the last one.


    Swiss Chard Rolls
    Wildly adapted from the Moosewood Restaurant Low-Fat Favorites Cookbook.

    These rolls scream for creativity. I used the ingredients I had in my kitchen (and garden), but you can switch them up, substituting fresh tomatoes for the dried (or canned), dried herbs for the fresh, different grains (bulgur, couscous, orzo, white rice) for the brown rice, and ground beef, ham, or bacon for the sausage. Or you could omit the meat all together.

    The original recipe suggests two different fillings for the rolls, neither of which call for meat. The first is a mushroom filling with celery, marjoram, mushrooms, cooked bulgur, dry sherry, soy sauce, dill, thyme, currants, and lemon juice. The second kind is a simple cheese filling involving leeks, scallions, cottage cheese, and basil.

    12 large leaves of Swiss chard
    2-3 cups cooked brown rice
    ½ cup cooked sausage
    1 medium onion, chopped
    4 cloves of garlic, minced
    1 tablespoon olive oil
    ½ cup oven-roasted tomatoes, chopped
    1/4 cup fresh parsley, chopped
    2 tablespoons fresh basil, chopped
    2 tablespoons fresh oregano, chopped
    3/4 cup ricotta cheese
    1 cup grated cheddar cheese
    1 pint stewed tomatoes
    ½ cup freshly grated Parmesan cheese
    ½ – 1 teaspoon salt
    1/4 teaspoon black pepper

    Wash the chard and cut out the central stem. Stack the leaves of chard on top of each other and loosely roll them up. Place them in a steamer and steam for a couple minutes, or until the leaves are bright green and wilted. Drain the chard and set aside.

    In a saucepan, saute the onion and garlic in the olive oil till translucent, about five minutes. Set aside.

    Strain the pint of tomatoes and reserve the juice. Set both the tomatoes and the juice aside.

    In mixing bowl, combine the rice, sausage, sauteed mixture, the fresh herbs, roasted tomatoes, ricotta and cheddar cheeses, and the salt and pepper. Taste to adjust seasonings (do not under-salt the mixture).

    Grease a casserole dish (a 9 x 12 was a little too big for the amount I had, so I used my 7 x 11 pan). Pour the drained tomatoes into the dish and spread them out so they cover the bottom of the pan.

    To assemble the rolls:
    Being as gentle as humanly possible, separate the leaves of chard and lay them out on a work surface.


    Pull the leaves together so the gap from where the stem used to be no longer shows. Place about ½ cup of filling in the center of the bottom part of the leaf.


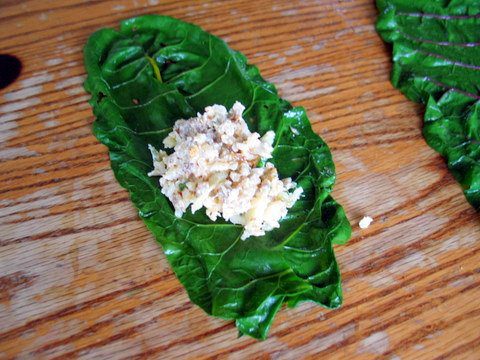
    Fold both sides up over the filling (it will not cover the filling). Fold the bottom part of the leaf up over the filling, and then, working up from the bottom of the leaf, flip the ball of filling over a couple times till it is completely encased in the leaf.


    Repeat the process until you run out of either the steamed leaves or the filling.

    Place the rolls with their seam-sides down on top of the stewed tomatoes. Pour the reserved tomato juice over of the rolls. Sprinkle the leaves with some more salt and pepper.


    Cover the dish tightly with tin foil and bake at 350 degrees for about 45 minutes. About ten minutes before the rolls are done baking, remove the pan from the oven, take off the foil, sprinkle the Parmesan cheese over the rolls, and return to the pan to the oven, uncovered, to finish baking.

    Serve the Swiss chard rolls with some crusty bread.

  • Under the right circumstances

    I told you I would post about this Strawberry Margarita Pie, and now I wish I hadn’t promised that because I have other, more pressing things (chicken, cherries, and cheese—but I’m not making any promises), to write about. However, a promise is a promise, so here’s the pie, coming at you.


    This pie (more a cake, in my mind) is not something I’m going to whip up all that often, and that’s possibly the reason I’m dragging my feet when it comes to giving you the recipe. It’s not that I don’t like the cake; on the contrary, I think it is delicious. It’s just that it’s not a very practical recipe: my kids can’t eat it (though they beg for bites) and many of my friends and family don’t like the taste of alcohol. Also, it’s not the type of thing that you want to eat with an afternoon cup of coffee, so I don’t get around to eating it, choosing instead to eat pastry-type goodies (like those white chocolate and dried cherry scones) with my coffee.


    So, under what circumstances would a person like me want to make this cake? It would be perfect for a summer evening gathering of giggling girlfriends because, after all, it’s pink.


    Strawberry Margarita Cake
    Adapted from Cookie Baker Lynn‘s blog

    No baking is involved—a plus for a summertime dessert.

    I make my graham cracker crumbs by blending the crackers, a few at a time, in the blender.

    The alcohol flavors are not disguised in any way, so if you don’t like alcohol, this will not be your thing. But the opposite is also true: If you like alcohol, then you will most certainly adore this cake.


    2 cups strawberries, washed, hulled, and sliced
    10 tablespoons sugar, divided
    1 3/4 cups graham cracker crumbs
    ½ cup butter, melted
    3/4 cup sweetened condensed milk
    7 tablespoons tequila
    6 tablespoons Triple Sec
    1 tablespoon lime juice
    2 cups whipping cream
    More sliced and sweetened berries and sweetened whipped cream, for garnish (optional)

    For the crust:
    Stir together the graham cracker crumbs, the melted butter and 6 tablespoons of the sugar. Press the crumbs into the bottom and up the sides of a greased, 9-inch springform pan.

    For the filling:
    Whip the cream until it forms stiff peaks. Set aside.

    Put the strawberries, remaining 4 tablespoons of sugar, the milk, liquors, and lime juice in a blender and blend until combined.


    Pour the strawberry mixture into a mixing bowl and beat in one-third of the whipped cream. Once combined, whisk in the remaining whipped cream. Pour the filling into the crust, cover well with plastic wrap, and freeze till solid.

    To serve:
    Run a knife around the edges of the pan and remove the side. Serve each slice of cake with sweetened sliced strawberries and extra whipped cream.

    Yield: 8-16 servings, depending on how you hold your liquor.

  • Staying on track

    You guys hold such power over me. You know that, right? It’s like I’m a puppy on a chain, and you hold the other end. Sometimes you yank my chain just to see me bark. Other times you tie me up to a tree and walk off, leaving me alone to howl at the moon. Sometimes you relax your grip, content to let me take you for a zig-zaggy hike through the bunny trail-infested woods, and other times you take a firm grip on the chain and strike out on a path of your own choosing, expecting that I’ll trot along faithfully at your heels, which I do, wiggly-waggly hindquarters, puppy dog eyes, and all.

    Zoe grabbed hold of my chain this morning when she asked how I freeze spinach. I was going to talk about something else, but well, once my tail commenced to thumping, I (almost) totally forgot what I was going to say.


    I had planned to tell you about freezing spinach, like four weeks ago. In fact, I had taken pictures of the whole process, but then I decided not to write about it after all. Another bunny must have run in front of my snuffling nose.

    Thanks, Zoe, for getting me back on track.

    How to Freeze Spinach

    Wash the spinach, and lay it out on a bath towel to air dry. There is no need to get it totally dry; you are going to steam it, after all.

    Steam the spinach. I do this by putting about an inch of water in my steamer, keeping the water below the level of the spinach because I don’t want to boil the spinach. I then stuff the steamer with as much spinach as possible.


    I clap the lid on the steamer and let it steam till the spinach is bright green and wilted (once in a while I gently toss the spinach with a pair of tongs so that it steams evenly).


    Transfer the spinach to a colander and allow to drip-drain.

    Now, my mother taught me to lay the spinach out, piece by piece, on cookie sheets lined with plastic wrap, repeating the process till I had two or three layers of spinach, each layer separated with a sheet of plastic wrap, and up until this spring this was how I froze my spinach (although the last time I did this I made the mistake of using wax paper instead of plastic wrap and the spinach froze to the paper and I had a dreadful mess on my hands).


    Then I would put the trays of spinach in the freezer until the spinach was frozen solid, and once the spinach was frozen (it took about an hour), I quickly transferred the stiff leaves into pint-sized plastic bags.


    But then Mr. Handsome walked into the kitchen while I was painstakingly putting the individual leaves of spinach into bags and asked, “Why do you lay the spinach out like that? Why don’t you just stick it into a bag?” I didn’t know. So I called mom and asked her, and she didn’t know. So I called my girlfriend Amber and she said that she just freezes it in 10-ounce portions since that’s how it’s sold in the store and that’s the amount that most recipes call for. So now I do it Amber’s way. It’s easier and it takes up less freezer space, too.

    I realize there’s more than once way to slice an onion, so … how do you freeze spinach?

    (Click here to learn how I freeze Swiss chard.)